Content Builder for Complete Anatomy COURSES
|
|
|
- Basil Shannon McCoy
- 5 years ago
- Views:
Transcription


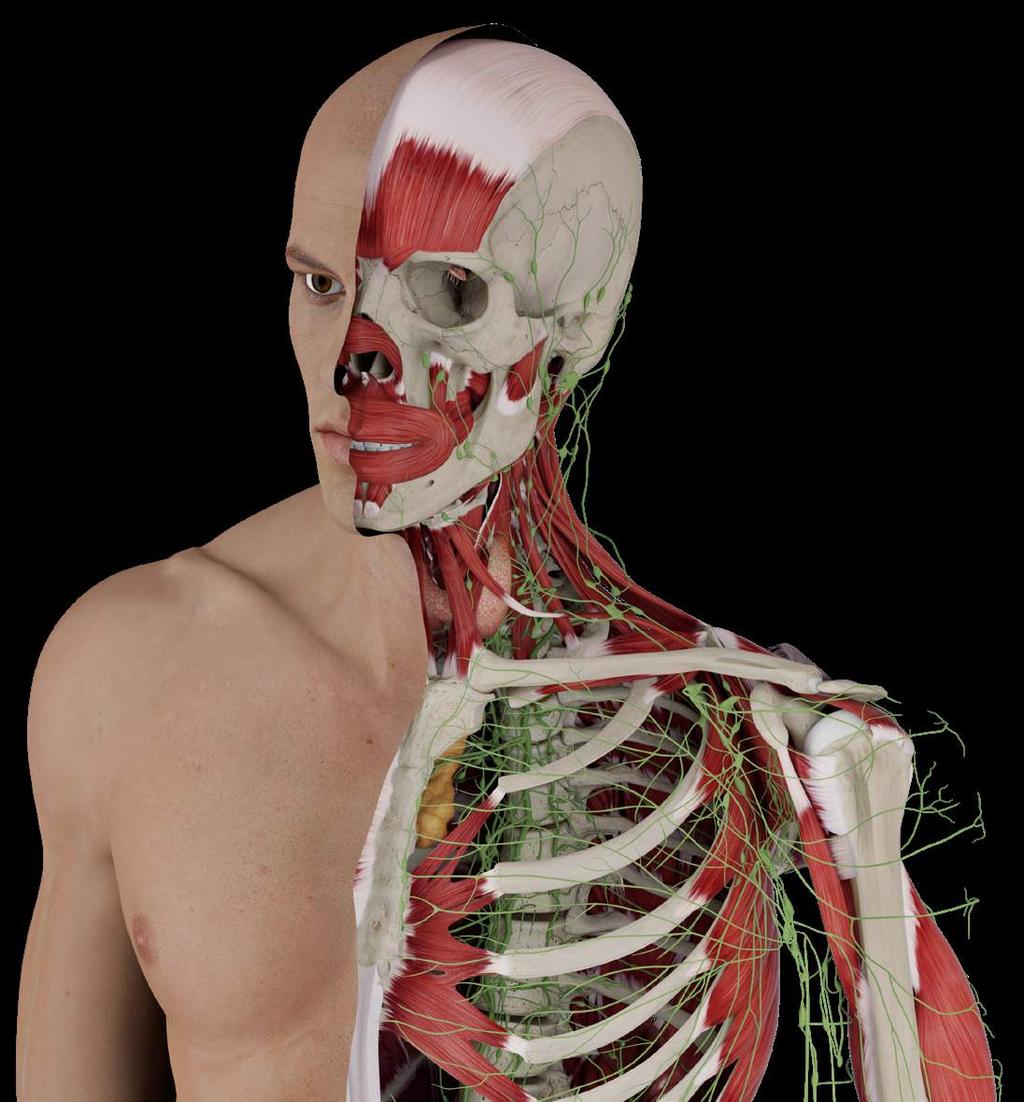
1 Content Builder for Complete Anatomy COURSES Starter Pack 1
2 Content Getting Started Page 5 Multiselect Sharing Page 32 Logging in Page 6 3D4Medical Library of Resources Page 33 Tips Profile Page 8 Page 9 Screens Page 34 Groups Page 10 How to Create Screens Edit Screens and Saving Options Page 36 Page 37 Creating a Group Page 11 Tips for Screens Page 38 Adding Members to your Group Page 13 Optimize Loading Speed Page 39 Increasing Group Member Limit Page 15 Tip: Assigning Labels Different Views Page 40 Members Accepting your Invitation Page 16 Custom Labels Page 44 Tip: Managing Groups Page 17 Tip: Multiple Ways to use Custom Labels Page 45 Making Group Members Administrators Page 18 Group Labels Page 48 Creating and Sharing Content Page 19 Import Images and Videos Tip: Getting Creative with Images Page 50 Page 54 Library Overview Page 20 Tip: Breadcrumb Trail Page 55 Library Categories Page 22 Tip: Multiselection Page 56 General Tips and Tricks Page 24 Undergraduate Human Anatomy Courses Page 25 Library Options Page 28 Tip: Numbering Resources Page 31 2
3 Recordings Page 58 Content Builder Page 80 Assessing & Selecting Recordings Page 59 Tips Page 81 Viewing Recordings Page 60 Accessing Content Builder Page 82 Creating Recordings Page 61 Creating Lectures Page 83 Editing Recordings Page 63 Copying Lectures to Groups Page 87 Tip: Using Images in Recordings Page 68 Creating a Course Page 90 Tip: Using Screens in Recordings Page 70 Quizzes Page 72 Contact Page 93 Creating Questions Page 73 Assembling Quizzes Page 77 3


4 Content Builder Starter Pack and Tips The following document was created to help you get started using Complete Anatomy right away. Learn how to create and share content and discover the best tips for getting the most out of Content Builder. These helpful guidelines will build a strong foundation for creating and sharing engaging content using Complete Anatomy. Tutorial Videos All video tutorials are available on our website: 3D4MEDICAL.COM 4
5 Getting Started 5


6 Logging In In order to unlock premium access to Complete Anatomy you need to login with your and password. To do this: 1. Select the Profile icon in the top right corner of the screen. 2. Select Login and type in your address and the password provided to you by 3D4Medical. 6


7 3. Once you have logged in, select Return to App. You can now fully interact with all the body systems and premium tools. 4. Tap the Library icon to start downloading content developed by 3D4Medical from the cloud. 7


8 Tips Select the? Tips button at the bottom right-hand corner of the screen. Instantly access short video tutorials on how to use every feature of Complete Anatomy. 8


9 Profile Use the Profile tab to edit your account details. Here you can change your password, manage your personal information, avatar, interests, and manage Groups and Notifications. WATCH VIDEO 9

10 Groups 10

11 Creating a Group Create a Group to share content with other faculty members or students. Complete Anatomy allows you to share Screens, Quizzes, Recordings, Lectures and Courses with any other Complete Anatomy user, directly within the app. 1. Select Profile from the Main Menu, and then the Groups tab to start working with Groups. 2. Create a Group by tapping the green + Add button. 11


12 3. Enter the name, description and specialist area for your Group, and give it an avatar to identify it easily. 4. Select Create Group when you re done. For more tutorials and videos, visit: TUTORIALS 12
13 Adding Members to your Group 1. Tap on the Manage Group Members tab to begin adding members. Here you can search for existing users to invite, or invite someone to your Group via . 13
14 2. Tap invite to confirm your invitation. Continue adding members until you reach the limit of five members. 3. There is a standard limit of 5 members per Group and 5 Groups per account. With the purchase of Content Builder, you can increase this group-member limit, just contact your Account Manager. 14

15 Increasing Group Member Limit If you are interested in increasing the limit of Group members, contact us directly: 1. Select the address in the green text at the bottom of Manage Group Members page or click the following link: 2. This will launch your Mail Application. 3. Include the following in your Your name Your institution Name of your Group Total number of members needing access to the Group Please keep in mind, members need to be Admins to share content to your Group. For more tutorials and videos, visit: TUTORIALS Hello 3D4Medical, I would like to increase the number of members for my Complete Anatomy Group. Please see my information: Name Institution or Company: Dr. Lisa Owens Group: Principles of Anatomy Number of people Needing access: 127 Kind Regards, Dr, Lisa Owens Medical University 15


16 Members Accepting your Invitation Once you have issued invitations to your Group, an in-app notification will appear within the Profile tab for each new member. Once the notification is received, navigating to Profile > Notifications and selecting Join Group will complete the process and they will now have access to existing and new content associated with your Group. 16


17 TIP Student Group to share lectures and finished content Faculty Group where you can create content Personal Group where you can create your own content Managing Groups We recommend that you create multiple groups for managing different content. 1. One Group to house your personal content that may be a work in progress. 2. One Group to share with other faculty members, who you ve designated as Admins. This way multiple users can contribute to the same Group. 3. One Group to share content with your students. 17

18 Making Group Members Administrators You can only edit, delete or add content to Groups you have created. Therefore, if you share a Screen with your class of students, then only you, the lecturer, can edit the Screens in that Group. If you would like multiple users to be able to edit content and add Resources to a Group you have created, for example, faculty members, then you can make them Administrators. 1. Go to Profile 2. Select the Groups tab 3. Select the Edit button beside the Group 4. Open the Manage Group Members tab 5. Under the list of Group Members, select Make Admin. The option to Reject Admin then becomes available. 18

19 Creating and Sharing Content Now that you have your Group set up, you can begin creating Resources. Complete Anatomy features Screens, Recordings and Quizzes, all of which can be customized for your needs and be assembled into Lectures. 19

20 Library Overview WATCH VIDEO Manage all of your Courses, Modules, Lectures, Screens, Recordings, and Quizzes in the Library. 20


21 Access the Library To view the Library, select Library from the main menu on the right-hand side of the screen. The grid of Library items will open. Choosing Content Five types of content can be viewed in the Library. Select a heading to view content associated with that category. 21

22 Library Categories Courses Courses are a series of guided Lectures arranged into Modules on various anatomical topics and areas. For more information on Courses, see page 79. Screen Screens allow you to create a fully interactive experience with our 3D model. Attach Labels, edit the model with tools to focus your audience on a specific body area or region. To find out more about creating Screens, please see page


23 Recordings Short recorded clips, complete with voiceover, to guide your audience through a particular aspect of the anatomy. To learn how to create Recordings, please see page 57. Quizzes Assemble tests on anatomical topics and areas. To find out more about Quizzes, please see page 76. Questions Individual questions designed for use in Quizzes. For instructions on how to create Questions, please see page

24 General Tips and Tricks Before you get started with creating your Library, the following section highlights some key guidelines you can follow to make managing and creating content easier. 24

25 Undergraduate Human Anatomy Courses 3D4Medical have teamed up with 7 anatomical experts from major universities to create two undergraduate human gross anatomy courses. Each course contains the same mixture of Screens, Recordings and Quizzes, they are just arranged differently depending on how you like to teach anatomy - regional vs. systemically. 25


26 If you ve subscribed to Content Builder, you have access to the hundreds of resources and 82 Lectures created by our team of anatomical experts. You can copy any of these resources to your own Group, adapt them, and share with your students. To view these Courses and all of the Lectures and resources available to you, open Library and, under Groups, select: 01-Undergraduate Gross Anatomy: Regions or 02-Undergraduate Gross Anatomy: Systems Once you have selected a Group, view the different Courses, Screens, Recordings, Quizzes and Questions by selecting the respective category heading. If you do not see these Groups, please contact us on groups@3d4medical.com 26

27 As you review each resource, you ll notice that all resources are numbered. This corresponds to the order in which resources appear in the Lectures. As a result, numbering systems between the Undergraduate Regions and Systems Groups will be different. Tip: Open the Courses tab to view each individual Undergraduate Course and note the names of the resources or Lectures you d like to copy to your own Group. Learn how to copy Screens, Recordings, Quizzes or Questions in the next section: Library Options. To learn how to copy Lectures to your own Group, please see page 86: Copying Lectures to Groups. 27

28 Library Options Access editing and sharing options for your Library items. WATCH VIDEO 28


29 Item Options To access the options for an individual resource, select the colored tab that appears on the item s thumbnail. The options bar will open. Copy to Group This option allows you to share the resource with members of your Groups. 29
30 Edit This option allow you to make changes to a resource, then choose to replace it or save as a new version, Learn how to edit Screens (see page 37) and edit Recordings (see page 62) in this document. Delete This option removes the resource from your Library. Note: If you have shared the item with other users, they will still have access to the item in their libraries. 30

31 TIP Numbering Resources All Screens, Recordings and Quizzes are sorted numerically. Therefore, it s a good idea to number resources when creating content so you can find more easily. Tip: Number resources in the following format: 01, 02, 03, etc to avoid the number 10 appearing before the number 2. If you expect to have 100+ Resources in a region, start with

32 Multiselect Sharing Multiselect Select multiple items to apply options across a group of resources. Begin multiselection by holding down on an resource for a couple of seconds. Alternatively, open the options bar on an item. After using either method, select more items by tapping on them. Multiselect Bar When multiple resources are grouped, the multiselect bar will appear. Choose to share the selected items with a group, or to delete the items from your Library. 32
. 33")
33 TIP 3D4Medical Library of Resources 3D4medical have created a library of Screens, Quizzes and Recordings which are available as educational resources for individual learning or, with a Content Builder subscription, as building blocks to create your own Lectures quickly and effortlessly. Use the Library Options to copy the Resources to your own Group (see page 28). 33


34 Screens 34

35 Screens Screens allow you to save a collection of information in a single place. WATCH VIDEO Manipulate the model and add Cuts, Textboxes, Labels, Images and Handwritten Notes or Drawings. This all can be saved as a Screen, which you can share with a Group or easily access and edit at any time. 35


36 How to Create Screens 1. Set your model to the position you d like to save, and tap the green Save Screen button under the Main Menu. You ll also find this button at the top of the Screens panel. 2. Enter a title and description for your Screen. 3. Choose which group you would like to save the Screen to, or save it to My Screens to keep it private. 4. When you re happy with the Screen, select Save. 36


37 Editing Screens and Saving Options Once you have copied a Screen to your Group, you can then edit it. To edit a Screen, select the Edit icon to be brought into Edit mode. You can set up the Screen in any way you like, including changing the position and adding new Tool work. Tap the Save / Edit button to confirm your changes. When confirming edits to your Screen, you can change the title, description, and other details. You also have the option of overwriting the old Screen, or saving your edited Screen as a new one alongside the previous version. 37

38 TIP Tips for Screens In this section, learn how to use Tools to create fun and interactive Screens that focus on your specific anatomical structure or region. Regardless of whether you are creating Lectures, Recordings or Quizzes, Screens will always be your essential starting point. 38

39 TIP Optimize Loading Speed Use the Isolate Body Region feature to show only the region you need for your Screen. This optimizes the model, and with a reduced number of structures to display, it helps the app to load the Screen at maximum speed when accessed by your students. 39

40 TIP Labels Assigning Labels to Different Views WATCH VIDEO You can link labels to different model views and positions. When a label is selected, it navigates the model to a specific position quickly, focusing on the structures you want to show. 40

41 TIP To assign labels to different views, just add a new label to a structure each time you move the model. 1. Arrange the model to a position you d like to focus on. 2. Open Tools and choose Labels. 41

42 TIP 3. Select a structure on the model to add a Label. 4. Deselect the Labels button or click Done to exit Label mode. 42


43 TIP 5. Rotate or zoom the model to a new position. 6. Select the Labels button to add a Label to this specific view. Repeat the process as often as required. Tip: After saving Labels in a Screen, you can always return to edit the finished screen and change labelled model positions at any time. 43


44 TIP Custom Labels Custom Labels allows you to create your own titles for structures and is one of our favorite tools for teaching anatomy! To create a Custom Label: 1. Open Tools from the Main Menu. 2. Select Labels. 3. Double-tap or double click on a structure. 4. Enter your own text. 44

45 TIP Multiple Ways to Use Custom Labels WATCH VIDEO Custom Labels can be used for adding short notes, labelling 3D pen markings, supplementing text and highlighting structures which are functionally related. 45


46 TIP Grouping Labels Group together and highlight types of structures which are functionally related. Supplementing text Where by a Custom Label can be added to highlight one of your main points by demonstrating it on the model. 46


47 TIP Labelling 3D Pen If you have used the 3D pen on the model, you can use the Custom Labels to provide more information about your illustration. Short Notes Custom Labels allow up to 300 characters so you can add short notes to your labels for additional learning value. 47


48 Group Labels Group Labels allow you to consolidate a large amount of information into one clear and simple location. TIP Creating a Group Label: 1. Open Tools and choose Labels. 2. Hold down anywhere on the model for more than 2 seconds and a Label will appear. A blue border will appear at the top of the screen to indicate that you are in Group Label creation mode. Position the Label wherever is best for you. 3. Continue tapping structures to add them to the label list. 4. When you ve finished adding structures, tap Save in the top right corner of the screen. Removing a Label inside Group: 1. Remove individual labels inside the Group by tapping the delete (x) button located in the top left corner of the label. 48


49 TIP Undo and Redo Undo and redo labels using the options at the top of the tool selection panel. Clear To remove all Labels, select the Clear button in the top left corner of the screen. Select Clear Labels or Clear All Tools to clear all. 49

50 TIP Import Images and Videos WATCH VIDEO Complete Anatomy gives you the opportunity to enhance each lesson by uploading Images and Videos to your Screens. 50

51 TIP How to Import Images and Videos: 1. Select Tools from the Main Menu on the right-hand-side of the screen. 2. Select the Import icon. 51


52 TIP 3. An array of Images and Videos stored on your device will be shown. Choose up to 5 Images or Videos per Screen that you would like to add. Note the Video cannot be longer than 10 seconds or larger than 10mb. 4. Drag the Image or Video to move it to your chosen location. 52


53 TIP 5. Use the indicators in the corners of the Image or Video to resize. 6. Clear individual Images and Videos using the bin button at the top left corner of the selected Image or Video, or select the Clear button in the top left of the screen. 53

54 TIP Getting Creative with Images! Bring diversity to each lesson by incorporating images of pathologies or slides from previously created presentations! You can also connect your images to the model by using the 2D pen to annotate the image and highlight important features on the model. 54


55 TIP Breadcrumb Trail The Breadcrumb trail is a navigation tool that allows you select groups of structures e.g. the Stomach. Following the Trail When a structure is selected, the Breadcrumb Trail will appear at the top of the screen, showing the path from that structure back to the system it belongs to. Selecting Parent Groups You can select any parent group from the Breadcrumb Trail and choose to Hide or Fade the group in the same way as as individual structure. Tip: Using the Breadcrumb Trail to hide structures means that you can make Screens a lot quicker then selecting and hiding each individual structure. 55


56 TIP Multi Selection Multi Selection allows you to group structures together for quicker navigation. 1. Access Multi Selection by selecting the first structure and tapping the Multi Selection button underneath the View Options. 2. Select more structures by tapping them one-by-one. The names of your selected structures appear in the info panel. 56


57 TIP 3. Also use Select Area to select multiple structures with one motion by dragging across the screen. Use the Deselect Area function to remove an area from the selection, or deselect an individual structure by tapping the X next to its name in the list. 4. You can undo selections by tapping on the Undo button in the Infobox. To redo a selection, tap the Redo button located next to it. 57

58 Recordings Recordings is a unique tool which allows you to record and save your interactions with the model, along with a voiceover. WATCH VIDEO 58

59 Using Recordings Accessing Recordings Recording are stored in the Library. To access, select Library from the main menu. Select the Recordings category to view individual resources associated with a specific Group. Browse the Recordings by group and body area. Selecting a Recording A list of Recordings is displayed in the panel, containing its title, creator, userrating and a preview image. You may add a Recording to your Favourites by tapping the heart icon. View a Recording by tapping its thumbnail. 59


60 Viewing Recordings Play a Recording by selecting it. The Recording loads fullscreen on your device and plays automatically. Along the bottom of the screen you will see the time indicator and a timeline containing the frames of the Recording. You may need to adjust the volume on your device to hear the voiceover, if present. Tap the screen at any time to pause the playback and interact with the model. Tap the flashing thumbnail at the bottom of the screen to resume from where you paused. Skip forwards and backwards by tapping any of the frames. When you re done, you can Rate the Recording along the top of your screen. Tap Exit Recording to return to the Main screen. 60


61 Creating Recordings 1. Set your model to the position from which you d like to begin and tap the green Record button under the Main Menu. This button can also be found at the top of the Recordings panel. 2. Tap the Record button to start. Allow Complete Anatomy to access your microphone to include a voiceover. 3. All model interactions will be saved in the Recording. Your voiceover will be recorded simultaneously as you interact with the model on-screen. 4. A timer will appear in the bottom left corner, showing the current length of the recording. The timer also includes the button to stop recording, as well as access to the Magic Marker. 5. While recording, you continue to have access to the full suite of Tools, allowing you to edit the model as you go along. 61


62 6. Highlight an area of the Screen while recording using the Magic Marker. Select the Magic Marker button and use as a pointer by tapping and dragging on screen to temporarily highlight. The Marker disappears when your finger is lifted. For a more permanent drawing on the model or screen, use the Pen Tool. 7. Not quite right? Discard and try again. Good to go? Save your Recording by choosing the Group to save to, the body area it s related to, and add a title and description. Tap on Save when done. You can replay your Recording at any time by selecting it from the Recordings panel. 62

63 Editing Recordings WATCH VIDEO All users can edit the name and audio of a Recording. Those with a Content Builder subscription also have the additional option of editing the model. 63

64 To edit a Recording: 1. Select the Edit icon to enter edit mode. Here, you can change the details of the Recording, including its title. 64

65 2. You can also choose to change the Model and Audio by selecting Edit Recording. This will load your Recording, and prepare it for the editing process. 3. To edit the audio, select the red Record Audio button to start recording your new audio from the beginning of your Recording, or select Play and select to find a particular segment you d like to re-record. 4. To edit the Model, select the Edit Model button to change the model state or edit any Tools used. 65


66 5. While editing the Model you can add or remove systems and structures, and edit or add Tools such as Labels. If you want to cancel your edits, select the Return button. If happy with your changes, select Apply. 6. Next, set the the duration of your edit using the yellow controller. 66

67 7. When finished, select Done on the top right hand corner. Here you can decide whether you want to Continue Editing, Discard or Save the changes. Tip: Always make a copy of your Recording before you edit the Audio or Model, so you have the original version to revert back to if needed. 67

68 TIP Using Images in Recordings WATCH VIDEO Already have a Presentation Slide made? You can upload as an image and use alongside the model in Complete Anatomy. 68


69 TIP 1. Take Screenshots of your Presentation Slides and store them in your photo library. 2. Open the Tools Menu and select the Image icon. 3. Select screenshots of your presentation from your photo library and import. 4. Stack images on top of each other in the order you d like your viewers to see them. 5. Start Recording and delete the top images one by one during the lesson. 69

70 TIP Using Screens in Recordings WATCH VIDEO Did you know you can open Screens while creating a Recording? 70


71 TIP Avoid having to type up notes during the lesson by preparing Screens with text or labels beforehand and keep your presentation looking seamless. 1. Prepare Screens you want to include in your Recording. 2. Start Recording. 3. Open Library and navigate to Screens or use the Search function to find your desired Screen. 4. Once found, select the Screen preview image and it will open in the Recording. Note: During playback, the Recording only shows the model and the Screens you have opened. It does not show your library of Screens or your Search bar. 71

72 Quizzes Create your own Questions and Quizzes to share with your Group of students or with other users. WATCH VIDEO 72

73 Creating Questions & Quizzes Access Quiz from the Main Menu and tap the Add button at the top of the screen. You can quickly add a new Question based on the setup of your screen, or assemble an entirely new Quiz. 73


74 Creating Questions 1. Tap New Question to begin creating a Question. You ll have the option to use the current model position, or to choose from a screen you ve made previously. 2. If you would like to, choose a Screen from your library by selecting it. You can return to your library to choose a different screen using the Screens button. 74

75 3. Type in your questions and add up to five answers, choosing between Correct or Incorrect for each. Tap outside of the answer box to save your answer. Make sure at least one of the potential answers is a correct answer! 75
76 4. Once you re happy with your question and choice of answers, hit the Save button. Choose the group where you d like to store your Question and the body section to which the Question applies. Use the slider to set the question difficulty, then press Save. 76

77 Assembling Quizzes 1. Tap New Quiz to begin assembling a Quiz. You re presented with a grid of Questions, which you can sort by group, body region, or difficulty. To add Questions to your quiz, simply drag and drop each Question into the timeline on the left of your screen. 77


78 2. Press Edit to rearrange the order of questions in your quiz. Drag and drop the questions that you d like to move to their new position. The first Question automatically becomes the poster image for the Quiz this can be changed in Settings. Tap Done when you re happy with the order of the Questions in your Quiz. Press Edit to rearrange the order of questions in your quiz. Drag and drop the questions that you d like to move to their new position. The first Question automatically becomes the poster image for the Quiz this can be changed in Settings. Tap Done when you re happy with the order of the Questions in your Quiz. 3. Tap Finish when you are happy with your Quiz and you will be brought to Quiz Settings. Here you can set your overall quiz settings including your Quiz title, description, and optional objective. Hit Edit Questions if there are any changes you would like to make. 78

79 4. When you re happy with your quiz, hit Save. Now choose the group you d like to save your new quiz to, and attach it to a relevant body area. Then, hit Save. Your quiz is now ready to be played! 79

80 Content Builder WATCH VIDEO Now that you ve assembled and/or created teaching resources that exist as individual Screens, Recordings and Quizzes within Complete Anatomy, it s time to use Content Builder to combine them into interactive Lectures, and then into one comprehensive, easy to manage Course. 80

81 Tips Before we dive in, here are some tips and terms to remember. Groups are a way to organise the content you send to your students. Assign your students to individual groups, depending on which classes you teach, and then arrange your content for easy reference! Lectures are the fundamental units of Courses. Lectures are created by selecting and assembling your resources (Screens, Recordings, Quizzes) into cohesive groups related to specific subjects. Collaborate with other faculty members (admins) to create Lectures designed specifically for your audience. Courses are a combination of Lectures and the gateway for your students to your subject matter. Your students will access Lectures through a Course, which is assigned to a specific Group. Your Lectures must be assigned to a Course in order for your students to see them. 81
82 Accessing Content Builder To access Content Builder, open your Library and select Go to Content Builder. To get started with a Course, you must first assemble Lectures. Select the Lectures tab to start creating. 82

83 Creating Lectures By default, your lectures will save to My Lectures, where they are visible only to you. You can also create lectures inside of a group, making it visible to admins of that group, and allowing them to edit it. 1. To begin, Select the Add button at the top of the screen to create a new Lecture. 2. Add an image to use as the cover for your Lecture, along with a title. 3. Select Add Resources and your library will appear. 83

84 4. Use the filter options at the top of the screen to search the name of the Resource or filter your search by Group, Body Region, and type of Resource. 5. Select and hold to drag your chosen Resource to your Lecture on the left. 84

85 6. At any point, select Edit to rearrange or remove Resources from the Lecture. 7. Select the Edit Description button in the top right hand corner. Add in your Description, Objectives and select a Body Region. 8. When you re happy with your Lecture, select Save Lecture. 85
86 Nice job! You ve made your first interactive lesson! To preview the Lecture as your students would see it, hit the 3 dots on the Lecture card, then choose the Play button and select any of the resources on the left hand side. 86

87 Copying Lectures to Groups Ready to collaborate? To start with, let s copy the Lecture into your target group so that administrators of a Group can edit the Lecture (e.g. your faculty members) The lecture you have created appears in your My Lectures group. 2. To share a lecture with a Group that contains your students, select the Copy to Group button. Don t worry, they won t be able to see this lecture until you add it to a Course. 2 87

88 3. Activate the switches beside the Groups that you would like to share the Lecture with. 4. You can also decide to copy all of the Resources to the Group members library. This means they will have access to Recordings, Screens and Quizzes within their own Libraries, not just through the Lecture. 5. Copying Lectures to another Group usually takes some time. You will get a notification in your Profile when copying is completed. Once there, only admins will have access to the lecture - for others to see it, you must first add it to a course
89 Once the lecture has been copied into the relevant Group, you can find it using the Group dropdown. At the moment, it can be seen and edited by administrator of the Group. Once you re happy that the Lecture is ready to be seen by students, it s time to add it to your Course. Note: The green number on the Lecture card represents how many people can currently access this Lecture. You can copy this Lecture to any other group by selecting the Copy to Group button displayed on the Lecture. 89

90 Creating a Course Adding a Lecture to your Course is easy! 1. Select the Courses tab from the top right. 2. The Group that contains your lectures is already selected, so go ahead and select Create My First Course. 90

91 3. Enter the details for your Course; you can choose a Title, Subtitle authors from the 3D4Medical member list. Add an Image to make your Course instantly recognisable. All set? Press Next. 4. You can add a brief description of the course for your students to read, learning outcomes, and any additional people you d like to credit for their work. Hit Next to continue. 5. Here you have the option to add a Course video to give a snapshot of what your Course will be about. Don t want to add a video? No problem, skip to the final step. 91


92 6. In this window, you will see Add New Module which you can rename. 7. Press Add Lectures to add lecture to module 1 and you ll see a selection of all Lectures which were shared to your target group in this window. 8. Simply grab the ones you need and press Add to Course. 9. Continue to add more Modules and Lectures. 10. Save your changes and your Course and Lectures are now live! Your students are notified that they have new content and view the Course. 92
93 Contact We will be available to help and provide any support to you and your staff going forward. It is our goal to make sure that your experience is as seamless as possible. If you or your faculty have any questions, software issues, or require training of any kind in regards to Complete Anatomy or Content Builder, please do not hesitate to reach out to either Mr.Simmons or Ms. Lynch. Americas EMEA and Asia/Pac Jeff Reyes Edel Lynch 93
WiggleWorks Software Manual PDF0049 (PDF) Houghton Mifflin Harcourt Publishing Company
 Houghton Mifflin Harcourt Publishing Company") WiggleWorks Software Manual PDF0049 (PDF) Houghton Mifflin Harcourt Publishing Company Table of Contents Welcome to WiggleWorks... 3 Program Materials... 3 WiggleWorks Teacher Software... 4 Logging In...
WiggleWorks Software Manual PDF0049 (PDF) Houghton Mifflin Harcourt Publishing Company Table of Contents Welcome to WiggleWorks... 3 Program Materials... 3 WiggleWorks Teacher Software... 4 Logging In...
STUDENT MOODLE ORIENTATION
 BAKER UNIVERSITY SCHOOL OF PROFESSIONAL AND GRADUATE STUDIES STUDENT MOODLE ORIENTATION TABLE OF CONTENTS Introduction to Moodle... 2 Online Aptitude Assessment... 2 Moodle Icons... 6 Logging In... 8 Page
Introduction to Moodle
 Center for Excellence in Teaching and Learning Mr. Philip Daoud Introduction to Moodle Beginner s guide Center for Excellence in Teaching and Learning / Teaching Resource This manual is part of a serious
MOODLE 2.0 GLOSSARY TUTORIALS
 BEGINNING TUTORIALS SECTION 1 TUTORIAL OVERVIEW MOODLE 2.0 GLOSSARY TUTORIALS The glossary activity module enables participants to create and maintain a list of definitions, like a dictionary, or to collect
Getting Started Guide
 Getting Started Guide Getting Started with Voki Classroom Oddcast, Inc. Published: July 2011 Contents: I. Registering for Voki Classroom II. Upgrading to Voki Classroom III. Getting Started with Voki Classroom
Moodle 2 Assignments. LATTC Faculty Technology Training Tutorial
 LATTC Faculty Technology Training Tutorial Moodle 2 Assignments This tutorial begins with the instructor already logged into Moodle 2. http://moodle.lattc.edu/ Faculty login id is same as email login id.
CHANCERY SMS 5.0 STUDENT SCHEDULING
 CHANCERY SMS 5.0 STUDENT SCHEDULING PARTICIPANT WORKBOOK VERSION: 06/04 CSL - 12148 Student Scheduling Chancery SMS 5.0 : Student Scheduling... 1 Course Objectives... 1 Course Agenda... 1 Topic 1: Overview
Schoology Getting Started Guide for Teachers
 Schoology Getting Started Guide for Teachers (Latest Revision: December 2014) Before you start, please go over the Beginner s Guide to Using Schoology. The guide will show you in detail how to accomplish
PowerTeacher Gradebook User Guide PowerSchool Student Information System
 PowerSchool Student Information System Document Properties Copyright Owner Copyright 2007 Pearson Education, Inc. or its affiliates. All rights reserved. This document is the property of Pearson Education,
Using SAM Central With iread
 Using SAM Central With iread January 1, 2016 For use with iread version 1.2 or later, SAM Central, and Student Achievement Manager version 2.4 or later PDF0868 (PDF) Houghton Mifflin Harcourt Publishing
TeacherPlus Gradebook HTML5 Guide LEARN OUR SOFTWARE STEP BY STEP
 TeacherPlus Gradebook HTML5 Guide LEARN OUR SOFTWARE STEP BY STEP Copyright 2017 Rediker Software. All rights reserved. Information in this document is subject to change without notice. The software described
Preferences...3 Basic Calculator...5 Math/Graphing Tools...5 Help...6 Run System Check...6 Sign Out...8
 CONTENTS GETTING STARTED.................................... 1 SYSTEM SETUP FOR CENGAGENOW....................... 2 USING THE HEADER LINKS.............................. 2 Preferences....................................................3
Houghton Mifflin Online Assessment System Walkthrough Guide
 Houghton Mifflin Online Assessment System Walkthrough Guide Page 1 Copyright 2007 by Houghton Mifflin Company. All Rights Reserved. No part of this document may be reproduced or transmitted in any form
Moodle Student User Guide
 Moodle Student User Guide Moodle Student User Guide... 1 Aims and Objectives... 2 Aim... 2 Student Guide Introduction... 2 Entering the Moodle from the website... 2 Entering the course... 3 In the course...
Storytelling Made Simple
 Storytelling Made Simple Storybird is a Web tool that allows adults and children to create stories online (independently or collaboratively) then share them with the world or select individuals. Teacher
Adult Degree Program. MyWPclasses (Moodle) Guide
 Guide") Adult Degree Program MyWPclasses (Moodle) Guide Table of Contents Section I: What is Moodle?... 3 The Basics... 3 The Moodle Dashboard... 4 Navigation Drawer... 5 Course Administration... 5 Activity and
Adult Degree Program MyWPclasses (Moodle) Guide Table of Contents Section I: What is Moodle?... 3 The Basics... 3 The Moodle Dashboard... 4 Navigation Drawer... 5 Course Administration... 5 Activity and
Longman English Interactive
 Longman English Interactive Level 3 Orientation Quick Start 2 Microphone for Speaking Activities 2 Course Navigation 3 Course Home Page 3 Course Overview 4 Course Outline 5 Navigating the Course Page 6
POWERTEACHER GRADEBOOK
 POWERTEACHER GRADEBOOK FOR THE SECONDARY CLASSROOM TEACHER In Prince William County Public Schools (PWCS), student information is stored electronically in the PowerSchool SMS program. Enrolling students
SECTION 12 E-Learning (CBT) Delivery Module
 Delivery Module") SECTION 12 E-Learning (CBT) Delivery Module Linking a CBT package (file or URL) to an item of Set Training 2 Linking an active Redkite Question Master assessment 2 to the end of a CBT package Removing
SECTION 12 E-Learning (CBT) Delivery Module Linking a CBT package (file or URL) to an item of Set Training 2 Linking an active Redkite Question Master assessment 2 to the end of a CBT package Removing
READ 180 Next Generation Software Manual
 READ 180 Next Generation Software Manual including ereads For use with READ 180 Next Generation version 2.3 and Scholastic Achievement Manager version 2.3 or higher Copyright 2014 by Scholastic Inc. All
Using Blackboard.com Software to Reach Beyond the Classroom: Intermediate
 Using Blackboard.com Software to Reach Beyond the Classroom: Intermediate NESA Conference 2007 Presenter: Barbara Dent Educational Technology Training Specialist Thomas Jefferson High School for Science
Appendix L: Online Testing Highlights and Script
 Online Testing Highlights and Script for Fall 2017 Ohio s State Tests Administrations Test administrators must use this document when administering Ohio s State Tests online. It includes step-by-step directions,
Connect Microbiology. Training Guide
 1 Training Checklist Section 1: Getting Started 3 Section 2: Course and Section Creation 4 Creating a New Course with Sections... 4 Editing Course Details... 9 Editing Section Details... 9 Copying a Section
Outreach Connect User Manual
 Outreach Connect A Product of CAA Software, Inc. Outreach Connect User Manual Church Growth Strategies Through Sunday School, Care Groups, & Outreach Involving Members, Guests, & Prospects PREPARED FOR:
RETURNING TEACHER REQUIRED TRAINING MODULE YE TRANSCRIPT
 RETURNING TEACHER REQUIRED TRAINING MODULE YE Slide 1. The Dynamic Learning Maps Alternate Assessments are designed to measure what students with significant cognitive disabilities know and can do in relation
Experience College- and Career-Ready Assessment User Guide
 Experience College- and Career-Ready Assessment User Guide 2014-2015 Introduction Welcome to Experience College- and Career-Ready Assessment, or Experience CCRA. Experience CCRA is a series of practice
DegreeWorks Advisor Reference Guide
 DegreeWorks Advisor Reference Guide Table of Contents 1. DegreeWorks Basics... 2 Overview... 2 Application Features... 3 Getting Started... 4 DegreeWorks Basics FAQs... 10 2. What-If Audits... 12 Overview...
ecampus Basics Overview
 ecampus Basics Overview 2016/2017 Table of Contents Managing DCCCD Accounts.... 2 DCCCD Resources... 2 econnect and ecampus... 2 Registration through econnect... 3 Fill out the form (3 steps)... 4 ecampus
2 User Guide of Blackboard Mobile Learn for CityU Students (Android) How to download / install Bb Mobile Learn? Downloaded from Google Play Store
 How to download / install Bb Mobile Learn? Downloaded from Google Play Store") 2 User Guide of Blackboard Mobile Learn for CityU Students (Android) Part 1 Part 2 Part 3 Part 4 How to download / install Bb Mobile Learn? Downloaded from Google Play Store How to access e Portal via
2 User Guide of Blackboard Mobile Learn for CityU Students (Android) Part 1 Part 2 Part 3 Part 4 How to download / install Bb Mobile Learn? Downloaded from Google Play Store How to access e Portal via
/ On campus x ICON Grades
 Today s Session: 1. ICON Gradebook - Overview 2. ICON Help How to Find and Use It 3. Exercises - Demo and Hands-On 4. Individual Work Time Getting Ready: 1. Go to https://icon.uiowa.edu/ ICON Grades 2.
EMPOWER Self-Service Portal Student User Manual
 EMPOWER Self-Service Portal Student User Manual by Hasanna Tyus 1 Registrar 1 Adapted from the OASIS Student User Manual, July 2013, Benedictine College. 1 Table of Contents 1. Introduction... 3 2. Accessing
TK20 FOR STUDENT TEACHERS CONTENTS
 TK20 FOR STUDENT TEACHERS This guide will help students who are participating in a Student Teaching placement to navigate TK20, complete required materials, and review assessments. CONTENTS Login to TK20:
How To Enroll using the Stout Mobile App
 How To Enroll using the Stout Mobile App 1 Login Login using your user name and password. 2 Select Enrollment When you ve finished logging in, it will bring you to this page. Select enrollment. From here
Test Administrator User Guide
 Test Administrator User Guide Fall 2017 and Winter 2018 Published October 17, 2017 Prepared by the American Institutes for Research Descriptions of the operation of the Test Information Distribution Engine,
Creating an Online Test. **This document was revised for the use of Plano ISD teachers and staff.
 Creating an Online Test **This document was revised for the use of Plano ISD teachers and staff. OVERVIEW Step 1: Step 2: Step 3: Use ExamView Test Manager to set up a class Create class Add students to
Quick Reference for itslearning
 Quick Reference for itslearning Frequently Asked Questions... 2 How do I access itslearning?... 2 Who can I contact if I get a problem?... 2 Where can I get help?... 2 Can I get itslearning in my language?...
Beginning Blackboard. Getting Started. The Control Panel. 1. Accessing Blackboard:
 Beginning Blackboard Contact Information Blackboard System Administrator: Paul Edminster, Webmaster Developer x3842 or Edminster@its.gonzaga.edu Blackboard Training and Support: Erik Blackerby x3856 or
Once your credentials are accepted, you should get a pop-window (make sure that your browser is set to allow popups) that looks like this:
 that looks like this:") SCAIT IN ARIES GUIDE Accessing SCAIT The link to SCAIT is found on the Administrative Applications and Resources page, which you can find via the CSU homepage under Resources or click here: https://aar.is.colostate.edu/
SCAIT IN ARIES GUIDE Accessing SCAIT The link to SCAIT is found on the Administrative Applications and Resources page, which you can find via the CSU homepage under Resources or click here: https://aar.is.colostate.edu/
MyUni - Turnitin Assignments
 - Turnitin Assignments Originality, Grading & Rubrics Turnitin Assignments... 2 Create Turnitin assignment... 2 View Originality Report and grade a Turnitin Assignment... 4 Originality Report... 6 GradeMark...
Parent s Guide to the Student/Parent Portal
 Nova Scotia Public Education System Parent s Guide to the Student/Parent Portal Revision Date: The Student/Parent Portal is your gateway into the classroom of the children associated to your account. The
TotalLMS. Getting Started with SumTotal: Learner Mode
 TotalLMS Getting Started with SumTotal: Learner Mode Contents Learner Mode... 1 TotalLMS... 1 Introduction... 3 Objectives of this Guide... 3 TotalLMS Overview... 3 Logging on to SumTotal... 3 Exploring
EdX Learner s Guide. Release
 EdX Learner s Guide Release Nov 18, 2017 Contents 1 Welcome! 1 1.1 Learning in a MOOC........................................... 1 1.2 If You Have Questions As You Take a Course..............................
Course Groups and Coordinator Courses MyLab and Mastering for Blackboard Learn
 Course Groups and Coordinator Courses MyLab and Mastering for Blackboard Learn MyAnthroLab MyArtsLab MyDevelopmentLab MyHistoryLab MyMusicLab MyPoliSciLab MyPsychLab MyReligionLab MySociologyLab MyThinkingLab
Spring 2015 Achievement Grades 3 to 8 Social Studies and End of Course U.S. History Parent/Teacher Guide to Online Field Test Electronic Practice
 Spring 2015 Achievement Grades 3 to 8 Social Studies and End of Course U.S. History Parent/Teacher Guide to Online Field Test Electronic Practice Assessment Tests (epats) FAQs, Instructions, and Hardware
Home Access Center. Connecting Parents to Fulton County Schools
 Home Access Center Connecting Parents to Fulton County Schools What is Home Access Center? Website available to parents (and at site discretion, students) that is a real-time look at student data The data
Online ICT Training Courseware
 Computing Guide THE LIBRARY www.salford.ac.uk/library Online ICT Training Courseware What materials are covered? Office 2003 to 2007 Quick Conversion Course Microsoft 2010, 2007 and 2003 for Word, PowerPoint,
Your School and You. Guide for Administrators
 Your School and You Guide for Administrators Table of Content SCHOOLSPEAK CONCEPTS AND BUILDING BLOCKS... 1 SchoolSpeak Building Blocks... 3 ACCOUNT... 4 ADMIN... 5 MANAGING SCHOOLSPEAK ACCOUNT ADMINISTRATORS...
Intel-powered Classmate PC. SMART Response* Training Foils. Version 2.0
 Intel-powered Classmate PC Training Foils Version 2.0 1 Legal Information INFORMATION IN THIS DOCUMENT IS PROVIDED IN CONNECTION WITH INTEL PRODUCTS. NO LICENSE, EXPRESS OR IMPLIED, BY ESTOPPEL OR OTHERWISE,
Justin Raisner December 2010 EdTech 503
 Justin Raisner December 2010 EdTech 503 INSTRUCTIONAL DESIGN PROJECT: ADOBE INDESIGN LAYOUT SKILLS For teaching basic indesign skills to student journalists who will edit the school newspaper. TABLE OF
16.1 Lesson: Putting it into practice - isikhnas
 BAB 16 Module: Using QGIS in animal health The purpose of this module is to show how QGIS can be used to assist in animal health scenarios. In order to do this, you will have needed to study, and be familiar
New Features & Functionality in Q Release Version 3.2 June 2016
 in Q Release Version 3.2 June 2016 Contents New Features & Functionality 3 Multiple Applications 3 Class, Student and Staff Banner Applications 3 Attendance 4 Class Attendance 4 Mass Attendance 4 Truancy
New Features & Functionality in Q Release Version 3.1 January 2016
 in Q Release Version 3.1 January 2016 Contents Release Highlights 2 New Features & Functionality 3 Multiple Applications 3 Analysis 3 Student Pulse 3 Attendance 4 Class Attendance 4 Student Attendance
Field Experience Management 2011 Training Guides
 Field Experience Management 2011 Training Guides Page 1 of 40 Contents Introduction... 3 Helpful Resources Available on the LiveText Conference Visitors Pass... 3 Overview... 5 Development Model for FEM...
Millersville University Degree Works Training User Guide
 Millersville University Degree Works Training User Guide Page 1 Table of Contents Introduction... 5 What is Degree Works?... 5 Degree Works Functionality Summary... 6 Access to Degree Works... 8 Login
School Year 2017/18. DDS MySped Application SPECIAL EDUCATION. Training Guide
 SPECIAL EDUCATION School Year 2017/18 DDS MySped Application SPECIAL EDUCATION Training Guide Revision: July, 2017 Table of Contents DDS Student Application Key Concepts and Understanding... 3 Access to
INSTRUCTOR USER MANUAL/HELP SECTION
 Criterion INSTRUCTOR USER MANUAL/HELP SECTION ngcriterion Criterion Online Writing Evaluation June 2013 Chrystal Anderson REVISED SEPTEMBER 2014 ANNA LITZ Criterion User Manual TABLE OF CONTENTS 1.0 INTRODUCTION...3
Completing the Pre-Assessment Activity for TSI Testing (designed by Maria Martinez- CARE Coordinator)
") Completing the Pre-Assessment Activity for TSI Testing (designed by Maria Martinez- CARE Coordinator) Texas law requires students to complete the Texas Success Initiative Assessment or TSI for college
Completing the Pre-Assessment Activity for TSI Testing (designed by Maria Martinez- CARE Coordinator) Texas law requires students to complete the Texas Success Initiative Assessment or TSI for college
Tour. English Discoveries Online
 Techno-Ware Tour Of English Discoveries Online Online www.englishdiscoveries.com http://ed242us.engdis.com/technotms Guided Tour of English Discoveries Online Background: English Discoveries Online is
myperspectives 2017 Click Path to Success myperspectives 2017 Virtual Activation Click Path
 myperspectives 2017 Click Path to Success Click Path Overview Sign in to PearsonRealize.com. Click Sign In. Click to Discover Note that you can also use helpful resources on the PearsonRealize.com home
Principal Survey FAQs
 Principal Survey FAQs Question: When will principals receive the Principal Survey? Answer: The surveys will be available in the principals TEA educator profiles on April 9, 2012. When principals access
Skyward Gradebook Online Assignments
 Teachers have the ability to make an online assignment for students. The assignment will be added to the gradebook and be available for the students to complete online in Student Access. Creating an Online
Bitstrips for Schools: A How-To Guide
 Bitstrips for Schools: A How-To Guide By: Sara Belliveau & Kimberly Mertens EDUC 5553: Educational Technologies Bitstrips for Schools Table of Contents I. Introduction II. III. IV. History Required Materials
INTERMEDIATE ALGEBRA PRODUCT GUIDE
 Welcome Thank you for choosing Intermediate Algebra. This adaptive digital curriculum provides students with instruction and practice in advanced algebraic concepts, including rational, radical, and logarithmic
Getting Started with MOODLE
 Getting Started with MOODLE Setting up your class. You see this menu, the students do not. Here you can choose the backgrounds for your class, enroll and unenroll students, create groups, upload files,
ACCESSING STUDENT ACCESS CENTER
 ACCESSING STUDENT ACCESS CENTER Student Access Center is the Fulton County system to allow students to view their student information. All students are assigned a username and password. 1. Accessing the
Office of Planning and Budgets. Provost Market for Fiscal Year Resource Guide
 Office of Planning and Budgets Provost Market for Fiscal Year 2017-18 Resource Guide This resource guide will show users how to operate the Cognos Planning application used to collect Provost Market raise
Naviance Family Connection
 What is it? Naviance Family Connection Junior Year Naviance Family Connection is a web-based program that allows you and your parents to organize and manage your college search process. It also allows
Excel Intermediate
 Instructor s Excel 2013 - Intermediate Multiple Worksheets Excel 2013 - Intermediate (103-124) Multiple Worksheets Quick Links Manipulating Sheets Pages EX5 Pages EX37 EX38 Grouping Worksheets Pages EX304
Naviance / Family Connection
 Naviance / Family Connection Welcome to Naviance/Family Connection, the program Lake Central utilizes for students applying to college. This guide will teach you how to use Naviance as a tool in the college
Welcome to California Colleges, Platform Exploration (6.1) Goal: Students will familiarize themselves with the CaliforniaColleges.edu platform.
 Goal: Students will familiarize themselves with the CaliforniaColleges.edu platform.") Welcome to California Colleges, Platform Exploration (6.1) Goal: Students will familiarize themselves with the CaliforniaColleges.edu platform. Lesson Time Options This lesson requires one 45-60 minute
Welcome to California Colleges, Platform Exploration (6.1) Goal: Students will familiarize themselves with the CaliforniaColleges.edu platform. Lesson Time Options This lesson requires one 45-60 minute
Introduction to WeBWorK for Students
 Introduction to WeBWorK 1 Introduction to WeBWorK for Students I. What is WeBWorK? WeBWorK is a system developed at the University of Rochester that allows professors to put homework problems on the web
Reviewing the student course evaluation request
 **These instructions are for PC use only. Please do not use a MAC.** To login directly to OnBase, you can follow this link: http://www.onbase.gvsu.edu/appnet/login.aspx However, once a course evaluation
PRD Online
 1 PRD Online 2011-12 SBC PRD Online What is it? PRD Online, part of CPD Online, will keep track of the PRD process for you, allowing you to concentrate on the quality of the professional dialogue. What
ALEKS. ALEKS Pie Report (Class Level)
") ALEKS ALEKS Pie Report (Class Level) The ALEKS Pie Report at the class level shows average learning rates and a detailed view of what students have mastered, not mastered, and are ready to learn. The pie
ALEKS ALEKS Pie Report (Class Level) The ALEKS Pie Report at the class level shows average learning rates and a detailed view of what students have mastered, not mastered, and are ready to learn. The pie
Android App Development for Beginners
 Description Android App Development for Beginners DEVELOP ANDROID APPLICATIONS Learning basics skills and all you need to know to make successful Android Apps. This course is designed for students who
FACULTY Tk20 TUTORIALS: PORTFOLIOS & FIELD EXPERIENCE BINDERS
 FACULTY Tk20 TUTORIALS: PORTFOLIOS & FIELD EXPERIENCE BINDERS TABLE OF CONTENTS TOPIC PAGE PORTFOLIOS 2 Introduction 2 Student View 2 Faculty Administrator View 3 Accessing eportfolios from personal Faculty
DO NOT DISCARD: TEACHER MANUAL
 DO NOT DISCARD: TEACHER MANUAL Adoption Registration Guide for Teachers & Students FOR ONLINE ACCESS TO: Mastering MyLab Instructor Resource Center This manual supports only those programs listed online
ACADEMIC TECHNOLOGY SUPPORT
 ACADEMIC TECHNOLOGY SUPPORT D2L Respondus: Create tests and upload them to D2L ats@etsu.edu 439-8611 www.etsu.edu/ats Contents Overview... 1 What is Respondus?...1 Downloading Respondus to your Computer...1
Student User s Guide to the Project Integration Management Simulation. Based on the PMBOK Guide - 5 th edition
 Student User s Guide to the Project Integration Management Simulation Based on the PMBOK Guide - 5 th edition TABLE OF CONTENTS Goal... 2 Accessing the Simulation... 2 Creating Your Double Masters User
Creating a Test in Eduphoria! Aware
 in Eduphoria! Aware Login to Eduphoria using CHROME!!! 1. LCS Intranet > Portals > Eduphoria From home: LakeCounty.SchoolObjects.com 2. Login with your full email address. First time login password default
Five Challenges for the Collaborative Classroom and How to Solve Them
 An white paper sponsored by ELMO Five Challenges for the Collaborative Classroom and How to Solve Them CONTENTS 2 Why Create a Collaborative Classroom? 3 Key Challenges to Digital Collaboration 5 How Huddle
U of S Course Tools. Open CourseWare (OCW)
") Open CourseWare (OCW) January 2014 Overview: Open CourseWare works by using the Public Access settings in your or Blackboard course. This document explains how to configure these basic settings for your
Open CourseWare (OCW) January 2014 Overview: Open CourseWare works by using the Public Access settings in your or Blackboard course. This document explains how to configure these basic settings for your
CODE Multimedia Manual network version
 CODE Multimedia Manual network version Introduction With CODE you work independently for a great deal of time. The exercises that you do independently are often done by computer. With the computer programme
Ascension Health LMS. SumTotal 8.2 SP3. SumTotal 8.2 Changes Guide. Ascension
 Ascension Health LMS Ascension SumTotal 8.2 SP3 November 16, 2010 SumTotal 8.2 Changes Guide Document Purpose: This document is to serve as a guide to help point out differences from SumTotal s 7.2 and
Creating Your Term Schedule
 Creating Your Term Schedule MAY 2017 Agenda - Academic Scheduling Cycle - What is course roll? How does course roll work? - Running a Class Schedule Report - Pulling a Schedule query - How do I make changes
Connecting Middle Grades Science and Mathematics with TI-Nspire and TI-Nspire Navigator Day 1
 Connecting Middle Grades Science and Mathematics with TI-Nspire and TI-Nspire Navigator Day 1 2015 Texas Instruments Incorporated Materials for Workshop Participant * *This material is for the personal
Experience: Virtual Travel Digital Path
 Experience: Virtual Travel Digital Path Introduction Content Organization This guide explores the digital content on myworldgeography.com and look at how it allows students to connect, experience, and
Attendance/ Data Clerk Manual.
 Attendance/ Data Clerk Manual http://itls.saisd.net/gatsv4 GATS Data Clerk Manual Published by: The Office of Instructional Technology Services San Antonio ISD 406 Barrera Street San Antonio, Texas 78210
Curriculum Design Project with Virtual Manipulatives. Gwenanne Salkind. George Mason University EDCI 856. Dr. Patricia Moyer-Packenham
 Curriculum Design Project with Virtual Manipulatives Gwenanne Salkind George Mason University EDCI 856 Dr. Patricia Moyer-Packenham Spring 2006 Curriculum Design Project with Virtual Manipulatives Table
Creating a Course Questionnaire in Blue
 Creating a Course Questionnaire in Blue Information Technology Services November 12, 2015 West Virginia University WVU ITS Creating a Course Questionnaire in Blue 1 Contents Overview...2 Logging in...2
Moodle MyFeedback update April 2017
 Moodle MyFeedback update April 2017 Jessica Gramp j.gramp@ucl.ac.uk Moodle My Feedback Report Allows students and staff to easily view grades & feedback across Moodle courses. It is available from Moodle.org
Blackboard Communication Tools
 Blackboard Communication Tools Donna M. Dickinson E-Learning Center Borough of Manhattan Community College Workshop Overview Email from Communication Area and directly from the Grade Center Using Blackboard
Star Math Pretest Instructions
 Star Math Pretest Instructions Renaissance Learning P.O. Box 8036 Wisconsin Rapids, WI 54495-8036 (800) 338-4204 www.renaissance.com All logos, designs, and brand names for Renaissance products and services,
LMS - LEARNING MANAGEMENT SYSTEM END USER GUIDE
 LMS - LEARNING MANAGEMENT SYSTEM (ADP TALENT MANAGEMENT) END USER GUIDE August 2012 Login Log onto the Learning Management System (LMS) by clicking on the desktop icon or using the following URL: https://lakehealth.csod.com
Netsmart Sandbox Tour Guide Script
 Netsmart Sandbox Tour Guide Script October 2012 This document is to be used in conjunction with the Netsmart Sandbox environment as a guide. Following the steps included in this guide will allow you to
USER GUIDANCE. (2)Microphone & Headphone (to avoid howling).
Microphone & Headphone (to avoid howling).") Igo Campus Education System USER GUIDANCE 1 Functional Overview The system provide following functions: Audio, video, textual chat lesson. Maximum to 10 multi-face teaching game, and online lecture. Class,
Igo Campus Education System USER GUIDANCE 1 Functional Overview The system provide following functions: Audio, video, textual chat lesson. Maximum to 10 multi-face teaching game, and online lecture. Class,
Create Quiz Questions
 You can create quiz questions within Moodle. Questions are created from the Question bank screen. You will also be able to categorize questions and add them to the quiz body. You can crate multiple-choice,
MULTIMEDIA Motion Graphics for Multimedia
 MULTIMEDIA 210 - Motion Graphics for Multimedia INTRODUCTION Welcome to Digital Editing! The main purpose of this course is to introduce you to the basic principles of motion graphics editing for multimedia
FAU Mobile App Goes Live
 Back to School August 2011 IRM Newsletter Technology News for FAU Faculty and Students Summer at IRM Has Been Anything But Quiet! Whether you are new to FAU or returning to campus after a relaxing summer,
ODS Portal Share educational resources in communities Upload your educational content!
 ODS Portal www.opendiscoveryspace.eu Share educational resources in communities Upload your educational content! 1 From where you can share your resources! Share your resources in the Communities that