Moodle An electronic classroom
|
|
|
- Ada Rodgers
- 6 years ago
- Views:
Transcription
1 Matt Riordan Cuyahoga Valley Christian Academy Moodle An electronic classroom Moodle is the name of a program that allows the classroom to extend onto the web. This program allows a common place for students to go for many classroom resources. Using Moodle, you can post news items, assign and collect assignments, post electronic journals and resources, and more. This manual seeks to introduce you to the features of this program.
2 Table of Contents 0.0 Logging On 1.0 Your Class Space 1.1 The People Box Participants Groups Edit Profile 1.2 Administering Your Class Settings Teachers Students Backup Restore Scales Grades Logs Files Help Teacher Forum 2.0 Editing Your Class 2.1 Adding Content The Add Menu Assignment Chat Choice Forum Glossary Journal Label Lesson
3 2.1.9 Quiz Multiple Choice True/False Short Answer Numerical Question Matching Description Random Question Random Short-Answer Matching Embedded Answers (Cloze) Resource Survey Workshop Accumulative Grading Strategy Not Graded Grading Strategy Error Banded Grading Strategy Criterion Grading Strategy Rubric Grading Strategy The News Forum 2.2 Recent Activity Appendix 1: Adding Audio to Your Classroom Appendix 2: Adding Mathematical Equations App 2.1 Algebra Notation App 2.2 TeX Notation


4 0.0 Logging On See your Moodle administrator to set up your class and account. Once set up, go to your Moodle site (something like and you will see the class screen: To log in, click on login in the upper-right corner, or click on your class name. This will bring you to the login screen: Fill in your Username and Password, and click on Login. This will take you into your class. 1.0 Your Class Space If this is the first time you are entering the class, it will be mostly blank:


5 1.1 The People Box In the upper left is the People box: Participants Participants will show you everyone enrolled in your class. If you click on this, you will see a screen like this:

6 Click on the Activity link to see what that person has done in your class. To see all of the information on a person in your class, click on Full profile. You should see a screen like this: To edit your personal information, click on Edit profile. For a more detailed description of this, please see below. You will notice a picture of an eye next to your address. If this eye is open, everyone in the class can see your address by looking at your profile. If the eye is closed, no one can see your address (except teachers). To change this setting, click on the picture of the eye Groups If you go back to your class screen (click on the class name in the upper left, CMPTR1 in my example), the next option under People is Groups. Groups lets you define groups of students within your class. If you click on Groups, you should see a screen like this:


7 To modify your groups, click on Turn editing on. You will see a screen like this: If your class has no students in it yet, you will see only your name. For this example, I have two students. There are no groups yet to add a group, type the name of the group in the box next to Add new group, and then click on Add new group. In my example, I have added a group called Group1:


8 Students can now be added to the group. To add a student, click on the student s name and click on Add selected to group. To add multiple students to a group at the same time, hold down the Shift key on your keyboard while clicking on each name. If you prefer, you may add all of the students to a group using the Randomly assign all to groups button. After adding my students to Group 1, my screen now looks like this: If you click on the Turn off editing button, you will see the newly created group: Groups will be discussed more when we look at adding modules (chat rooms, forums, assignments, etc.) later in this manual Edit Profile Back on the class page, under the People section, there is Edit Profile. Edit Profile allows you to change information about yourself. If you click on this you will see something like this:
 can see your email, or so that only other students in the class can see your email address, or so that no one can see your email address at all.")
9 Most of the fields are straightforward, but several need special attention: display this allows you to show or hide your in the class. You can set it so all users (including guests) can see your , or so that only other students in the class can see your address, or so that no one can see your address at all. Forum auto-subscribe This setting lets you decide if you want copies of posts that are added to forums (bulletin boards). If you set this to subscribe, the system will you copies of new posts in forums that you join. When editing text This can usually be left on Use HTML editor. This allows for text formatting options, but requires newer browsers. If you find your browser is not letting you edit text, change this setting to Use standard web forms. Description This can be anything you like Teacher, Mr. Riordan CVCA, or any text you like. New picture If you wish, you may upload a picture to represent you. To do this, click on the Browse button and find the picture you would like to upload, and click on Open. When you are finished, click on Update profile. You will now see your updated profile.

. Students lists all of the students in the class.")
10 To get back to your class, click on the short class name in the upper left (in my case, CMPTR1): This should take you back to the basic screen. 1.2 Administering Your Class: On the left-hand side of the screen are the administrative tools for your class: Turn editing on allows you to make changes to your class. Settings allows you to change the look of your class (more on this later). Teachers lists all the teachers for the course (typically just you, but could be more than that if the class were team-taught). Students lists all of the students in the class. You can manually enroll or unenroll a student from here. Backup allows your class data to be backed up. Restore allows you to restore old class data (that was backed up).
 Grades lists the grades of the tests and quizzes of each enrolled student. Logs shows you all of the activity in your class for a set amount of time.")
11 Scales allows you to define special scales for evaluation. These are made up of word evaluations (i.e., Excellent, Good, Average, etc.) Grades lists the grades of the tests and quizzes of each enrolled student. Logs shows you all of the activity in your class for a set amount of time. Files allows you to upload files to your classroom, or to view any files that are already there. Help brings up the Moodle manual (and it s pretty good!). Teacher forum is a teacher-only discussion board. Turn editing on we ll come back to this one in its own section Settings This allows you to change the look of the class. If you click on the Settings link, you should see a screen like this: All of the individual settings have? next to them to explain what they do. A few of these fields warrant special comment: - Summary this can be anything. If you have HTML editors enabled, you can use full formatting, including superscripts, subscripts, emoticons, etc. - Format this is an important field. There are three different formats for the class Weekly, Topic, and Social. The weekly format organizes the class into weeks, with assignments, discussion boards, tests, etc. all residing in a week-by-week block. The Topic format organizes everything by topics (or units), regardless of how long they take. The Social format is built around a forum (bulletin board), which is good for announcements and discussions. I find the Weekly and Topic boards to be the more


12 useful, but someone may come up with a creative Social format use. The different formats look like this: Weekly Topic Social Notice that the Weekly and Topic formats look very similar, but they are organized very differently. Weekly format lends itself to classes that are structured in a regular format, and Topic lends itself to classes that have units that are chronologically dynamic. For the rest of this manual, I will be using the Topic format, but all the functions work in the Weekly and Social formats as well. - Number of weeks/topics this displays the number of weeks or the number of topics displayed on your class page (the default is 10 weeks or 10 topics). - Group mode This is the default setting for groups for the course. You have three settings to choose from if you use groups: - No groups if this is set, the class is one big group. Everyone can see everyone. - Separate groups if this is set, each group is separate the groups cannot see each other. - Visible groups if this is set, students belong to groups, but the groups can see each other. - Force (setting related to group mode) if this is set to No, then groups can be assigned for each module added (each assignment). In this case, the class group setting is the default setting, but that can be changed. If this is set to Yes, then the group setting cannot be changed at the assignment level the setting for the class level is always the setting.

13 - Enrollment key this is the classroom password. If you fill in this field, students will have to put in the password the first time they log in to the class. This is to keep people who are not in your class from joining. The enrollment key can be anything a word, numbers, or a combination. This can be changed as many times as you like in case the password gets spread outside of class. Again students only need to put this key in the first time after that they do not have to. If someone from outside of the class joins and then you change the key, they do not have to put in the new key because they have already joined, but they can be kicked out by you. Once they are kicked out, they would have to know the new key to rejoin the class. When done modifying the class settings, click on Save changes Teachers Again, this lists all the teachers in a course (typically just you). From here you can add a co-teacher if you wish. To add another teacher to your class, click on the Add teacher button next to the name of the teacher you wish to add (or type in the teacher s name if there are too many users to show) Students From here, you may add or unenroll a student from your class. The screen should look something like this: On the left are the students currently enrolled in the class, and on the right are the students that could be added to the class. To add a new student, click on the left-facing arrow next to the student s name (or type in the student s name in the Search field if there are too many students to list). The student should move from the Potential student column to the Enrolled students column. To unenroll a student from a class, click on the right-facing arrow next to the student s name. The student should move from the Enrolled students column to the Potential students column. Please note that students may enroll themselves by clicking on the class listing of your class (they will need the enrollment key if you supply one). You may also add students manually using this method Backup Generally, you will not have to worry about backup (that should be done by the administrator), but if you do want to back up your files, you click on this button.
. The screen should look something like this: - Name This is the name of the scale. It can be anything that you like. In my example, I will call it Computer Scale.")
14 1.2.5 Restore If you have backup files you wish to restore to the system, click on this button Scales This screen allows you to create a word-based evaluation scale (like fair, excellent, etc.). The screen should look something like this: - Name This is the name of the scale. It can be anything that you like. In my example, I will call it Computer Scale. - Scale This is where you input your scale words. You can have as many as you like, but they need to be separated by commas, and they should be from the lowest level comment (like Poor ) to the highest level comment (like Excellent ). - Description This is an optional field. You may type anything you like here. My example now looks like:

15 When you are done typing in the information, click on Save changes. The new scale will now be available to the resources that can use it (more on that later) Grades This shows the grades of tests, quizzes and projects that students have done Logs Logs show you the activity in your class for different days or times. This can be useful to check to see if everyone has done a certain task Files This allows you to upload files to the server. Students do not have access to these files unless you link them to another part of the site (more on that later). A file can be text documents, sound files, spreadsheets, and more Help This is Moodle s own documentation, which is an excellent resource Teacher Forum This is a forum that is accessible by teachers only. It can be used to discuss anything you like, but may be especially useful if face-to-face meetings are difficult (if schedules conflict). It may also be useful for departmental discussions. 2.0 Editing your class:
. This will change the look of the page slightly.")
16 This is where the majority of things happen in your classroom. This is where you add discussion boards, journals, tests, quizzes, online resources and more. To start editing your page, click on Turn editing on (on the left-hand side, or at the top right of the page). This will change the look of the page slightly. Editing symbols will now appear next to existing features, and an Add box will now be in each topic box (or week box if you use Weekly format): For existing items (like News forum above) there is a series of symbols next to the item. If you hover over each symbol with the mouse, it will tell you what the button does: The right-facing arrow indents the item (for organization). If the item is already indented, there will be a left-facing arrow to un-indent the item. The double arrows move the item up or down in the list. The hand holding the pen edits the item. The X deletes the item. The eye hides the item from students (or shows the item if it is already hidden).


17 2.1 Adding Content We can now add content to each topic. Note next to the Add menus there is a? symbol. This brings up a window that explains what each item is, in case you need help. The first thing we can do is to add text to the topic box (or week box if using Weekly format). To do this, click on the hand holding the pen in the box to which you wish to add text: This will bring up the editing box: Add the summary, and click on Save changes. If you change your mind about what you have typed, you can click on Revert and the changes will not be saved. My example class now looks like this (after several edits):
")
18 2.1.0 The Add Menu We can now add more content from the Add menus. The Add menus are pull-down menus, and include: Assignment Chat Choice Forum Glossary Journal Label Lesson Quiz Resource Survey (Note: this one is mostly for online course evaluation) Workshop Assignment To add an assignment, click on Assignment under the Add menu. This will take you to the Assignment screen:
, or to upload a single file (they send you the file")
19 Again, notice there are? buttons next to each menu to help explain what each does. Some fields deserve a special note: The Assignment type field you have the option of allowing students to do the assignment offline (paper copies), or to upload a single file (they send you the file electronically). In either case, you may enter a description of the assignment. If you do want the students to submit the assignment electronically, they can upload one file of any type (Word, PowerPoint, etc.). If you do this, make sure you set the maximum size field to be big enough. I would always set it to the maximum size just to be safe. Note that 2 Mb is plenty for most assignments, but that PowerPoints can exceed this amount. The Allow resubmitting field this allows students to resubmit the assignment if this field is set to Yes. Grade this sets the grade as either a number (from 1-100) or as a custom word-based scale set up in the Scales section (see earlier section). For my example, I will assign an essay on PC safety, and require it to be submitted electronically. To do this, I type the name and description, select that it is an online activity, keep resubmitting off, set the grade to 100, set the size to the maximum (8 Mb in my case) and set the due date to March 10 at 08:00. When finished I hit Save changes. There is now an assignment on my main page called PC Safety :
. To get back to the main screen, click on the class short name in the upper left (CMPTR1 in my example). 2.1.2 Chat A chat is a chat room.")

20 If I click on the assignment s name ( PC Safety ), it will take me to what the assignment looks like, as well as provide a link to look at any uploaded assignments: Notice that as a teacher, you have the option to view submitted assignments (in the upper right). To get back to the main screen, click on the class short name in the upper left (CMPTR1 in my example) Chat A chat is a chat room. It is used for live-time discussions. Moodle also supplies a bulletin-board discussion space (see Forum below). The main difference is that Chat is a very efficient way to discuss things in live-time. If you expect your students to log in over several days at different times, then the forum is a better choice. Please note: Chat will archive a session if two (or more) people interact within a five-minute span. Otherwise, the program will not archive the session (why archive only one person talking?). When you add a chat, you should get a screen like this:


21 - Name of this chat room This can be anything you like. - Introduction text You can type anything you like here. Whatever you type will appear on the chat room s introductory screen. - Next chat time This is to advertise to students when to enter the chat room. Students may enter the chat room before the scheduled time, but this is useful to organize the start of a chat session. - Repeat sessions This sets whether or not to advertise when the chat room will be in session. If you choose to advertise the opening time, you can choose whether it is a one-time chat event, a daily event, or a weekly event. - Save past sessions This is where you set how long a chat room should be archived (from two days to never delete ). - Everyone can view past sessions This sets if students can see past chat sessions (the teacher can always see past sessions regardless of this setting). Please remember that a session will not archive unless there is interaction between two (or more) users within a five-minute period. When you have finished filling out the Chat options, click on Save changes. In my example screen, I now have a chat called Building a Network : Choice A choice is basically a poll. When you add a choice, you ask a question, and supply two or more answers to the question. Then students may vote. This only asks one question at a time, so works well as a poll, but would not work well as a multiple choice test (that is
.")
: If you click on the Choice name ( PC Memory ), you can see how the Choice looks, or vote on the options, or view results.")
22 under the quiz module). To add a Choice, select Choice from the Add menu. This will take you to the Choice screen: At this point, add a name and a question. Then fill in the possible answers in the Choice # boxes. You may then choose to post the results with students names, publish them without names, or keep the results private (only you can see them). You may also select if you want to see a list of who has not yet answered the choice with the Show column for unanswered field. When finished, click on Save changes. My screen now has a Choice called PC Memory added (the question mark): If you click on the Choice name ( PC Memory ), you can see how the Choice looks, or vote on the options, or view results. To return to the main screen, click on the class short name in the upper left (CMPTR1 in my example) Forum This is basically a bulletin board. You may create a forum to discuss various topics for your class. To add a Forum, select Forum from the Add menu. This will take you to the Forum page:

23 Again, there are help buttons next to each pull-down menu (the? buttons). The Forum type offers three choices: A single simple discussion, Each person posts one discussion, or Standard forum for general use. In A single simple discussion, students can reply to the topic, but cannot create new topics. In Each person posts one discussion, the students can each start one new topic, which could be useful if they were all doing different books, reports, etc. In Standard forum for general use, students may start new topics any time they wish. You have the option to allow students to post to the Forum or not. If you do not allow students to post, the forum can be used as a News forum (like the one created by default at the top of the class page). In these cases, you as a teacher could add to the Forum, but students could not. To set up this kind of Forum, you would select No discussions, no replies from the Can a student post to this forum? menu. You may also allow students to reply to a topic only. In this case, a student can only reply to a topic that already exists, not create a new topic. This is set by selecting the No discussions, but replies are allowed from the Can a student post to this forum? menu. This style is probably the most common setting. Lastly, you can allow both discussions and replies, where students can post anything they like they can reply to an existing discussion, or start a new discussion topic on their own. This is set by selecting Discussions and replies are allowed from the Can a student post to this forum? menu. Next is the Force everyone to be subscribed? option. If this is set to Yes, then every student in your class will get an copy of every post in the forum. This might get old in a big discussion group, but would be useful if the forum were a class news forum

24 where students would be ed any new announcements. Students can always elect to be subscribed to a forum if this setting is set to No. The next setting is Maximum attachment size, which allows you to limit the size of any attachments that students may want to upload. The next section of setting up a Forum is the option to rate posts in a discussion. If you do not want to rate posts, then leave the Use ratings checkbox blank. If you do want to rate posts, check the box next to Use ratings. Once you check Use ratings, the other options become available. Under the Users menu, you have the option of setting who can rate posts. If you want to restrict rating posts to just yourself (as the teacher), select Only teachers can rate posts from the Users menu. If you would like the students to be able to rate posts (for peer review or the like), select Everyone can rate posts. Then you can set who can see ratings. You can allow everyone to see the ratings the posting has received, or you can restrict it so only the student that posted can see the ratings (the teacher can always see the ratings no matter what the setting is). Once you have determined who can rate posts, then you can select the rating method. To set the evaluation method, select what you would like from the Grade menu. Under this menu, you will see any custom scales you set up under Scales (see above), as well as any numerical evaluation from 1 to 100. If you select a custom scale, the evaluator (you or the students) can select any of the words you set up (Excellent, Good, etc.). If you select a numerical evaluation, the evaluator can select a number from 0 to the upper limit you set (if you set a grade of 85, then the evaluator can select any number from 0 to 85). If you wish, you can limit the rating of posts to just certain days or times. If you wish to do this, check the Restrict ratings to posts with dates in this range box. Set your From date and your To date, and the evaluator will only be able to assign grades during those times. When you are done with the Forum, click on Save changes. My example now has a Forum posted called Computer Errors : Glossary

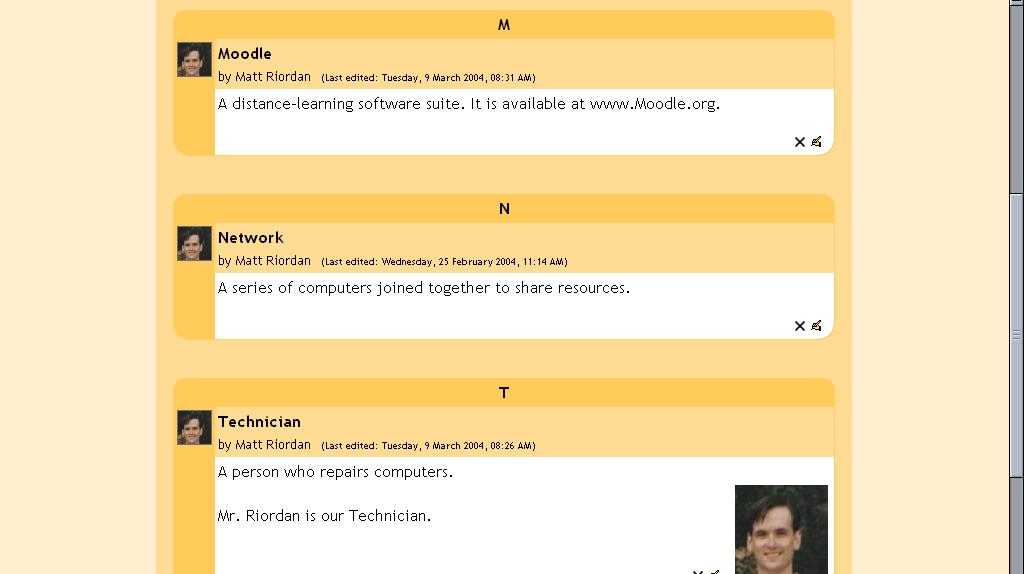
25 The Glossary option adds a flexible way to present definitions (and more) that can be linked through your entire class site. For example, if you define the term sonnet and the word sonnet comes up in a forum discussion, the word sonnet will appear as a link that will take the user to the definition. To add a Glossary, select Glossary from the pulldown menu. This will take you to the Glossary screen: - Name: This field can be anything you like it is the name that shows up on the class page. For my example, I will call it Computer Terms. - Description: This can be anything you like. - Entries shown per page: This is useful to help users with slow connections. If you limit the entries to 10 or 15 per page, the load time is faster. If you do not specify a number, the system will load every definition. - Glossary Type: This can be either Secondary glossary or Main glossary. You can only have one Main Glossary for your entire classroom. You may have as many Secondary Glossaries as you like. Entries from Secondary Glossaries can be transferred to the Main Glossary. This allows you to build a Main Glossary with the definitions you want from any definition in the Secondary Glossaries. Students cannot modify a Main Glossary. - Students can add entries: This setting allows students to create entries if it is set to Yes and if the glossary is a Secondary Glossary. - Duplicated entries allowed: This sets if students can define a term more than once (if two or more students can define sonnet or the like). - Allow comments on entries: This sets if others in the class can make comments on glossary entries or not. - Automatically link glossary entries: If this option is set to yes, then every time a term is used anywhere on the site, the term will link to the definition in the glossary. For example, if I define sonnet, and someone uses the term sonnet in a forum discussion, the word sonnet will become a link to the definition I wrote.
26 - Default approval status: If this setting is set to No, then all student entries must be approved by the teacher before they become available to everyone. If this is set to Yes, then all entries are available to everyone. The next section defines how the Glossary appears to the class. There are multiple settings. - Display format: This sets how the glossary will appear to the students. There are several choices: - Simple, dictionary style this presents the terms like a dictionary, in alphabetical order. Any attachments are shown as links. Author information is not presented. - Continuous without author this presents the terms as one big page, and sorts the terms by date. The author is not indicated. - Encyclopedia this presents the terms like an encyclopedia. All uploaded images are seen in the article, and the author is indicated. - Entry list this presents the terms as a list of the terms with no definitions. Your Moodle administrator must set what happens when you click on the term it may or may not show the definition depending on what is set by the administrator. - FAQ this presents the terms as a frequently asked question forum. The term title will be labeled as a question, and the definition will be given as the answer. - Full with author this is similar to the Encyclopedia setting, except attachments are seen as links instead of being in the definition. Author information is given. - Full without author this is the same as Full with author, except no author information is given. This looks very much like the Simple, dictionary style except time and date information is given. Here are what the various settings look like:


27 Simple, dictionary style: Continuous without author:
28 Encyclopedia: Entry list:

29 FAQ: Full with author:
.")

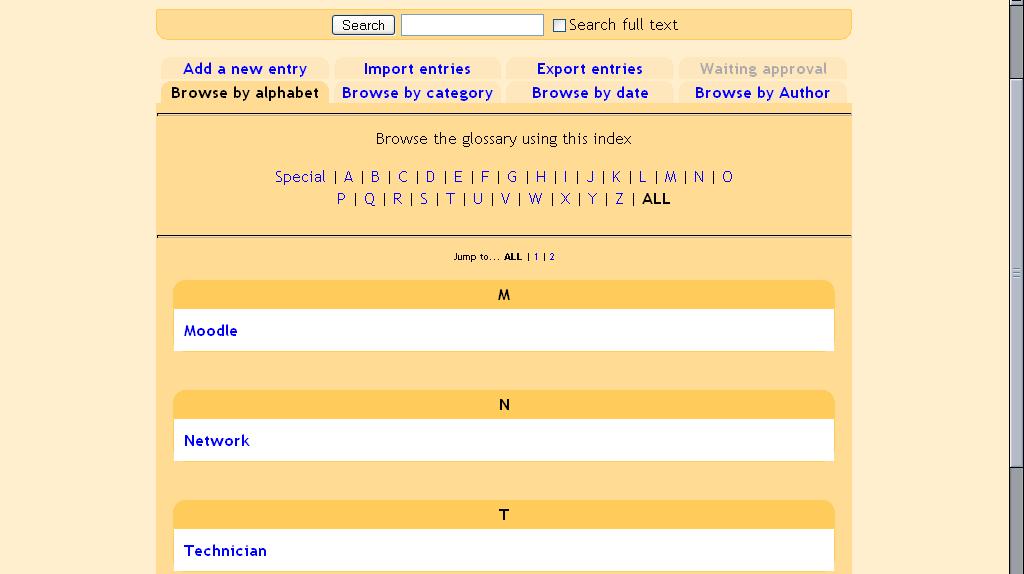
30 Full without author: - Show 'Special' link: if this setting is set to yes, it allows students to search using special characters (like $ % #). - Show alphabet: if this is set to yes, it allows students to browse by letter of the alphabet. - Show ALL link: if this is set to yes, it allows students to list all entries in the glossary at once. Once you have these settings the way you want them, click on Save changes. This will take you to your glossary page:
. - Browse by date sorts the terms by date.")
31 The heading tabs are: - Browse by alphabet sorts the terms by letter. - Browse by category sorts the terms by categories you define (define categories by clicking on the Edit categories button under the Browse by category tab). - Browse by date sorts the terms by date. This can sort by modification date or by creation date. - Browse by Author sorts the terms by author of the definition. This works even when the author information is not displayed. - Add a new entry this allows a new term and definition to be added to the system. See below for more detail. - Import entries this allows you to import glossaries that have been exported. from other classes. - Export entries this allows you to export your glossary to share with another class. - Waiting approval if entries require teacher approval before being publicly posted, this is where those entries are approved. Also note the search option at the top of the page. If you do not check the Search full text box, then the search only looks for the term names. If the Search full text box is checked, the system will search through every word. This can take longer and return more entries than you might wish, but it is thorough. Adding a new entry if you click on the Add new entry tab, you will see a screen like this: You must specify the Concept field. You may add keywords that the system will link to this definition if those words are used. For example, if I define sonnet with a keyword of poem, then the system will link to the definition of sonnet if someone uses poem in a discussion. You may also put the term into a category if you have any defined. You

 to see how each student s thought process and writing skills improve. To add a Journal, select Journal from the Add menu.")
32 then can fill in the Definition field, and can attach any attachments you want to. When you are done, click on Save changes. My main class screen now has a glossary called Computer Terms: Journal This option adds an online journal for the student. Each student has one, and the journal can only be seen by the student and the teacher. The journal can be edited by the student and refined. You may also assign as many journals as you wish (one/week, one/unit, one/chapter, etc.) to see how each student s thought process and writing skills improve. To add a Journal, select Journal from the Add menu. This will take you to the Journal editing page: Give the journal a name, and ask the student a question (or describe what the journal is for). You then have the option to set a grading scale. This can be No grade, one of your custom scales (set up in Scales from above), or a number that represents the maximum grade (from 1-100). Since the journal can only be seen by the teacher and the individual student, only the teacher has the ability to assign a grade (there is no peer review). The last menu lets you select how long the journal will be available (from one day to Always
: 2.1.")
.")
33 open ). When you are finished with editing the journal, click on Save changes. My example class now looks like this, with a Journal added (called Repair Log ): Label This feature allows you to insert text, images, and other things into the topic (or week) box. To add a Label, click Label in the Add menu. This will take you to the Label editing page: You may now type what you want to add to the class topic (or create a link, or add a picture, etc.). When you are done, click on Save changes. In my example, I have added a Label that says Please be careful with the computers! :


34 2.1.8 Lesson This feature allows you to add entire lessons that guide the student based on the student s answers. It might be helpful to think of a lesson as a kind of flowchart. The student reads some content. After the content, you ask the student some questions. Based on the answers the student gives, the system sends him or her to another page. For example, if a student chooses question one, then the system goes to page 3. If the student chooses answer two, the system goes to page 1. If the student answers question 3, the system goes to page 5. Lessons are very flexible, but do require some set-up. To add a Lesson, select Lesson from the Add menu. This will take you to the Lesson page: Fill in the name of the lesson (for my example, I will use More Safety Tips ). Select the maximum grade to be given out for the whole lesson (this is a number from 0-100). How grading works is if the system sends the student ahead to any later page, the question is marked correct. If the system sends the student back to any page, the question is marked incorrect. The Maximum number of answers sets how many questions can be asked on each page. If you leave the number at 4, you can still ask 2 questions on one page if you wish. You can even have a page where you do not ask a question in those cases the student automatically continues on to the next page. Next, set if the students can retake the lesson or not, and set the dates that the lesson is available. When you are done, click on Save changes. You will be taken back to your class page, with the new lesson added (mine is called More Safety Tips ):


35 You must still define all of the pages in the lesson. To do that, click on the lesson icon on your class page. This will take you to the first page to define: The items on this page are: - Page title this is the title of this page. If you have multiple pages for your lesson, each one will have a title. In my case, I might have Basic Safety, Working on Computers, and Protect Yourself and the Equipment as titles for separate pages within the More Safety Tips lesson. - Page contents this is where you put the information you are trying to convey. It may be a story, a problem to solve, a poem, or anything that you want to ask questions about. You should usually end the section with a question that will be answered by the students. - Answer 1 (or Answer #) this is where you type one answer to the question you asked. You fill in one answer per Answer # up to the maximum you defined. You do not have to fill them all in. - Response # - after each Answer # section, there is a Response #. This is an explanation that the student will see after picking one of the possible answers and before being redirected to another page (or staying on the same page). - Jump to after each Response # there is a field that tells the system what to do if the student picks that number. You can tell the system to end the lesson, to stay on the current page, or to jump to any page that already exists (forward or back). For example, if I pick Answer 1 and the Jump to field is set to go to the next page, then I will be sent to

. Once you have all of the fields set up, click on Save page.")
36 the next page of the lesson. Grading is determined by the navigation if a student stays on the same page or is sent to a previous page, then the answer is counted as wrong. If the student picks an answer and is sent to a later page, then the answer is counted as right. By default, Answer 1 sends the student to the next page, and all the other Answers keep the student on the same page, but that can be changed. The students will see the order of the Answers mixed up (Answer 1 may actually be the fourth question asked). Once you have all of the fields set up, click on Save page. This will take you to a summary page like this: From here, you can add another page with the link in the upper right or the lower right. If you click on the link above the page, your new page will be added before the page you are looking at. If you click on the link below the page, your new page will be added after the current page. You would then fill in the new page with content, a question (at the end of the content), your answers, responses, and jump to fields. You can repeat that as many times as you like. Once you have more than one page, you can move the pages around by clicking on the arrows near the top of the page descriptions: Once you have some (or all) of your pages in the system, you can check to make sure things work the way you expect. To test the pages, click on the Check navigation link at the bottom of the page:
: In this example, if I checked Unplug")
.")

37 This will take you to the testing screen (which is what the students will see): In this example, if I checked Unplug the computer, I would move on to the next page (because that is what I assigned the Jump to to do). If I choose one of the other two answers, I d stay on this page. My basic class screen now looks like (with the lesson More Safety Tips added):

38 2.1.9 Quiz This feature adds a quiz to the class. It can contain any number of questions, and they can be true/false, multiple choice, and fill-in-the-blank. The quiz may also have feedback, where it can explain to the students why the answer is what it is. To add a Quiz, select Quiz from the Add menu. This takes you to the Quiz editing screen: Again, there are help buttons available if you need them (the? buttons). Note that the quiz has open and close dates. If these are set incorrectly, the students will not be able to take the quiz. A student cannot take a quiz before the opening time or after the closing time. These times can be changed by the teacher at any time. Shuffle Questions changes the order of the questions on the quiz every time the student takes it (or for every different student who takes the quiz). This helps to prevent students from copying each other. Shuffle Answers is very similar, except it changes the order of the answers given for multiple choice or matching questions. Attempts allowed sets the number of times a student may take a quiz. This can be very useful if the quiz is a review exercise, as the student can take it as many times as the teacher wants (and each grade does get reported to the teacher). Each attempt builds on the last sets whether or not the quiz builds on previous quizzes. If multiple attempts of a quiz are allowed, and this is set to Yes, then the former quiz results will be included in this attempt (including feedback, if turned on). If this option is set to no, then the quiz will be a fresh (blank) quiz every time the student takes it.

39 Grading method allows you to set how quizzes are scored if the student can take the quiz multiple times. You can choose from keeping the highest grade, keeping the average of all the grades, keeping the first score, or keeping the latest score. After answering, show feedback can immediately give a student feedback on a question. You type the feedback into the question when you create it (more on that below). In feedback, show correct answers can show students the correct answers to questions if feedback is on. To activate this option, set this to Yes. Allow review lets students see the full quiz(zes) they took. If this is set to Yes, then students can still see (review) the quiz after it closes. Maximum grade is an important field. This sets the maximum grade for the quiz (from No grade to 100). If this field is set to No grade, then the student can take the quiz, but will not be evaluated (although feedback will still work if enabled). When you have the settings the way you want them (and they can always be changed), click on Continue. This will take you to a screen like this: On the right, you may select a category (there is one set up called default ). These are ways of organizing your questions. If you use the same questions over and over, you may wish to organize them (into categories like Othello, Hamlet, etc.). The questions are then available to pick and choose from to create your quiz (this is useful if your electronic classroom has spanned several semesters and you have questions built up). To add new categories, click on Edit categories, add the new category, and click on Save changes. Also, you have the option to publish categories to all teachers (this is an option under Edit categories ). This makes all the questions in that category available to any teacher, which can be handy if you are teaching the same book/lesson/unit as someone else. To build a question, select a category (for my examples, I will use default ) and click on Show. The screen will then show any existing questions, and allow you to add new ones:
.")
40 In my example, I already have one question made ( PC Case ), and I have the option to Import questions from file or Create multiple questions. - Import questions from file this imports existing questions from file systems Moodle recognizes (many formats). - Create multiple questions this feature creates a specified number of random questions. These questions are drawn randomly from your database of pre-existing questions. You specify the category the questions come from, so Moodle will not accidentally ask questions about Othello when you are teaching Hamlet! - Create new question: When you create a question, it is stored in the category you select. It is then always available to add to any quiz any time. To create a new question, select the type of question you want from the pull-down menu. You have the option of adding a multiple choice question, a true/false question, a short answer, a numerical answer, matching, description, random, random short answer, or a special question called embedded Multiple Choice To add a multiple choice question, select Multiple Choice in the Create new question pull-down menu This will take you to the multiple choice question screen:

41 This works like a standard multiple choice question. Type in the name of the question (something to help you identify the question in the list), and type in the question. You do not have to type the answers in the Question box the program will list the answers you type in the various Choice # boxes. You may select an image to display, if you have any loaded in your Files section. You may then select if students are allowed to select more than one answer, or if there is only one answer allowed. You may then fill in your answers for the multiple choice question, and include feedback text if you wish. Something that is different for multiple choice questions is they have weight. The positive answers must add up to 100%, or the system will ask if that is what you want to do. You do have the option to assign negative weight to an answer, such that a wrong answer might actually count against the student, instead of being no credit. This might be true where multiple answers are possible, such that A) is worth 50%, B) is worth -50% and C) is worth 50%. A student selecting A) and C) would get full credit, but a student selecting A) and B) would get no credit at all. You do have the option to make a wrong answer not count either way as well. When you are done filling in your questions, answers, feedback, and grade, click on Save changes. You should go back to the quiz screen again, with the new question listed ( Matt s Foods in my example).
, and then fill in the actual question.")
 if this is a feature you wish to use.")
42 True/False the questions are just that true/false. To add a true/false question, select True/False from the Create new question pull-down menu. This will take you to a screen like this: Fill in a question name (a short name that tells you what the question is), and then fill in the actual question. If you have uploaded images to your course (in the Files section from earlier), you can add an image if you want to ask a question about the picture. Then you select the answer (true or false). You may then add feedback to each answer (text explaining why the answer the student chose is right or wrong) if this is a feature you wish to use. When everything is the way you want it, click on Save changes. This will take you back to the questions page. You should see your question added to the available questions ( Class Mascot in my example):
 and the question itself.")
.")
43 Short Answer To create a short answer question, select Short Answer from the Create new question pull-down menu. This will bring you to the short answer question screen: Fill in the question name (something that will tell you what the question is) and the question itself. The question can have up to 5 short answer answers. This can be very flexible. You can make a fill-in-the-blank (Matt is years old), or just ask for answers (Name the first 3 presidents). One big caution to pass on to students: a misspelled answer is WRONG (unless you put in the right answer and the 2 or 3 most common misspellings that would work). Next to each answer is the Grade field. The total points of the question must equal 100%. In the case of the presidents question above, you would make each answer worth
.")
44 33% of the question. In the case of the fill-in-the-blank question, one answer (33 years old right now ) would be worth 100%. You can have multiple answers be worth 100% (in the case of listing common misspellings, or in the case of Name 1 of the first 3 Presidents where 3 answers would be worth 100% each). You may also fill in feedback for each answer. My tests show that the feedback only comes up if you type an answer that the quiz has, so on short answer questions, the feedback is limited to telling you why your answer is correct (on short answer questions only). The feedback can show the student the correct answer if the student guesses wrong, even if the wrong answer is not in the list of answers. Once you are finished, click on Save changes. This will take you back to the quiz screen, and the new question should be there ( The First President in my example): Numerical Question To add a numerical question, make sure Numerical is selected in the Create new question pull-down menu. This will take you to the numerical question screen:
.")
45 A numerical question is a question that expects a number for the answer. It has the added flexibility to accept a range of answers ( would accept anything from 7 to 13). Fill in the Question name with anything that will help you identify the question. In the Question box, fill out the question you wish to ask ( How fast can Matt run? ). If you have loaded any picture images to the system (in the Files section from above), you will have the option to display the image as part of the question. You then fill in the correct answer (10 in my example), and the accepted error (2 in my example would allow a correct answer of 8-12). You may then fill in feedback if you wish to use that feature. When everything is filled out the way you want it, click on Save changes. The question will then appear in the list of questions ( Matt s Speed in my example):

46 Matching To add a matching question, select Matching from the pull-down menu. This will take you to the matching question editing screen: Fill out a question name that you will recognize, and then write the big question this is the introduction the student sees. This could be Match the following questions with the correct answers, or Match the name of the president with the year he was elected, or anything else you like. You then need to fill in at least 3 questions that will be matched to the answers you provide. The questions can be one word to be matched to the answer. Each matching part is worth an equal amount (if you have four matches, each is worth 25% of the whole question. The whole question then can be weighted on the quiz more on weighting later). When you are finished filling in the whole question (remember the program treats all the matches even if there are eight as one question), click on Save changes. You will then be taken back to the quiz editing screen, and the new matching question should be listed (in my example, it is Matt s Past ):
 that you can then ask other questions about.")
47 Description To add a description, select Description from the pull-down menu. A description is not actually a question. It allows you to add text to a quiz (such as a story or an article) that you can then ask other questions about. The description editing screen looks like this: Fill in the Question name with a name that will help you remember the description. Then, in the Question box, fill in your description (story, article, etc.). If you have uploaded pictures in the Files section, you can choose to display them with the description (so your description can describe a picture). When everything is filled out the

48 way you want it, click on Save changes. Your description should now appear in the list of questions ( Cats in my example): Random question To select a random question, select Random question from the pull-down menu. A random question will select a question that already exists randomly from all the questions in any category you specify. If you have 10 questions in an Othello category, this feature will pick one of those questions at random. The random question editing screen looks like this: Select the category you wish to draw the question from ( Default in my example). You may name the question if you wish (you might want to add the category to the name i.e. random default #1 ). Note that you can mix random questions with normal questions on a quiz. When you are done, select Save changes, and you should see the edit quiz screen, with the new random question added ( Random Default #1 in my example):

49 Random Short-Answer Matching This question makes a matching question by drawing random questions and answers from among the short-answer questions you have created. You must have at least two short-answer questions in a category for this feature to work. The random short answer matching editing page looks like this: The category is whatever category you were in when you selected the random short answer matching question. The question name can be anything you like, but I would suggest adding a number to the end (#1, #2, etc.). You may leave the existing default introduction, or you may change it if you wish. You then select the number of questions
 These question embed the answers into the question.")
50 you would like to have. When you are finished, click on Save changes. You should see the quiz editing screen with the new question listed ( Random Short-Answer Matching #1 in my example): Embedded Answers (Cloze) These question embed the answers into the question. This allows you to have questions that look like this (taken from Moodle help): These are great questions, but do require some formatting. The Embedded Answer (Cloze) editing page looks like this:
51 The Question name names the question for the list. The Image to display lists any pictures you have uploaded to your Files section. The Question part is where you type your question, but this MUST include the formatting. This can take some getting used to. This text (from Moodle help) is a valid question: This question consists of some text with an answer embedded right here {1:MULTICHOICE:Wrong answer#feedback for this wrong answer~another wrong answer#feedback for the other wrong answer~=correct answer#feedback for correct answer~%50%answer that gives half the credit#feedback for half credit answer} and right after that you will have to deal with this short answer {1:SHORTANSWER:Wrong answer#feedback for this wrong answer~=correct answer#feedback for correct answer~%50%answer that gives half the credit#feedback for half credit answer} and finally we have a floating point number {2:NUMERICAL:=23.8:0.1#Feedback for correct answer 23.8~%50%N/A#Feedback for halfcredit answer in the nearby region of the correct answer}. This produces this: The formatting works like this: - Normal text is just typed (like This question consists of some text with an answer embedded right here from above).
52 - To open a field in the embedded question, use the left bracket { and close the field with the right bracket }. - To insert a pull-down menu, type the number of points the field (the menu) is worth (1,2,3, etc.). The entire question is worth the total of all the points of each part (the menus and the short answer parts). Follow the number by a colon, followed by the word MULTICHOICE followed by another colon (1:MULTICHOICE:). Then type your possible answers followed by tildes (~). The correct answer must start with an equals sign (=). An answer that counts for partial credit starts with the percent sign followed by the credit followed by a percent sign (%50% for 50 % credit). A full example would be: {2:MULTICHOICE:Washington~Jefferson~Lincoln~=Franklin~%50%Adams} This would make a pull-down menu of 5 items. This menu would be worth 2 points. In this example, Washington, Jefferson and Lincoln are wrong, Franklin is right, and Adams is worth half-credit. - To insert a short answer (fill-in-the-blank), put in the points the short answer is worth, followed by a colon followed by SHORTANSWER followed by a colon (2:SHORTANSWER:). Then put an equals sign (=) followed by the right answer inside the brackets. An example would be {2:SHORTANSWER:=Maine}. This would make a blank worth 2 points where the answer is Maine (and spelling does count!). You may list other correct answers by separating them by a tilde sign (~) like this (don t forget the = sign): {2:SHORTANSWER:=Maine~=Ohio}. When you have everything the way you want it, click on Save changes. Your Embedded Answers question will now be in the list ( Nice Places in my example):

.")
53 Let us suppose that those are all the questions I want for my quiz. To construct my quiz, I check the box next to each question I want (remember, there may be questions I don t want to use because they are from another unit), and I click on the Add selected to quiz button: I selected five questions for my quiz. I may edit them just for the quiz and leave the originals alone by editing the quiz side of the screen (the left half of the screen). I can also change the order of the questions by clicking on the up or down arrows on the left. The random question will pick a question not used on the quiz.

54 Finally, I can weight each question. Under Grade is a pull-down menu. I can select any grade weight I want for that question, from 0 to 10. If most questions are weighted as a 1, then a weight of 5 will be worth five times as much as the 1 questions. This is important as you can use this to make matching questions worth more than normal questions. If most of your questions are worth 1, and you have 2 matching questions of 5 parts each, you might want to make those worth 5 each to reflect that they have more parts. The total of the quiz can be anything (it does not have to total 10 or 100). This total will be scaled down to the maximum grade you set on the first screen. Once you have your quiz constructed and weighted, click on Save this whole quiz, and the quiz will be added to your class. My example page now looks like this, with a quiz named Quiz : Resource This is used to add a resource to your class. A resource can be text, a web page, an uploaded file, or other things. The specific resources you can add are: Plain text this adds whatever you type. HTML text this adds text that understands HTML formatting. Program this adds an interface so that other programs can get information from Moodle. Reference this adds a text box used to cite books and other articles (a bibliography). Uploaded File this adds a link to a file you have uploaded to your Files section. Web Link this adds a link to another web page, which takes the user out of Moodle. Web Page this adds a link to another web page, but the page opens in Moodle, so the user can remain in Moodle. Wiki text this adds a text file that understands Wiki-style formatting. For a description of Wiki formatting, add a Wiki resource and click on the help button that reads How to write Wiki text. All of these resources require that you name the resource, add a short description of the resource, and either fill out a text box, select a file, or fill in a web page address. For my


55 example class, I will add a resource of a web page. My class example now looks like this (with a resource named CVCA Web Site ): Survey This adds pre-built surveys to the class. These are typically used for online, distancelearning courses. If you are curious, feel free to add one you can always delete it later if you don t find it useful. Future versions of Moodle are supposed to allow the user to design surveys Workshop This creates a workshop space for the class. It is used to facilitate peer review. It has a range of options. To add a workshop, select Workshop from the Add menu. This will take you to the workshop edit screen: The Title and Description can be whatever you like ( Peer Review, Othello, etc.).
56 Formatting determines how the program displays information. I recommend leaving it as HTML format unless you have problems with your internet browser (in which case use Moodle auto-format ). If you want to change the formatting, click on the? Moodle help button to evaluate the other options. The Maximum grade is set to a number from 0 to 100. For all of my examples, I will use a maximum grade of 100. The Grading strategy has several options Accumulative, Not Graded, Error Banded, Criterion, and Rubric. These will be covered in detail shortly. Accumulative grading This is the default setting. Accumulative grading breaks each project into sections (you determine the number, from 1-20) that can be individually graded and commented upon. The grades of each piece determine the final grade (based on the maximum grade you set). This style of review uses yes/no questions, grading scales (i.e., poor to excellent ) and purely numeric grading (1-100). Not Graded This setting is used for peer review where the students may comment on work, but not grade it. The teacher may assign grades to the comments that are made; not assigning grades on the comments means the assignment does not count for a grade (it is used for peer comments only). Error Banded This style of grading sets up multiple yes/no expectations for an assignment. If the element is there (a yes answer), credit is given; if not (a no answer), no credit is given for that part of the assignment. Each individual part may be weighted if desired. Criterion For this type of grading scale, you set up criteria for the peers to choose from. The students then chose ONE criterion that most closely matches the project. Each criterion has a grade assigned to it, so by choosing one criterion, the reviewer gives the grade associated with that comment. Rubric This review setting is very similar to Criterion, except that the teacher assigns different sections to each project. Then, within each section, the reviewer selects one comment that most closely matches the project being reviewed. The grades from each section are then combined to give the final grade. The Number of Comments, Assessment Elements, Grade Bands, Criterion Statements or Categories in a Rubric field determines how many elements an assignment will have evaluated. This is the number of things you wish to have evaluated. You could set this to 3, and have the peers evaluate on style, content, and grammar (for example). If this field is set to 0, then the group may only make comments in the General Comments section of an assignment. The Allow Resubmissions field allows students to resubmit their assignment at any time. This can be useful to encourage students to write several drafts incorporating suggestions made. The system will then keep the highest grade of all the assignments submitted by the student (the highest grade is the largest teacher-peer combined score).
57 The Number of Assessments of Examples from Teacher forces the students to walk through one or more example projects that the teacher has put online. The student will have to make comments and grade the project, and then these comments can be graded by the teacher. Students can NOT submit their own work until they have gone through all of the examples the teacher has set up. The Number of Assessments of Student Submissions field sets how many other projects the student can evaluate and comment on. If there are more submissions than the allowed assessments, the reviewer will get a random set to evaluate. The Self Assessment field, if set to Yes, allows students to evaluate and grade their own work. This is added to the Number of Assessments (if the Number of Assessments is set to 5, the student must still evaluate 5 other students work). If the Number of Assessments is set to 0 and this field is set to Yes, then the project is for self-evaluation only. If the Assessments must be agreed field is set to Yes, then the assessments from students are open to review from other students. If other students disagree with the evaluation made by the original reviewer, then the evaluation process will continue until the students do agree, or until the assignment passes the closing time. The Hide Grades before Agreement field allows the teacher to hide the numeric grades from other reviewers while they are trying to reach agreement. If this field is set to Yes, then all the numeric parts of the evaluation are hidden students can only see each other s comments. The grades will appear after the reviewers agree with each other. Maximum Size limits how big the project can be. In general, I recommend making this as big as you can unless space is an issue. The Deadline field sets when the workgroup assignment closes. After this point, student grades will appear (if hidden) and peer evaluation stops. Workgroup Evaluation Types Getting a workgroup ready for evaluation requires setting up each section (called evaluation elements). These element vary depending on the type of evaluation you select. Once you have added a workgroup, it has no evaluation elements in it. To add the elements, click on your new workgroup. In my example, it is called Uses of Computers :
: I have selected to have 5 elements on my evaluation")

58 Accumulative Grading Strategy This is the default grading strategy. It allows for various styles of evaluation, including yes/no questions, scaled questions, and numeric evaluations. If you selected this strategy on the setup screen, you will see something like this when you click on the workgroup ( Uses of Computers on mine): I have selected to have 5 elements on my evaluation (2 are off-screen). 5 to10 elements is pretty typical, but you can have anywhere from 1 to 20 elements. In the blank space next to Element 1, fill in your evaluation standard. This varies on the type of element you are using. For Element 1, I will use a 2 point Yes/No scale. Note that the 2 point does not refer to how much the question is worth (that is set using the weight). The 2 point refers to the fact that there are 2 options available (yes or no). Since I am using a yes/no answer, I need an element that can be answered using yes or no. For my example, I will use Is the paper 2 pages long or longer?
59 Type of Scale allows you to set how you want the element evaluated. The options are: 2 point Yes/No scale 2 point Present/Absent scale 2 point Correct/Incorrect scale 3 point Good/Poor scale (a sliding scale with 3 options) 4 point Excellent/Very Poor scale (a sliding scale with 4 options) 5 point Excellent/Very Poor scale (a sliding scale with 5 options) 7 point Excellent/Very Poor scale (a sliding scale with 7 options) Score out of 10 Score out of 20 Score out of 100 In all cases, the points are for the element ONLY. A Score out of 100 is not for the whole project, but for the element is it assigned to only. In my Element 1 example, I will use a 2-point Yes/No scale. Element Weight sets the weight of the element. In my example, right now all 5 elements are weighted with a weight of 1. That means each element is worth the same, or 20% (5 elements at 20% each = 100%). If I feel an element should be worth more or less than other elements, I can change the weight (from 0 to 4 times weight there are negative weights as well, but they are experimental). In my examples, I will leave the weight as 1. For Element 2, I will choose one of the sliding scales, the 5-point Excellent/Very Poor scale. This creates a scale that has 5 options, from Excellent to Very Poor. The grade of the element is based on the choice. In my example, each element is worth 20%. If someone rates my paper as a 3 on the scale, I will get 3/5 (a rating of 3 out of a possible 5) of 20, or 12 points for this element. I need to fill in the element description in a way that can be answered by the scale Excellent to Very Poor. In my example, I will use Rate the paper on how well it is written. For Element 3, I will use the Score out of 100 scale. This allows the reviewer to select a score of 0 to 100 for this element. The grade of this element is based on the score given. If I get a score of 75 on the scale, I will get 75/100 credit, or 15 points (75% of 20 total points). I need to describe the element in a way that can be evaluated on a 100-point scale. For this example, I will use On a scale of 100, rate how well the author did research. Other elements are filled out in a similar way. When I have filled out the other elements, my example looks like this:


60 Click on Save changes to save your changes. The system will then ask if you want to Amend Assignment Elements again. If you want to go back and make changes, click on Yes ; otherwise, click on No. You will then see a screen something like this: The links at the bottom allow you to control the workgroup. The Amend Assessment Elements link takes you back to where you can modify the elements, the scoring, and the weights. The Administration link allows you to evaluate student evaluations, papers, and so on.

61 The 6 stages near the bottom allow you to control the pacing of the workgroup. The screen above shows step 1. Set Up Assignment as the current stage. To move to one of the next stages, click on the stage you want. 2. Allow Student Submissions allows student to submit papers, but they can not evaluate other papers. 3. Allow Student Submissions and Assessments allows students to upload their papers and to assess other papers. 4. Allow Student Assessments does not allow students to upload papers, but does allow them to assess other papers. 5. Calculation of Final Grades allows you to make changes to the grades, and 6. Show Final Grades allows students to see their grades. You can move between stages at any time (you can skip from stage 1 to stage 3 and back to stage 2 if you wanted to). What an accumulative evaluation looks like: At this point, it might be useful to see what a student would see for an evaluation. For the accumulative evaluation from above, a student would see this: Not Graded Grading Strategy This grading strategy is used for peer comments only. You may still have as many elements as you like, but each elements only has a comments section there is nowhere for a numerical evaluation. When you click on a workgroup that has been set up with Not Graded, you will see a screen like this (mine has five elements):
 When you have filled in all of the elements, click on Save changes. The system then follows the same steps as above (see the Accumulative Grading Strategy section above). 2.1.12.")
62 Fill in each element field with a description to guide the reviewer s comments (like Discuss the strength or weakness of the thesis statement. ) When you have filled in all of the elements, click on Save changes. The system then follows the same steps as above (see the Accumulative Grading Strategy section above) Error Banded Grading Strategy This grading strategy is based entirely on yes/no responses for the evaluation. Each element is set up with a yes/no system. When you first click on the workgroup, you should see something like this:
.")
. Fill out each element with a yes/no question and set the weight. When you weight a question, it will count that weight against the yes or no count.")
63 In addition, there is a Grade Table to set up at the bottom of the page (mine is set up as an example): The grade table allows the teacher to set up suggested grades based on the number of No answers recorded by the reviewer. It does not have to be linear (my example takes off 5 for the first No, 10 for the second No, and 15 for the third No. ). These are only suggested grades the reviewer may modify the grade up or down by up to 20 points (you might want to stress to the students they should have good reasons for changing your suggested grades!). Fill out each element with a yes/no question and set the weight. When you weight a question, it will count that weight against the yes or no count. For instance, if I had 3 questions, and weighted one question as 2, and the other two questions as 1, the first
, it would count as two No s on the grade (or an 85 in my example grade chart). When done, click on Save changes.")
64 question would have twice the weight of the other two. That means if a reviewer selects No on the first question (the weighted one), it would count as two No s on the grade (or an 85 in my example grade chart). When done, click on Save changes. My example screen looks like this: Criterion Grading Strategy This strategy lets the reviewer pick ONE statement that matches the project. Each statement has a grade assigned to it. When you click on a Criterion workgroup for the first time, you will see a screen like this:


65 In each element section, write the statement you want and assign a suggested grade to that statement. The reviewer may change the suggested grade up or down by up to 20 points. When you are finished, click on Save changes. My example looks like this: Rubric Grading Strategy This strategy is very similar to the Criterion. In the Rubric, the reviewer must select ONE statement that most closely matches the project. Each statement has a grade attached to it.

66 The difference with the Rubric is that it allows a statement for multiple elements, so a project might have 5 elements to it, each of which has statements to be matched to the project. The total grade is based on each element grade. When you click on a Rubric workshop for the first time, you will see a screen like this: The Element box is where you describe what you want the reviewer to evaluate. You may then set the weight of the element. You then fill in at least two of the Grade boxes. You do NOT have to fill in all five (but you can if you wish). The system will ignore everything after the first blank box, and will calculate the grade based on how many possibilities are present. An example will help. If I have 5 elements all weighted as 1, each element is worth 20%. Each grade box (inside each element) divides the 20 points available to the element. If I fill in 2 boxes, Grade 0 is worth zero points (Grade 0 is always worth zero points, no matter how many boxes are filled out), and the statement in Grade 1 is worth all 20 points. If I fill out 3 boxes, Grade 0 is worth 0, Grade 1 is worth 10 points, and Grade 2 is worth all 20. If I fill out all 5 boxes, Grade 0 is worth 0, Grade 1 is worth 5, Grade 2 is worth 10, Grade 3 is worth 15, and Grade 4 is worth all 20 points. The reviewer will pick ONE statement for EACH element. Fill in each element description, pick the weight, and fill in as many grade boxes as you like for each element (you must fill out at least two Grade boxes for each element, or the element will not count). The best grade is always the last statement. Click on Save changes. My example looks like:


67 In my example, Element one would have 3 choices. The reviewer would pick one of them for this element, and would then do the same for the remaining elements The News Forum This covers all of the resources available from the Add menu. There is one more resource on the class page that is useful the News forum. You will notice that at the top of the class pages there is a forum called News forum. This is always present, and the system recreates it if you delete it. It is a place for you to post news items relating to your class. To add a news item, click on the News forum icon at the top: This will take you to a screen like this:


68 Before we Add a new topic, I want to point out the link in the upper right. By default, Everyone is subscribed to this forum. This means that every time you add a news item, the system will everyone in the class automatically. To change this option, click on the Everyone is subscribed to this forum link, and it will change to where the students have the option to sign up to get ed. If you do change this, and then want to change back, click on the Everyone can choose to subscribe link. If you click on the Add a new topic link, you will be taken to a screen where you give the announcement a name, type the details of the actual announcement, and have the option to attach a file to the announcement. The attachment can be any file Word, PowerPoint, etc. When you are done adding the announcement, click on Save changes. The system will then tell you that you have 30 minutes to make changes to the announcement. Click on Continue. The news item will now show up in the news forum: If you go back to the main screen (click on the short class name, CMPTR1 in my case), you will see that the headline now appears on the right under Latest news :
 next to News forum, and change the menu item Can a student post to this forum?")

69 One word of warning the default news forum allows students to reply to your posting, but not add new postings. To turn this off, click on the edit button (the hand holding a pen) next to News forum, and change the menu item Can a student post to this forum? from No discussions, but replies are allowed to No discussions, no replies. This covers everything about editing your class page. When you are finished, click on the Turn editing off button to see how your page looks. 2.2 Recent Activity One thing to point out to your students: on the right-hand side is a box labeled Recent activity. This lists everything that has changed in the class site since the last time the student logged in: This is a good place to see if there are new things in the class. If you have any questions, remember to click on the? buttons Moodle s help is very good. Thank you for using Moodle!
, or add it as an embedded sound to the module you are in (forum, quiz, etc.). Both methods are pretty straightforward.")

70 Appendix 1: Adding audio to your classroom Moodle allows you to add audio to classroom modules (forums, quizzes, etc.). There are two ways to do this: add the sound file as a resource (this is a separate module), or add it as an embedded sound to the module you are in (forum, quiz, etc.). Both methods are pretty straightforward. Please note that for sound to work, your administrator must enable multi-media plug-ins for Moodle. See your administrator if these features do not work. 1. Adding sound as a resource: Make sure you are in edit mode in your classroom. Go to the topic (or week) where you want to add the sound and select Resource from the Add menu: This will take you to the resource edit screen: Type in a name for your sound resource, and select Uploaded File from the Type of resource menu:


71 Fill in a description of the file in the Summary field. When you are done, click on Continue. You will then see a screen where you can browse for your sound file: To find your file, click on Choose or upload a file. This will bring up a new window that will show you any files you have already uploaded: If your file is not yet uploaded, click on Upload a file. This will bring you to a screen like this:
.")

72 You may type in the file path for the file you want or you may click on Browse to search for it (browsing is much easier). Find the file you want, and double-click on it (or click on it once and select Open : This fills in the path for you: Click on Upload this file, and the file will be moved into your Moodle classroom: Click on Choose on the right-hand side to select the sound file you wish to use. The system will fill in the name of the file for you:
. When you are finished, click on Save changes.")


73 You may wish to check Display this resource in a new popup window if you want that feature (the sound will open in a new window of the browser). When you are finished, click on Save changes. Your sound will now appear as a resource in your class page: When you click on the resource, it will play for you: 2. Adding embedded sound: Adding a sound as a resource works well, but it requires your students to click on the resource, which means opening another browser window, or leaving the module they are in. Moodle has the ability to embed sound in another module (like a forum or a quiz). You can only add sounds that you have already uploaded to your classroom, and the sound files should be in mp3 format (they should end in.mp3). If you need to add a new sound, click on the Files link on the left-hand side of the basic class page:


74 This will take you to the files section: To add a new file, click on Upload a file. This will take you to this screen: Click on Browse and find the file you want on your computer. Important: please make sure your sound files are in mp3 format other types of sound files may cause problems! When you find the file you want, double-click on the file and the system will fill in the information: Click on Upload this file, and the system will add the file to your classroom:
.")


75 The sound testsound_2.mp3 can now be added to any module I want. Go back to the basic class page by clicking on the name in the upper left (CMPTR1 in my example). You are now ready to add the sound anywhere you like. For this example, I am going to add a sound to a forum, but it works the same way in any module. Create a forum (or use an existing one). My example looks like this: Go into your forum and find the discussion group you want to add the sound to. My example looks like this: I will reply to this posting, but you can use the same procedure to start a new discussion with a sound. When I click on reply, I get to the reply screen:


: Then, click on the link icon on the tool bar (it looks")
76 Fill in the body of the message. At some point, add some text that will be a link to the sound (usually at the end, but it does not have to be). My example looks like this: To add the sound, use your cursor to highlight the text that will link to the sound file ( Sound File in my example): Then, click on the link icon on the tool bar (it looks like a chain): open up a dialog box like this:. This will


77 Click on the name of the sound file you want to play (testsound_2.mp3 in my case). The system will fill in the URL box for you: You may add a title if you wish, but it is not required. You may also choose to have the sound open in another window and other options under the Target menu, but the default ( None ) works just fine. When you are finished, click OK. Your window will now show the sound as a link: You may add more sounds or more text if you wish. When you are finished, click on Save changes. My example forum now looks like this:


78 To hear the sound that was added, I just have to click on the play button system will play the sound for me. and the Appendix 2: Adding Mathematical Equations, Algebra Moodle supports TeX and Algebra notation to add mathematical expressions anywhere in a module. Please note that your Moodle administrator must turn on support for TeX and Algebra for these functions to work. 2.1 Algebra (based on postings by Zbigniew Fiedorowicz at There are a couple of ways to add mathematical expressions. For very simple expressions, you can use the superscript and the subscript functions in the html editors: More complicated expressions (fractions, calculus, etc.) need more advanced formatting, using the algebra filter. This filter uses coding to create mathematical expressions. The good news is that it is very simple to use. The code looks like a mathematical expression you would type (like x^2 = y), except you enclose it in signs, like = y@@. The filter is flexible and can ignore is the same x y = The filter can make full use of parenthesis for organization, is a valid expression.
STUDENT MOODLE ORIENTATION
 BAKER UNIVERSITY SCHOOL OF PROFESSIONAL AND GRADUATE STUDIES STUDENT MOODLE ORIENTATION TABLE OF CONTENTS Introduction to Moodle... 2 Online Aptitude Assessment... 2 Moodle Icons... 6 Logging In... 8 Page
Introduction to Moodle
 Center for Excellence in Teaching and Learning Mr. Philip Daoud Introduction to Moodle Beginner s guide Center for Excellence in Teaching and Learning / Teaching Resource This manual is part of a serious
Moodle 2 Assignments. LATTC Faculty Technology Training Tutorial
 LATTC Faculty Technology Training Tutorial Moodle 2 Assignments This tutorial begins with the instructor already logged into Moodle 2. http://moodle.lattc.edu/ Faculty login id is same as email login id.
MOODLE 2.0 GLOSSARY TUTORIALS
 BEGINNING TUTORIALS SECTION 1 TUTORIAL OVERVIEW MOODLE 2.0 GLOSSARY TUTORIALS The glossary activity module enables participants to create and maintain a list of definitions, like a dictionary, or to collect
Skyward Gradebook Online Assignments
 Teachers have the ability to make an online assignment for students. The assignment will be added to the gradebook and be available for the students to complete online in Student Access. Creating an Online
Adult Degree Program. MyWPclasses (Moodle) Guide
 Guide") Adult Degree Program MyWPclasses (Moodle) Guide Table of Contents Section I: What is Moodle?... 3 The Basics... 3 The Moodle Dashboard... 4 Navigation Drawer... 5 Course Administration... 5 Activity and
Adult Degree Program MyWPclasses (Moodle) Guide Table of Contents Section I: What is Moodle?... 3 The Basics... 3 The Moodle Dashboard... 4 Navigation Drawer... 5 Course Administration... 5 Activity and
Moodle Student User Guide
 Moodle Student User Guide Moodle Student User Guide... 1 Aims and Objectives... 2 Aim... 2 Student Guide Introduction... 2 Entering the Moodle from the website... 2 Entering the course... 3 In the course...
Create Quiz Questions
 You can create quiz questions within Moodle. Questions are created from the Question bank screen. You will also be able to categorize questions and add them to the quiz body. You can crate multiple-choice,
Getting Started with MOODLE
 Getting Started with MOODLE Setting up your class. You see this menu, the students do not. Here you can choose the backgrounds for your class, enroll and unenroll students, create groups, upload files,
Using Blackboard.com Software to Reach Beyond the Classroom: Intermediate
 Using Blackboard.com Software to Reach Beyond the Classroom: Intermediate NESA Conference 2007 Presenter: Barbara Dent Educational Technology Training Specialist Thomas Jefferson High School for Science
SECTION 12 E-Learning (CBT) Delivery Module
 Delivery Module") SECTION 12 E-Learning (CBT) Delivery Module Linking a CBT package (file or URL) to an item of Set Training 2 Linking an active Redkite Question Master assessment 2 to the end of a CBT package Removing
SECTION 12 E-Learning (CBT) Delivery Module Linking a CBT package (file or URL) to an item of Set Training 2 Linking an active Redkite Question Master assessment 2 to the end of a CBT package Removing
Schoology Getting Started Guide for Teachers
 Schoology Getting Started Guide for Teachers (Latest Revision: December 2014) Before you start, please go over the Beginner s Guide to Using Schoology. The guide will show you in detail how to accomplish
Using SAM Central With iread
 Using SAM Central With iread January 1, 2016 For use with iread version 1.2 or later, SAM Central, and Student Achievement Manager version 2.4 or later PDF0868 (PDF) Houghton Mifflin Harcourt Publishing
Creating a Test in Eduphoria! Aware
 in Eduphoria! Aware Login to Eduphoria using CHROME!!! 1. LCS Intranet > Portals > Eduphoria From home: LakeCounty.SchoolObjects.com 2. Login with your full email address. First time login password default
ACADEMIC TECHNOLOGY SUPPORT
 ACADEMIC TECHNOLOGY SUPPORT D2L Respondus: Create tests and upload them to D2L ats@etsu.edu 439-8611 www.etsu.edu/ats Contents Overview... 1 What is Respondus?...1 Downloading Respondus to your Computer...1
ecampus Basics Overview
 ecampus Basics Overview 2016/2017 Table of Contents Managing DCCCD Accounts.... 2 DCCCD Resources... 2 econnect and ecampus... 2 Registration through econnect... 3 Fill out the form (3 steps)... 4 ecampus
PowerTeacher Gradebook User Guide PowerSchool Student Information System
 PowerSchool Student Information System Document Properties Copyright Owner Copyright 2007 Pearson Education, Inc. or its affiliates. All rights reserved. This document is the property of Pearson Education,
Houghton Mifflin Online Assessment System Walkthrough Guide
 Houghton Mifflin Online Assessment System Walkthrough Guide Page 1 Copyright 2007 by Houghton Mifflin Company. All Rights Reserved. No part of this document may be reproduced or transmitted in any form
Outreach Connect User Manual
 Outreach Connect A Product of CAA Software, Inc. Outreach Connect User Manual Church Growth Strategies Through Sunday School, Care Groups, & Outreach Involving Members, Guests, & Prospects PREPARED FOR:
The Moodle and joule 2 Teacher Toolkit
 The Moodle and joule 2 Teacher Toolkit Moodlerooms Learning Solutions The design and development of Moodle and joule continues to be guided by social constructionist pedagogy. This refers to the idea that
2 User Guide of Blackboard Mobile Learn for CityU Students (Android) How to download / install Bb Mobile Learn? Downloaded from Google Play Store
 How to download / install Bb Mobile Learn? Downloaded from Google Play Store") 2 User Guide of Blackboard Mobile Learn for CityU Students (Android) Part 1 Part 2 Part 3 Part 4 How to download / install Bb Mobile Learn? Downloaded from Google Play Store How to access e Portal via
2 User Guide of Blackboard Mobile Learn for CityU Students (Android) Part 1 Part 2 Part 3 Part 4 How to download / install Bb Mobile Learn? Downloaded from Google Play Store How to access e Portal via
Creating an Online Test. **This document was revised for the use of Plano ISD teachers and staff.
 Creating an Online Test **This document was revised for the use of Plano ISD teachers and staff. OVERVIEW Step 1: Step 2: Step 3: Use ExamView Test Manager to set up a class Create class Add students to
WiggleWorks Software Manual PDF0049 (PDF) Houghton Mifflin Harcourt Publishing Company
 Houghton Mifflin Harcourt Publishing Company") WiggleWorks Software Manual PDF0049 (PDF) Houghton Mifflin Harcourt Publishing Company Table of Contents Welcome to WiggleWorks... 3 Program Materials... 3 WiggleWorks Teacher Software... 4 Logging In...
WiggleWorks Software Manual PDF0049 (PDF) Houghton Mifflin Harcourt Publishing Company Table of Contents Welcome to WiggleWorks... 3 Program Materials... 3 WiggleWorks Teacher Software... 4 Logging In...
/ On campus x ICON Grades
 Today s Session: 1. ICON Gradebook - Overview 2. ICON Help How to Find and Use It 3. Exercises - Demo and Hands-On 4. Individual Work Time Getting Ready: 1. Go to https://icon.uiowa.edu/ ICON Grades 2.
Getting Started Guide
 Getting Started Guide Getting Started with Voki Classroom Oddcast, Inc. Published: July 2011 Contents: I. Registering for Voki Classroom II. Upgrading to Voki Classroom III. Getting Started with Voki Classroom
Storytelling Made Simple
 Storytelling Made Simple Storybird is a Web tool that allows adults and children to create stories online (independently or collaboratively) then share them with the world or select individuals. Teacher
INSTRUCTOR USER MANUAL/HELP SECTION
 Criterion INSTRUCTOR USER MANUAL/HELP SECTION ngcriterion Criterion Online Writing Evaluation June 2013 Chrystal Anderson REVISED SEPTEMBER 2014 ANNA LITZ Criterion User Manual TABLE OF CONTENTS 1.0 INTRODUCTION...3
Preferences...3 Basic Calculator...5 Math/Graphing Tools...5 Help...6 Run System Check...6 Sign Out...8
 CONTENTS GETTING STARTED.................................... 1 SYSTEM SETUP FOR CENGAGENOW....................... 2 USING THE HEADER LINKS.............................. 2 Preferences....................................................3
MyUni - Turnitin Assignments
 - Turnitin Assignments Originality, Grading & Rubrics Turnitin Assignments... 2 Create Turnitin assignment... 2 View Originality Report and grade a Turnitin Assignment... 4 Originality Report... 6 GradeMark...
Connect Microbiology. Training Guide
 1 Training Checklist Section 1: Getting Started 3 Section 2: Course and Section Creation 4 Creating a New Course with Sections... 4 Editing Course Details... 9 Editing Section Details... 9 Copying a Section
Your School and You. Guide for Administrators
 Your School and You Guide for Administrators Table of Content SCHOOLSPEAK CONCEPTS AND BUILDING BLOCKS... 1 SchoolSpeak Building Blocks... 3 ACCOUNT... 4 ADMIN... 5 MANAGING SCHOOLSPEAK ACCOUNT ADMINISTRATORS...
Many instructors use a weighted total to calculate their grades. This lesson explains how to set up a weighted total using categories.
 Weighted Totals Many instructors use a weighted total to calculate their grades. This lesson explains how to set up a weighted total using categories. Set up your grading scheme in your syllabus Your syllabus
Beginning Blackboard. Getting Started. The Control Panel. 1. Accessing Blackboard:
 Beginning Blackboard Contact Information Blackboard System Administrator: Paul Edminster, Webmaster Developer x3842 or Edminster@its.gonzaga.edu Blackboard Training and Support: Erik Blackerby x3856 or
CHANCERY SMS 5.0 STUDENT SCHEDULING
 CHANCERY SMS 5.0 STUDENT SCHEDULING PARTICIPANT WORKBOOK VERSION: 06/04 CSL - 12148 Student Scheduling Chancery SMS 5.0 : Student Scheduling... 1 Course Objectives... 1 Course Agenda... 1 Topic 1: Overview
Introduction to WeBWorK for Students
 Introduction to WeBWorK 1 Introduction to WeBWorK for Students I. What is WeBWorK? WeBWorK is a system developed at the University of Rochester that allows professors to put homework problems on the web
DegreeWorks Advisor Reference Guide
 DegreeWorks Advisor Reference Guide Table of Contents 1. DegreeWorks Basics... 2 Overview... 2 Application Features... 3 Getting Started... 4 DegreeWorks Basics FAQs... 10 2. What-If Audits... 12 Overview...
EdX Learner s Guide. Release
 EdX Learner s Guide Release Nov 18, 2017 Contents 1 Welcome! 1 1.1 Learning in a MOOC........................................... 1 1.2 If You Have Questions As You Take a Course..............................
i>clicker Setup Training Documentation This document explains the process of integrating your i>clicker software with your Moodle course.
 This document explains the process of integrating your i>clicker software with your Moodle course. Center for Effective Teaching and Learning CETL Fine Arts 138 mymoodle@calstatela.edu Cal State L.A. (323)
Field Experience Management 2011 Training Guides
 Field Experience Management 2011 Training Guides Page 1 of 40 Contents Introduction... 3 Helpful Resources Available on the LiveText Conference Visitors Pass... 3 Overview... 5 Development Model for FEM...
Appendix L: Online Testing Highlights and Script
 Online Testing Highlights and Script for Fall 2017 Ohio s State Tests Administrations Test administrators must use this document when administering Ohio s State Tests online. It includes step-by-step directions,
ACCESSING STUDENT ACCESS CENTER
 ACCESSING STUDENT ACCESS CENTER Student Access Center is the Fulton County system to allow students to view their student information. All students are assigned a username and password. 1. Accessing the
Blackboard Communication Tools
 Blackboard Communication Tools Donna M. Dickinson E-Learning Center Borough of Manhattan Community College Workshop Overview Email from Communication Area and directly from the Grade Center Using Blackboard
Quick Reference for itslearning
 Quick Reference for itslearning Frequently Asked Questions... 2 How do I access itslearning?... 2 Who can I contact if I get a problem?... 2 Where can I get help?... 2 Can I get itslearning in my language?...
School Year 2017/18. DDS MySped Application SPECIAL EDUCATION. Training Guide
 SPECIAL EDUCATION School Year 2017/18 DDS MySped Application SPECIAL EDUCATION Training Guide Revision: July, 2017 Table of Contents DDS Student Application Key Concepts and Understanding... 3 Access to
EMPOWER Self-Service Portal Student User Manual
 EMPOWER Self-Service Portal Student User Manual by Hasanna Tyus 1 Registrar 1 Adapted from the OASIS Student User Manual, July 2013, Benedictine College. 1 Table of Contents 1. Introduction... 3 2. Accessing
Parent s Guide to the Student/Parent Portal
 Nova Scotia Public Education System Parent s Guide to the Student/Parent Portal Revision Date: The Student/Parent Portal is your gateway into the classroom of the children associated to your account. The
Moodle 3.2 Backup and Simple Restore
 Moodle 3.2 Backup and Simple Restore Center for Effective Teaching and Learning CETL Fine Arts 138 cetl@calstatela.edu Cal State L.A. (323) 343-6594 Table of Contents Create a Backup File of your Course...
TK20 FOR STUDENT TEACHERS CONTENTS
 TK20 FOR STUDENT TEACHERS This guide will help students who are participating in a Student Teaching placement to navigate TK20, complete required materials, and review assessments. CONTENTS Login to TK20:
Moodle MyFeedback update April 2017
 Moodle MyFeedback update April 2017 Jessica Gramp j.gramp@ucl.ac.uk Moodle My Feedback Report Allows students and staff to easily view grades & feedback across Moodle courses. It is available from Moodle.org
Longman English Interactive
 Longman English Interactive Level 3 Orientation Quick Start 2 Microphone for Speaking Activities 2 Course Navigation 3 Course Home Page 3 Course Overview 4 Course Outline 5 Navigating the Course Page 6
Test How To. Creating a New Test
 Test How To Creating a New Test From the Control Panel of your course, select the Test Manager link from the Assessments box. The Test Manager page lists any tests you have already created. From this screen
How To Enroll using the Stout Mobile App
 How To Enroll using the Stout Mobile App 1 Login Login using your user name and password. 2 Select Enrollment When you ve finished logging in, it will bring you to this page. Select enrollment. From here
Moodle Goes Corporate: Leveraging Open Source
 www.elearningguild.com Moodle Goes Corporate: Leveraging Open Source Michelle Moore, Remote-Learner.net 508 Moodle Goes Corporate: Leveraging Open Source Michelle Moore Open Source: What is it? Free redistribution
BLACKBOARD TRAINING PHASE 2 CREATE ASSESSMENT. Essential Tool Part 1 Rubrics, page 3-4. Assignment Tool Part 2 Assignments, page 5-10
 BLACKBOARD TRAINING PHASE 2 CREATE ASSESSMENT Essential Tool Part 1 Rubrics, page 3-4 Assignment Tool Part 2 Assignments, page 5-10 Review Tool Part 3 SafeAssign, page 11-13 Assessment Tool Part 4 Test,
Millersville University Degree Works Training User Guide
 Millersville University Degree Works Training User Guide Page 1 Table of Contents Introduction... 5 What is Degree Works?... 5 Degree Works Functionality Summary... 6 Access to Degree Works... 8 Login
Intel-powered Classmate PC. SMART Response* Training Foils. Version 2.0
 Intel-powered Classmate PC Training Foils Version 2.0 1 Legal Information INFORMATION IN THIS DOCUMENT IS PROVIDED IN CONNECTION WITH INTEL PRODUCTS. NO LICENSE, EXPRESS OR IMPLIED, BY ESTOPPEL OR OTHERWISE,
Managing the Student View of the Grade Center
 Managing the Student View of the Grade Center Students can currently view their own grades from two locations: Blackboard home page: They can access grades for all their available courses from the Tools
LMS - LEARNING MANAGEMENT SYSTEM END USER GUIDE
 LMS - LEARNING MANAGEMENT SYSTEM (ADP TALENT MANAGEMENT) END USER GUIDE August 2012 Login Log onto the Learning Management System (LMS) by clicking on the desktop icon or using the following URL: https://lakehealth.csod.com
TeacherPlus Gradebook HTML5 Guide LEARN OUR SOFTWARE STEP BY STEP
 TeacherPlus Gradebook HTML5 Guide LEARN OUR SOFTWARE STEP BY STEP Copyright 2017 Rediker Software. All rights reserved. Information in this document is subject to change without notice. The software described
Student Handbook. This handbook was written for the students and participants of the MPI Training Site.
 Student Handbook This handbook was written for the students and participants of the MPI Training Site. Purpose To enable the active participants of this website easier operation and a thorough understanding
Home Access Center. Connecting Parents to Fulton County Schools
 Home Access Center Connecting Parents to Fulton County Schools What is Home Access Center? Website available to parents (and at site discretion, students) that is a real-time look at student data The data
Donnelly Course Evaluation Process
 Donnelly Course Evaluation Process Contents Donnelly Course Evaluation Process... 2 The Rules... 2 From the Student Perspective... 3 From the Faculty Perspective... 7 From the Moodle Admin Perspective...
Test Administrator User Guide
 Test Administrator User Guide Fall 2017 and Winter 2018 Published October 17, 2017 Prepared by the American Institutes for Research Descriptions of the operation of the Test Information Distribution Engine,
Tour. English Discoveries Online
 Techno-Ware Tour Of English Discoveries Online Online www.englishdiscoveries.com http://ed242us.engdis.com/technotms Guided Tour of English Discoveries Online Background: English Discoveries Online is
Once your credentials are accepted, you should get a pop-window (make sure that your browser is set to allow popups) that looks like this:
 that looks like this:") SCAIT IN ARIES GUIDE Accessing SCAIT The link to SCAIT is found on the Administrative Applications and Resources page, which you can find via the CSU homepage under Resources or click here: https://aar.is.colostate.edu/
SCAIT IN ARIES GUIDE Accessing SCAIT The link to SCAIT is found on the Administrative Applications and Resources page, which you can find via the CSU homepage under Resources or click here: https://aar.is.colostate.edu/
Welcome to California Colleges, Platform Exploration (6.1) Goal: Students will familiarize themselves with the CaliforniaColleges.edu platform.
 Goal: Students will familiarize themselves with the CaliforniaColleges.edu platform.") Welcome to California Colleges, Platform Exploration (6.1) Goal: Students will familiarize themselves with the CaliforniaColleges.edu platform. Lesson Time Options This lesson requires one 45-60 minute
Welcome to California Colleges, Platform Exploration (6.1) Goal: Students will familiarize themselves with the CaliforniaColleges.edu platform. Lesson Time Options This lesson requires one 45-60 minute
Using Moodle in ESOL Writing Classes
 The Electronic Journal for English as a Second Language September 2010 Volume 13, Number 2 Title Moodle version 1.9.7 Using Moodle in ESOL Writing Classes Publisher Author Contact Information Type of product
Online ICT Training Courseware
 Computing Guide THE LIBRARY www.salford.ac.uk/library Online ICT Training Courseware What materials are covered? Office 2003 to 2007 Quick Conversion Course Microsoft 2010, 2007 and 2003 for Word, PowerPoint,
New Features & Functionality in Q Release Version 3.1 January 2016
 in Q Release Version 3.1 January 2016 Contents Release Highlights 2 New Features & Functionality 3 Multiple Applications 3 Analysis 3 Student Pulse 3 Attendance 4 Class Attendance 4 Student Attendance
Starting an Interim SBA
 Starting an Interim SBA January 26, 2015 DRAFT PowerPoint - 1.26.2015 by Laura Bay 1 Resources to help Start by visiting: www.wa.portal.airast.org which is the portal for SBA and MSP/EOC testing. This
RETURNING TEACHER REQUIRED TRAINING MODULE YE TRANSCRIPT
 RETURNING TEACHER REQUIRED TRAINING MODULE YE Slide 1. The Dynamic Learning Maps Alternate Assessments are designed to measure what students with significant cognitive disabilities know and can do in relation
Completing the Pre-Assessment Activity for TSI Testing (designed by Maria Martinez- CARE Coordinator)
") Completing the Pre-Assessment Activity for TSI Testing (designed by Maria Martinez- CARE Coordinator) Texas law requires students to complete the Texas Success Initiative Assessment or TSI for college
Completing the Pre-Assessment Activity for TSI Testing (designed by Maria Martinez- CARE Coordinator) Texas law requires students to complete the Texas Success Initiative Assessment or TSI for college
POWERTEACHER GRADEBOOK
 POWERTEACHER GRADEBOOK FOR THE SECONDARY CLASSROOM TEACHER In Prince William County Public Schools (PWCS), student information is stored electronically in the PowerSchool SMS program. Enrolling students
READ 180 Next Generation Software Manual
 READ 180 Next Generation Software Manual including ereads For use with READ 180 Next Generation version 2.3 and Scholastic Achievement Manager version 2.3 or higher Copyright 2014 by Scholastic Inc. All
Creating Your Term Schedule
 Creating Your Term Schedule MAY 2017 Agenda - Academic Scheduling Cycle - What is course roll? How does course roll work? - Running a Class Schedule Report - Pulling a Schedule query - How do I make changes
Spring 2015 Achievement Grades 3 to 8 Social Studies and End of Course U.S. History Parent/Teacher Guide to Online Field Test Electronic Practice
 Spring 2015 Achievement Grades 3 to 8 Social Studies and End of Course U.S. History Parent/Teacher Guide to Online Field Test Electronic Practice Assessment Tests (epats) FAQs, Instructions, and Hardware
How to set up gradebook categories in Moodle 2.
 How to set up gradebook categories in Moodle 2. It is possible to set up the gradebook to show divisions in time such as semesters and quarters by using categories. For example, Semester 1 = main category
Special Enrollment Petition (SEP): In-Absentia Enrollment
: In-Absentia Enrollment") Special Enrollment Petition (SEP): In-Absentia Enrollment Student navigation: CalCentral > Student Resources > Special Enrollment Petition link Advisors: Click a link in an email or CalCentral > Student
Special Enrollment Petition (SEP): In-Absentia Enrollment Student navigation: CalCentral > Student Resources > Special Enrollment Petition link Advisors: Click a link in an email or CalCentral > Student
U of S Course Tools. Open CourseWare (OCW)
") Open CourseWare (OCW) January 2014 Overview: Open CourseWare works by using the Public Access settings in your or Blackboard course. This document explains how to configure these basic settings for your
Open CourseWare (OCW) January 2014 Overview: Open CourseWare works by using the Public Access settings in your or Blackboard course. This document explains how to configure these basic settings for your
Shared Portable Moodle Taking online learning offline to support disadvantaged students
 Shared Portable Moodle Taking online learning offline to support disadvantaged students Stephen Grono, School of Education University of New England, Armidale sgrono2@une.edu.au @calvinbal Shared Portable
Course Groups and Coordinator Courses MyLab and Mastering for Blackboard Learn
 Course Groups and Coordinator Courses MyLab and Mastering for Blackboard Learn MyAnthroLab MyArtsLab MyDevelopmentLab MyHistoryLab MyMusicLab MyPoliSciLab MyPsychLab MyReligionLab MySociologyLab MyThinkingLab
Version August Student manual Osiris, Blackboard and SIN-Online
 Version August 2010 Student manual Osiris, Blackboard and SIN-Online Index I. MyEUR p. 2 II. Osiris p. 4 A. Enroll for courses and exams p. 5 B. Studyresults/-progress p. 6 III. Blackboard p. 7 A. Options
TotalLMS. Getting Started with SumTotal: Learner Mode
 TotalLMS Getting Started with SumTotal: Learner Mode Contents Learner Mode... 1 TotalLMS... 1 Introduction... 3 Objectives of this Guide... 3 TotalLMS Overview... 3 Logging on to SumTotal... 3 Exploring
An Introductory Blackboard (elearn) Guide For Parents
 Guide For Parents") An Introductory Blackboard (elearn) Guide For Parents Prepared: July 2010 Revised: Jan 2013 By M. A. Avila Introduction: Blackboard is a course management system widely used in educational settings. At
An Introductory Blackboard (elearn) Guide For Parents Prepared: July 2010 Revised: Jan 2013 By M. A. Avila Introduction: Blackboard is a course management system widely used in educational settings. At
Experience College- and Career-Ready Assessment User Guide
 Experience College- and Career-Ready Assessment User Guide 2014-2015 Introduction Welcome to Experience College- and Career-Ready Assessment, or Experience CCRA. Experience CCRA is a series of practice
SYLLABUS: RURAL SOCIOLOGY 1500 INTRODUCTION TO RURAL SOCIOLOGY SPRING 2017
 College of Food, Agricultural, and Environmental Science School of Environment and Natural Resources SYLLABUS: RURAL SOCIOLOGY 1500 INTRODUCTION TO RURAL SOCIOLOGY SPRING 2017 Course overview Instructor
Preparing for the School Census Autumn 2017 Return preparation guide. English Primary, Nursery and Special Phase Schools Applicable to 7.
 Preparing for the School Census Autumn 2017 Return preparation guide English Primary, Nursery and Special Phase Schools Applicable to 7.176 onwards Preparation Guide School Census Autumn 2017 Preparation
myperspectives 2017 Click Path to Success myperspectives 2017 Virtual Activation Click Path
 myperspectives 2017 Click Path to Success Click Path Overview Sign in to PearsonRealize.com. Click Sign In. Click to Discover Note that you can also use helpful resources on the PearsonRealize.com home
FACULTY Tk20 TUTORIALS: PORTFOLIOS & FIELD EXPERIENCE BINDERS
 FACULTY Tk20 TUTORIALS: PORTFOLIOS & FIELD EXPERIENCE BINDERS TABLE OF CONTENTS TOPIC PAGE PORTFOLIOS 2 Introduction 2 Student View 2 Faculty Administrator View 3 Accessing eportfolios from personal Faculty
PRD Online
 1 PRD Online 2011-12 SBC PRD Online What is it? PRD Online, part of CPD Online, will keep track of the PRD process for you, allowing you to concentrate on the quality of the professional dialogue. What
CENTRAL MAINE COMMUNITY COLLEGE Introduction to Computer Applications BCA ; FALL 2011
 CENTRAL MAINE COMMUNITY COLLEGE Introduction to Computer Applications BCA 120-03; FALL 2011 Instructor: Mrs. Linda Cameron Cell Phone: 207-446-5232 E-Mail: LCAMERON@CMCC.EDU Course Description This is
Justin Raisner December 2010 EdTech 503
 Justin Raisner December 2010 EdTech 503 INSTRUCTIONAL DESIGN PROJECT: ADOBE INDESIGN LAYOUT SKILLS For teaching basic indesign skills to student journalists who will edit the school newspaper. TABLE OF
Attendance/ Data Clerk Manual.
 Attendance/ Data Clerk Manual http://itls.saisd.net/gatsv4 GATS Data Clerk Manual Published by: The Office of Instructional Technology Services San Antonio ISD 406 Barrera Street San Antonio, Texas 78210
MAT 122 Intermediate Algebra Syllabus Summer 2016
 Instructor: Gary Adams Office: None (I am adjunct faculty) Phone: None Email: gary.adams@scottsdalecc.edu Office Hours: None CLASS TIME and LOCATION: Title Section Days Time Location Campus MAT122 12562
ADMN-1311: MicroSoft Word I ( Online Fall 2017 )
") ADMN-1311: MicroSoft Word I ( Online Fall 2017 ) Instructor Information Instructor Name Arnitria Hawkins-Taylor Instructor Rank Assistant Professor Instructor Email ahawkins@southwest.tn.edu Instructor
ADMN-1311: MicroSoft Word I ( Online Fall 2017 ) Instructor Information Instructor Name Arnitria Hawkins-Taylor Instructor Rank Assistant Professor Instructor Email ahawkins@southwest.tn.edu Instructor
FAU Mobile App Goes Live
 Back to School August 2011 IRM Newsletter Technology News for FAU Faculty and Students Summer at IRM Has Been Anything But Quiet! Whether you are new to FAU or returning to campus after a relaxing summer,
InCAS. Interactive Computerised Assessment. System
 Interactive Computerised Assessment Administered by: System 015 Carefully follow the instructions in this manual to make sure your assessment process runs smoothly! InCAS Page 1 2015 InCAS Manual If there
INTERMEDIATE ALGEBRA Course Syllabus
 INTERMEDIATE ALGEBRA Course Syllabus This syllabus gives a detailed explanation of the course procedures and policies. You are responsible for this information - ask your instructor if anything is unclear.
PART 1. A. Safer Keyboarding Introduction. B. Fifteen Principles of Safer Keyboarding Instruction
 Subject: Speech & Handwriting/Input Technologies Newsletter 1Q 2003 - Idaho Date: Sun, 02 Feb 2003 20:15:01-0700 From: Karl Barksdale To: info@speakingsolutions.com This is the
Naviance / Family Connection
 Naviance / Family Connection Welcome to Naviance/Family Connection, the program Lake Central utilizes for students applying to college. This guide will teach you how to use Naviance as a tool in the college