Indiana Online Testing Guide. Updated 10/19/2017
|
|
|
- Sandra Waters
- 6 years ago
- Views:
Transcription


1 Indiana Online Testing Guide Updated 10/19/2017
2 Table of Contents Introduction... 6 Indiana ISTEP+ and IREAD-3 Resource Center... 6 Timeline of Important Events for PearsonAccess next System Basics... 6 Logging In... 7 Exporting and Importing Data... 8 Managing Organizations... 8 Managing Users... 9 Managing Students Student Data Student Transfer Process Managing Sessions Accessing Reports TestNav 8 and ProctorCache Download TestNav Configuring a Secondary Saved Response File Download ProctorCache Precaching Test Content Accommodations Calculator and Text-to-Speech Setting Calculator Accommodation Other Accommodations Accommodations Report Pre-Test Administration Tasks Tasks for Organizations Local Infrastructure Trials (November 1 10) Requesting Paper-Pencil Tests & Online / Paper-Pencil Mode Selection (November 1 17) Required Tasks to be completed for Mode Selection Verify Contact Information Indicating Testing Mode for ISTEP+ Part 1 & Part 2, Grade 10 Winter Retest, and IREAD Selecting Sort Order
3 Technology Requirements Introduction PearsonAccess next TestNav ProctorCache Special Tips for Chromebooks Top 10 Avoidable Errors Local Infrastructure Trial Instructions Step 1: Log in to the PearsonAccess next Training Site Step 2: Technology Setup Step 3 (As Needed): Generate Sample Students Step 4 (As Needed): Create a Session Step 5: Precache Content Step 6: Manage Sessions Step 7: Create and Print Student Testing Tickets Step 8: Student Login Step 9: Manage Test Sessions Step 10: Mark Student Tests Complete Step 11: After the Local Infrastructure Trial Stopping a Session Step 12: Evaluation The Statewide Readiness Test Online Practice Test Before Administering the Online Practice Test Online Experience Items Tasks During Test Administration Material Management and Additional Materials Order Guidelines Student Transfer Process How to Create a Work Request for Transfer Students Manage Online Tests During Testing Unlock or Lock a Test Retrieve Student Test Tickets and Seal Codes TestNav 8 Testing Features
4 Resume and Resume Upload When to Resume vs. Resume Upload Reviewing Student Test and Item Progress Post-Test Procedures Marking Tests Complete Invalidating Test Sections or Marking as Do Not Report Removing Student Tests in Ready Status Stop Test Sessions Tasks After Test Administration Rejected Test Attempts Cleanup Process Demographic Mismatch: Failed Validations: Undetermined Results Resolution Guide Locating Students with Undetermined Status Results Understanding and Researching Undetermined Status Reviewing Details for Undermined Status on Student Tests Undetermined Status Results Submitting Undetermined Status Resolutions to Pearson Reporting Groups Manage Reporting Groups Entering Data with Import / Export in PearsonAccess next Updating User Reporting Groups Appendix 1 Statewide Readiness Test Appendix 1.1 Statewide Readiness Test IT Checklists Appendix Before the Statewide Readiness Test IT Checklist: Appendix During Statewide Readiness Test IT Checklist Appendix After the Statewide Readiness Test IT Checklist Appendix 1.2 Statewide Readiness Test CTC & STC Checklists Appendix Before the Statewide Readiness Test: Appendix During the Statewide Readiness Test Appendix After the Statewide Readiness Test Appendix 1.2 Statewide Readiness Test Examiner and Proctor Checklists
5 Appendix Before the Statewide Readiness Test: Appendix During the Statewide Readiness Test Appendix After the Statewide Readiness Test Appendix 1.3 Statewide Readiness Test (SRT) Test Administration Script Appendix 2 Critical Task Checklist Appendix 2.1 Online Testing Critical Tasks Checklist Appendix 3 Practice Test Appendix ISTEP+ and IREAD-3 Online Practice Test Setup Instructions for Corporation & School Test Coordinators Appendix Before Administering the Online Practice Test: Appendix 4 - Exercises Appendix 4.1 Exercises for Test Administration Training Access the Training Site Exercise Exercise Exercise Exercise Exercise Exercise Indiana Support Number Helpful Links
6 Introduction This document s purpose is to provide Indiana Specific information regarding ISTEP+ and IREAD-3 test administrations. Additional links may be found to PearsonAccess next Online User Guide and other resources. Indiana ISTEP+ and IREAD-3 Resource Center The Indiana ISTEP+ and IREAD-3 Resource Center. It is our centralized location for all of the information you need for this testing season. It has links directly to PearsonAccess next, as well as Technology, Training, and Reporting Resources. It contains all of the latest bulletins and access to Support contact information. This is a public site and does not require a login. Timeline of Important Events for The Timeline of Important Events for is available to download from The Indiana Resource Center as a.pdf file. This document outlines key dates for training, Local Infrastructure Trials, deadlines, requests, practice, and testing. For more information: Indiana ISTEP+ and IREAD-3 Resource Center Bulletins PearsonAccess next System Basics In the System Basics section, information will be provided about how to manage accounts, navigate the system layout and utilize the search filters that appear throughout PearsonAccess next. For more information: PearsonAccess next System Basics This section outlines some of the basic information for use of the PearsonAccess next system including: Logging In Importing and Exporting Data Managing Organizations Managing Users Managing Students Managing Sessions Starting Sessions Reporting 6

7 Logging In A user account is required to access PearsonAccess next. The Corporation Test Coordinator (CTC) or School Test Coordinator (STC) can create additional user accounts as needed. When a new account is created, an is sent to the new user with directions on how to access the system. Users with access to a training site will use the same login information to access both sites. The user ID, which this system calls "username," is not case sensitive. The password is case sensitive. PearsonAccess next Operational Site PearsonAccess next Training Site Step 1: Getting Started A. Using the supported internet browser of your choice, go to either: for Training Site for the Operational Site B. Click the green Sign In button in the upper right on the page. Step 2: Entering username and password. A. In the field labelled Username, type your username (not case sensitive). B. In the field labelled Password, type your password (case sensitive). C. Click the blue Login button. 7
8 Exporting and Importing Data Large data files can be downloaded (exported) or uploaded (imported) into the system. A CTC will have the options for: Student Registration Export User Export and User Import Enrollment Transfer Export and Import Student Test Reporting Group Export User Reporting Group Export For more information go to For detailed descriptions of the various Import/Export data files, including formatting visit For more information: Data File Descriptions Managing Organizations An organization is an entity in a customer's organizational structure or hierarchy. For example, a state, a corporation, and a school are all considered organizations. An organization must exist in the system before that organization can participate in testing or test-related activities. The organizational hierarchy provides a backbone or a framework that gives structure to the data that will be stored in the system. For example, all students, administrators, and teachers in the system must belong to an organization. Only after the organizational hierarchy is built can student data and user accounts be uploaded. For this reason, building the organizational 8
9 hierarchy is one of the first tasks. The hierarchy of categories for organizations is created based on the corporation s defined requirements for the testing program. Only one hierarchy is allowed for each school corporation. This hierarchy is unique to that corporation and must be used by all schools within the organization. Here is an example: IDOE Corporation 1 Corporation 2 School 1 School 2 School 1 School 2 A user s level in the hierarchy determines the features of PearsonAccess next to which that user has access. After the organizational hierarchy is defined, program-specific data can be uploaded. Common tasks for managing organizations include: Creating and Editing Organizations Deleting Organizations Managing Contacts For more information: Manage Organizations Managing Users User accounts are the primary method for granting and preventing access to the system. All user accounts are assigned to at least one organization. User accounts also contain a user's personal and system-related information, such as his or her user ID and address. The organization to which a user account belongs defines what data the user will be able to view and manage. Each user account has user roles and a set of permissions associated with it. A user can access data only for his or her assigned organizations and the data for any organizations lower in the hierarchy. For example, if the user account is assigned to a school, the user has access only to data for that school. If the user account is assigned to a corporation, the user can access corporation data, in addition to data from all of the schools assigned to that corporation. When assigning roles, a good security policy is to assign roles only to people who need to perform the tasks granted by those roles. This requires some thoughtfulness in making sure that 9
10 staff members have the ability to perform the tasks they will need, without granting extensive access to student data they otherwise don t require. The Family Educational Rights and Privacy Act (or FERPA) restricts access to some student data. For more information: Manage Users User Roles Matrix User Roles Upload Template Managing Students Students are the test-takers within an organization. Student data refers to student demographic data and test-related information. Student data must be entered into the system before students can be assigned to a test (online or paper). Student data and student registrations are pre-loaded into PearsonAccess next. Students can be transferred to your corporation within PearsonAccess next, and all of their data will follow them. If a student enrolls in a school within your corporation from out of state, you need to add that student to the system. NOTE: The only time you manually add a student is when that student has entered your corporation from out of state after the initial student data load this fall or the student has transferred from a homeschool. For more information: Manage Students Student Data PearsonAccess next contains three types of student data. Level 1: This data is static (permanent). Examples of Level 1 student data include, but are not limited to, name, date of birthday, sex. Level 2: This data is information that changes based on a specific point in time. Examples of level 2 Student data include, but are not limited to, age and grade. Level 3: This information is student data generated for a specific test. Level 3 data includes information on Accommodations. For more information regarding editing student data visit Student Transfer Process When a student transfers into your school from another school within the state, one of the following processes must be followed. Two methods are used for the transfer. One method is using the file import / export features to transfer multiple students at once. The manual method is used for small numbers of transfer students. You will not be able to register a transfer student in your organization until the Student Transfer Process has taken place. For detailed steps, please reference Tasks During Administration in this document. 10
11 Managing Sessions When students are loaded into the operational site, they are assigned to online test sessions. A test session consists of the specific section of the test administration. Students are assigned to a session. For more information: View or Edit an Online Test Session Manage Online Test Sessions Add Students to Online Test Sessions Move Students Between Online Test Sessions NOTE: Student Testing Tickets should be printed, separated, and organized well in advance of the first day of testing by the Corporation or School Test Coordinator. Student Testing Tickets can be also be accessed by Examiner and Proctor user roles; however, Student Testing Tickets and Seal Codes are secure test materials and must be stored and handled securely. NOTE: Because printing Student Testing Tickets and Seal Codes can be done only one session at a time, starting each session as these steps are completed will help to keep track of your progress. You are better off completing these tasks while live testing is not in progress to maintain proper attention to the current day s activities. For more information: Test Tickets and Seal Codes Accessing Reports Several different types of reports are available on PearsonAccess next. They can be accessed by clicking Reports from within PearsonAccess next. Published Reports detail the outcomes of individual student assessments and provide summary results of student groups within the customer organization. A report must be downloaded to view it. OnDemand Reports are online reports that detail the outcomes of students assessments in real time. Depending on the selected filters, report details vary. The two types of OnDemand reports are: The Student Detail Report displays each student s assessment details, including graphs, overall score, and sub-scores. The Student List Report displays all the students and their assessment details based on the selected filters. Operational Reports are available for a variety of different operational functions. 11
12 New! An Accommodations report is now available to identify all student Accommodations. The report pulls data directly from the user interface in PearsonAccess next, so any updates in the system are reflected in the report each time it is generated. For more information: TestNav 8 and ProctorCache Download TestNav 8 TestNav 8 has been updated since the Spring and Summer 2017 ISTEP+ and IREAD-3 test administrations and needs to be reinstalled. You need to install the new version of TestNav 8 even if you are using the same computers as last year. NOTE: Regarding ios, Pearson updated the TestNav 8 App as of August 8, If TestNav 8 was last updated before this date, it must be updated to the latest version prior to testing. For Mac OS X, Windows, and Linux, the install needs to be downloaded from Two options are available for Microsoft Windows:.msi, which is optimized for network installation.exe, which is for installing on individual computers Configuring a Secondary Saved Response File Primary Saved Response Files (.SRF) are managed by the TestNav 8 application and TestNav 8 log files are managed by the configuration in PearsonAccess next. Creating secondary save locations is a critical step in preparing for a successful online testing experience. CTCs must confirm with local IT staff that secondary save locations have been configured prior to the test administration for the Local Infrastructure Trial, the Statewide Readiness Test, and Operational Tests to ensure successful capture of student responses. For Windows, Mac, and Linux testing machines, you may use a network share or an SFTP server as your secondary response file (SRF) location. For Android, ios, or ChromeOS you must utilize an SFTP server for a SRF file location. For more information: cations Download ProctorCache ProctorCache is a Pearson supplied software that is used to reduce internet bandwidth needed for online testing and accelerate the delivery of test content to the students. ProctorCache is required by IDOE because of the much improved online testing experience it provides. The software a can be downloaded for Windows and Mac OS X at 12
13 These are NEW versions since last year, so if you have previously installed ProctorCache, you should purge your old content, uninstall your previous version, and then reinstall the updated software. The previous version of ProctorCache will function correctly, but it is recommended that the newest version is used. For more information: Download ProctorCache Precaching Test Content After test sessions are created and students are added to the sessions, Corporation IT Coordinators (CITCs), School IT Coordinators (SITCs), CTCs, or STCs can precache test content. Multiple sessions and ProctorCache servers can be precached simultaneously. If additional servers or sessions are added after precaching, they must be precached separately. Be sure to include all servers and sessions at the school and corporation level, if applicable, and whether your access rights allow. For more information: Accommodations Calculator and Text-to-Speech For a student to receive the Text-to-Speech (TTS) or Calculator Accommodations, the correct checkboxes must be selected in PearsonAccess next before starting the test session. NEW! Starting in January, Calculator Accommodations will be assigned in the Personal Needs Profile section in PearsonAccess next. This new functionality eliminates the need for a Calculator Form Group Type. When implemented for the Spring 2018 ISTEP+ Test Administrations, students with or without TTS Accommodations and Calculator Accommodations can be tested in the same session, providing greater flexibility for session planning and logistics. Setting Calculator Accommodation Step 1: Getting Started A. Click the drop-down menu under Setup. B. Select Students. Step 2: Selecting the students who require the Calculator Accommodation A. Enter the last name of the student in the Find Students search field. B. Click Search. C. Mark the checkbox that corresponds with student. D. Click the Select Tasks drop-down menu. E. Mark the checkbox next to Manage Student Tests. F. Click Start. Step 3: A. Mark the checkbox next to Calculator under Accommodations. 13
14 B. Click Save. C. Repeat for each Student listed on the left under Student Tests. D. When finished Click Exit Tasks. NOTE: The student may be placed in a regular session. When the test starts, that student will have the appropriate Accommodation. Other Accommodations Other Accommodations, such as Large Print, IEP Paper Accommodation, Extended Time, Braille, Special Education, and Read Aloud (Paper) are selected here as well. These will not affect an online test, but they are used for tracking and reporting purposes or for Paper-Pencil testing. Accommodations Report New! If you want to see a report of all Accommodations in your school, you can run an Accommodation Report. Step 1: Getting Started A. Click the drop-down menu under Reports. B. Select Operational Reports. C. Mark the checkbox Students & Registrations. D. From the list on the right, click Accommodation Report. 14
15 Tasks for Organizations Pre-Test Administration Tasks Local Infrastructure Trials (November 1 10) New! Each school is required to conduct a Local Infrastructure Trial. The Local Infrastructure Trial (not the Statewide Readiness Test) is what each school must use to assess online testing capacity. The Statewide Readiness Test is not a factor in determining Paper-Pencil or online testing status. For Spring 2018 only schools that are testing online will participate in the Statewide Readiness Test (SRT) as a final check of local testing infrastructure and Pearson s systems. NOTE: Do not wait until the Statewide Readiness Test to try to determine your online testing capacity. All requests to test on paper, with the exception of the Grade 10 Winter Retest, must be made this fall, following completion of a Local Infrastructure Trial. Each school needs to conduct a Local Infrastructure Trial for confirmation that its site has the capacity for online testing, including verification of the following items: Your school has the capacity to test online TestNav 8 is configured correctly Devices can successfully run TestNav 8 Local networks are capable of handling the computer-based assessments Participating staff know how to administer the computer-based assessments NOTE: Students are not required to participate in your Local Infrastructure Trial. The trial is the only opportunity to determine whether your school has the capacity to test online for all test administrations (ISTEP+ Part 1, ISTEP+ Part 2, IREAD-3, ISTEP+ Winter Retest). If, during the trial, you determine that your school does not have the capacity to test online, you will have an opportunity to request Paper-Pencil tests. Instructions for completing a Local Infrastructure Trial will be included as part of the Technology Readiness Training and the Test Administration Training sessions. For a complete set of step-by-step instructions see Local Infrastructure Trial Instructions below. 15
16 Requesting Paper-Pencil Tests & Online / Paper-Pencil Mode Selection (November 1 17) From November 1 through 17, after you have completed a Local Infrastructure Trial, you will need to log in to PearsonAccess next to verify your contact information. For , the expectation is that all students will test online for the ISTEP+ Grade 10 Winter Retest, ISTEP+ Part 2 and IREAD-3. This excludes any student who has paper format as a testing accommodation, as formally documented in an IEP, ILP, or Section 504 Plan. For ISTEP+ Part 1, the Department is recommending that at least two-thirds of students within a corporation or school test online For Spring 2018, during the Mode Selection Window (November 1-17), the CTC will mark grade levels requesting Paper Testing mode for each test administration in PearsonAccess next via the Organizations > Manage Participation screen. Schools will be defaulted for Online Testing mode. Schools that select Paper Testing mode for any grade levels for ISTEP+ Part 2, IREAD- 3, and/or more than one-third of students/grade levels for ISTEP+ Part 1 are required to complete a Waiver Request Form for Paper Testing mode approval. No selections need to be made for schools planning to test all students online for all test administrations. Waivers will be granted for corporations and/or schools that demonstrate significant technology capacity issues that prevent them from meeting the online testing expectations in There are three options for requesting an online testing waiver: Pathway 1: Lack of Testing Devices Pathway 2: Lack of Network Stability Pathway 3: Lack of Instructional Technology Implementation Please see below for important dates pertaining to the waiver request process: September 11-22: Waiver request window for the ISTEP+ Grade 10 Winter Retest only October 16 (on or before): Final determinations for Paper/Pencil mode approvals posted for the ISTEP+ Grade 10 Winter Retest November 1-10: Local Infrastructure Trials (Note: A local infrastructure trial will be required to request a Pathway 2 waiver for Spring assessments.) November 1-17: Waiver request window for Spring 2018 assessments January 8 (on or before): Final determinations for Paper/Pencil mode approvals posted for Spring 2018 assessments Required Tasks to be completed for Mode Selection The directions below are divided into the following three sections: Verify Contact Information Indicate Testing Mode Complete and submit the Waiver Request Form, if applicable Select Sort Order The window to complete the tasks outlined in these directions is November

17 Verify Contact Information Each selected organization will appear in a list on the left side of the page. Select an organization, and address type, to display the contact information currently available in PearsonAccess next. If the information is incorrect, you will need to communicate changes to the Indiana Department of Education via DOE Online. The IDOE will send information to Pearson to be updated in PearsonAccess next. Indicating Testing Mode for ISTEP+ Part 1 & Part 2, Grade 10 Winter Retest, and IREAD-3 NOTE: For the Grade 10 Winter Retest, all schools are expected to test online unless prohibited by technology challenges. If your school has significant technology issues that will limit your ability to test online, a Waiver Request Form must be submitted. The window for requesting paper for the Grade 10 Winter Retest is September 11 22, Make sure you select the proper test administration upon which you want to work. You will need to repeat these steps for both ISTEP+ and IREAD-3 administrations. You can do this by clicking the Administration drop-down menu in the top right of the screen in PearsonAccess next. Step 1: Select Proper Test Administration 17


18 Once you are on the Organizations page, select the school from the list of available schools by marking the checkbox to the left of the school name. To see all of the schools, select Show all results in the Search drop-down tab. Remember, you can select multiple schools and each school will be listed as a separate line item within the task page. Step 2: Select schools A. Mark checkbox to the left of the school name. B. Select Manage Participation from Select Tasks. C. Next, select Start to continue with the task. Step 3: Indicate Testing Mode for ISTEP+ Part 1 and ISTEP+ Part 2 or IREAD-3 The Participation screen should look similar to this image. Select the Participating checkbox. This indicates you are participating in the chosen administration. A. All schools are defaulted to Online Testing mode. Select Paper Testing or Online Testing as appropriate for each grade in the selected organization. If you have multiple organizations listed, each will have its own line on the left, and you repeat this step for each. 18
 are responsible for determining the Sort Order of the pre-id labels on ISTEP+ and IREAD-3.")
19 As a reminder, the Local Infrastructure Trial will determine a schools capacity to test online, NOT the Statewide Readiness Test. Selecting Sort Order Step 1: Choose Your Pre-ID Label Sort Order NOTE: Corporation Test Coordinators (CTCs) are responsible for determining the Sort Order of the pre-id labels on ISTEP+ and IREAD-3. You need to repeat these steps in both test administrations. The default Sort Order is automatically selected and used unless you choose Sort Option 2. OPTION 1 DEFAULT OPTION 2 Corporation Corporation School School Grade / Subject Grade / Subject Session Name Student Last Name 19

20 Student Last Name Student First Name Student First Name A. From the Student Barcode Sort Order Options drop-down menu select your organizations preferred Sort Order. B. Click Save. 20
21 21
: The preliminary count is based on the enrollment numbers initially submitted to the state.")
22 Step 2: Enrollment Counts New! On the Edit Enrollment Counts screen schools can find several enrollment numbers that reflect enrollment counts at different stages of the process. Preliminary Count (Static): The preliminary count is based on the enrollment numbers initially submitted to the state. If a school did not submit enrollment counts to the state a preliminary enrollment count number will not appear on the Edit Enrollment Counts screen. The Preliminary Count is loaded to the system in September for all test administrations. Student Registration Count (Static after dates below): The registration count appears above the Student Registration Import (SRI) count and is a static number that reflects the number of students that were submitted on the DOE-TL as well as any additional student registrations as of the date listed below for each test administration. The number that appears in the system for each test administration listed below reflects the number of registrations Pearson exports to generate materials for shipping: Grade 10 Retest: 10/16/2017 ISTEP+ Part 1: 1/19/2018 IREAD-3: 1/22/2018 ISTEP+ Part 2: 2/28/
23 SRI Count (Incremental): The Student Registration Import (SRI) number changes incrementally. The SRI number is based on what was provided to Pearson from the DOE-TL file as well as changes to registration numbers in the system. The counts labelled as SRI reflect the actual number of paper materials you need for testing based on current student registrations. This number may differ from the static registration count above. NOTE: If the top box (current registrations) is more than the SRI number then the user will need to order the difference as an Additional Materials Order (AMO). If the top box is less than the SRI number then the difference represents an overage that you will receive. Technology Requirements Introduction This section addresses various technology requirements for the Pre-Test Administration tasks. The three main parts of online test are: PearsonAccess next TestNav 8 ProctorCache NOTE: All schools are required to test online unless a significant technology issue can be demonstrated. It is imperative that all technology requirements are met and that schools ensure proper technology configuration prior to testing. If you anticipate challenges for online testing or encounter issues, it is critical that you submit an electronic request with the link at the bottom of each page on the Indiana ISTEP+ and IREAD-3 Resource Center or the homepage of PearsonAccess next and begin working through any IT issues. Electronic Help Request: PearsonAccess next This section covers system requirements for PearsonAccess next. Pearson continually monitors and evaluates the recommended and supported software requirements. As vendors release newer versions of their products, the recommended operating systems and browsers are updated accordingly. Test Admin PearsonAccess next Version Grade 10 Winter Retest PearsonAccess next 4.2 ISTEP+ Part 1 and Part 2 PearsonAccess next 4.3 IREAD-3 Spring and Summer PearsonAccess next 4.3 PearsonAccess next System Requirements: 23
24 TestNav 8 TestNav 8 is the secure application used by students participating in computer-based testing. A student authorization ticket printed from PearsonAccess next provides students the information necessary to access TestNav 8. A plan for tracking the computers or devices on which students test should be developed by Corporation and School Test Coordinators. Students testing on tablets and Chromebooks must complete the entire test on the same device. Likewise, students using the same computer to complete the tests also is a best practice. TestNav 8 current capabilities include a wide range of tools and features (see TestNav 8 Current Capabilities table on the page that follows). TestNav 8 uses App Check to confirm that the device or computer can connect to TestNav and that it is configured to start TestNav in Kiosk mode. An optional configuration identifier may be entered to validate additional TestNav configurations from PearsonAccess next. Test Admin TestNav 8 Version Grade 10 Winter Retest TestNav 8.9 ISTEP+ Part 1 and Part 2 TestNav 8.10 IREAD-3 Spring and Summer TestNav 8.10 TestNav 8 System Requirements: TestNav 8 Download ProctorCache ProctorCache is Pearson-supplied software that allows schools to precache test content to a local network prior to administering the test. ProctorCache reduces the burden on Internet service providers (ISPs) and Internet connections by eliminating redundancy in requests for test content. ProctorCache stores an encrypted local copy of all precached tests on a designated computer on the Local Area Network (LAN). When students are ready to begin testing, TestNav 8 then has only to download the test from the LAN, rather than each student downloading the test data from the Internet. These are NEW versions since last year, so if you have previously installed ProctorCache, you should purge your old content, uninstall your previous version, and then reinstall the updated software. The previous version of ProctorCache will function correctly, but it is recommended that the newest version is used. For more information: ProctorCache System Requirements To use ProctorCache, the software must be downloaded and installed. The requirements do not preclude use of a desktop or laptop computer. A server class computer and Operating Systems can also be used, but are NOT required. The minimum required amount of RAM is 2 GB. ProctorCache can run on both Windows and Mac operating systems. ProctorCache is compatible with Windows 7, 8, 10, Windows Server 2008, and Windows Server For Macintosh, it is compatible with OS X 10.7, 10.8, 10.9, 10.10, and macos ProctorCache uses TCP Ports 80 and 443 for communication between the ProctorCache 24
25 machine and the Pearson servers, and ports 4480 and 4481 for communication between testing workstations and the ProctorCache machine. This means TCP ports 80, 443, 4480, and 4481 must be opened and directed to the IP address of the computer that is to be used as the ProctorCache. It is possible to set custom ports for ProctorCache. In that case, those specific ports should be opened and not 4480 and Your Organization s IT contact may be able to assist with correctly configuring ProctorCache. Because testing workstations must know a predictable network location for the ProctorCache machine, ProctorCache requires a fixed internal IP address. Those corporations that require Internet traffic to pass through an upstream proxy server must configure ProctorCache to point to their proxy server. For details on setting up an upstream proxy, refer to the Upstream Proxy Configuration section in the ProctorCache setup instructions. For more information: Download ProctorCache 25
26 Special Tips for Chromebooks Setting up a secondary save location in PearsonAccess next o When setting up your ProctorCache in PearsonAccess next creating secondary save locations is a critical step in preparing for a successful online testing experience. CTCs must confirm with local IT staff that secondary save locations have been configured prior to the test administration to ensure successful capture of student responses. For Windows, Mac, and Linux testing machines, you may use a network share or an SFTP server as your secondary response file (SRF) location. For Android, ios, or ChromeOS you must utilize an SFTP server for a SRF file location. Backup+Locations Checking your managed Chromebook settings o Prior to testing, check your managed Chromebook settings to ensure that everything is properly set for your environment and that all student Chromebooks being used for testing are properly enrolled and managed. NOTE: Take extra precautions to ensure that your Chromebooks are not set to erase data when rebooted, because this setting can cause issues during testing. For more information, consult the Setup TestNav on Chrome OS site listed below. Ensuring your wireless access points can support the number of Chromebooks used o If you notice a large number of dropped connections or network connection errors, make sure your Wireless Access Point can support the number of Chromebooks that are connecting to it at the same time. If you have a Wireless Access Point in each room and still are experiencing issues, ask your IT staff to confirm that the Chromebooks are connecting to the Access Point in the room and not to another nearby access point. For more information or concerns about local wireless setup, please consult with your local IT staff. Properly exiting the test after completing sections o Whenever students will be away from their Chromebook after completing a section, be certain they properly exit the test by clicking on the Account icon at the top right of the screen and choosing Sign Out of TestNav. If the student exits by clicking the red X in the upper right corner or otherwise closes the Chromebook without completing this process, it can cause issues communicating properly with Pearson. NOTE: This issue also can occur if the student leaves the Chromebook open but logged in, and the device then goes to sleep. Create a tracking log for testing devices o Keeping records during testing to specifically determine which students use which devices is imperative to resolve potential errors and assist in troubleshooting. This solution does not have to be computer-based. Something as simple as a paper notebook with a written record that can referenced if needed is sufficient. NOTE: See the following sites for setup instructions and system requirements:
27 Top 10 Avoidable Errors Error Number Error Message Unable to connect to the ProctorCache computer. Please contact your administrator. Please use the TestNav 8 app to take this test. This browser does not support secure test. You must use the TestNav 8 app to take this test. TestNav 8 Chrome app supports secure tests only on a Chromebook in Kiosk mode. How to Avoid If the "ProctorCache Override" checkbox is enabled in TestNav Configuration, the student's machine will "bypass" ProctorCache in the event that they are not able to communicate with ProctorCache at the time of login. TestNav 8 usually displays this error because of network connectivity problems. Verify the network connection and try again. If you cannot connect after the second attempt, close TestNav 8. A network administrator may help you to resolve these issues by confirming the following: Network Testing machine is connected to the school's network Ethernet cables or wireless connections, routers, and switches are in place and functioning Proctor caching computer is on and running Both ports 4480 and 4481 are open in the firewall on the ProctorCache computer Testing machine is on the same network subnet as the proctor caching computer TestNav 8 configuration on administrative site Administrative site has the accurate IP address and port configurations for the ProctorCache computer After you restore the connection, check the student's test status in the administrative application and reset, if needed. Then, resume the student's testing session and have the student log in. Use the TestNav 8 App to take this test. This browser does not support secure test. User downloaded the TestNav 8 App from the Chrome Web Store (chrome.google.com/webstore) while on ChromeOS rather than going to download.testnav.com to get the ChromeOS App. Need to use the supported version for the Desktop App. User downloaded the TestNav 8 App from the Chrome Web Store (chrome.google.com/webstore) rather than going to download.testnav.com to get the Desktop App (for Windows or Mac). Need to use the supported version for the Desktop App. Kiosk Mode needs to be configured in the Chrome Management Console (if managed). 27
28 You cannot lock the device. Please contact your proctor. The installed app is out of date and needs to be updated to use TestNav 8 on this device. Unable to save response file (at beginning of test) There was an error launching the Java applet. Please ask your proctor for assistance. Pop-ups are currently blocked for this site. Please enable popups for TestNav 8 to function correctly and refresh your browser. Java has not been installed on this machine and is required. Please install Java and then refresh this browser page to log in. To configure the device, refer to the Setup and Use TestNav 8 instructions. This message applies to ios and Android. The student or proctor is choosing to Not Confirm Self-Lock rather than selecting 'yes'. Update the App Users are trying to access to TestNav 8 using v1.4.x (2017). The designated location for saving a response file (as a backup in case of network interruption) is not writable. TestNav 8 cannot connect to the servers, or cannot save the Saved Response File after the test content has been viewed. Click Exit Test and contact your local technical support to determine why the save locations are not working and there is a loss of connectivity. Resume the student or contact your school assessment coordinator to resume the student. The student should log in and continue testing. Use the Desktop App. User tried to take the test with the browser. Use the Desktop App. Use the Desktop App. 28
29 Local Infrastructure Trial Instructions The purpose of this section is to help you complete the steps necessary to successfully conduct a local Infrastructure Trial. Some tasks may require assistance from your Technology Coordinator. The Local Infrastructure Trial itself should take no more than minutes to administer. Conducting a Local Infrastructure Trial is required. You should utilize a sample of every type of device used for testing. For the school year, capacity for online testing is assessed through the completion of a Local Infrastructure Trial. In previous years the Statewide Readiness Test helped to determine online capacity. For Spring 2018 online testing, the Statewide Readiness Test is a final readiness check for all schools that are scheduled to test online. Do not wait until the Statewide Readiness Test to try to determine your online testing capacity. The SRT is a final check of local technology configurations and devices prior to live testing for schools that are scheduled to test online. The SRT is not a factor in determining paper or online for testing status, but rather the Local Infrastructure Trial in November is the determining factor for Paper-Pencil and online testing. All devices that are going to be used for live testing should be included in the SRT. All requests to test on Paper-Pencil, with the exception of the Grade 10 Winter Retest, must be made this fall, following completion of a Local Infrastructure Trial. September is the paper request window for Grade 10 Winter Retest. NOTE: Again, do not wait until the SRT to determine your capacity for online testing. Please check with your Corporation Test Coordinator to see if your Local Infrastructure Trial will be performed from a corporation level, or a school level. You will need to verify that all staff members participating in the trial have received usernames and passwords for the PearsonAccess next training site. Any staff participating as testers will not need PearsonAccess next usernames. They will receive TestNav 8 login credentials through a testing ticket. Step 1: Log in to the PearsonAccess next Training Site The training site is where the Local Infrastructure Trial tests will be located. You will conduct your required Local Infrastructure Trial using the training site. The training site is distinguished by a brown header, which is visible after you log in to the site. Once you have logged in to PearsonAccess next, be sure you are in the Infrastructure Trial test administration. Select the Infrastructure Trial from the drop-down menu at the top of the page. The Local Infrastructure Trial test will be conducted in the Infrastructure Trial test administration ISTEP+ Spring


30 Step 2: Technology Setup Note: Corporation Information Technology Coordinators (CITCs) and staff need to complete Step 2 of this Local Infrastructure Trial Test Guide before Test Coordinators can complete the remaining steps. If you are not an assigned CITC, you may skip ahead to Step 3, where the Corporation Test Coordinators (CTCs) tasks begin. Skip to Step 3. A. Under the Setup drop-down menu, select TestNav Configurations. B. From the Select Tasks menu, select Create / Edit TestNav Configurations. C. Select Start to launch the configuration and enter a name in the Configuration Name box. D. Select the Precaching Computer Override box if you want to enable that feature. E. Select your school from the Organizations menu. F. Enter the Computer Name, IP Address, and Port Information, and then check the Uses Pearson Precaching Software checkbox. 30

31 G. Set the primary and backup saved response file (SRF) locations and select Create. Backup saved response file locations are required for live testing. You should see the Success Changes saved message. H. Once you have set up an initial TestNav configuration, you can apply that configuration to multiple ProctorCache computers, if desired. Select TestNav Configurations under the Setup drop-down menu. I. This will display all TestNav configurations created for your selected organization. 31

32 J. Select the configuration you want to work with, then select Create/Edit TestNav Configurations from the Select Tasks drop-down menu. Click Start to enter the Create/Edit screen. K. From here, you will select your configuration from the list on the left-hand side of the screen. You can then choose Add to assign additional precaching computers using your chosen TestNav configuration. L. You can now insert the appropriate information for your additional precache machine. Select Add to add the machine. This will also return you to the previous screen in order to add more machines, if desired. M. Click the Exit Tasks button in the top right corner of the page. You will exit to the TestNav Configurations page. Note: Corporation Test Coordinators (CTCs) will need to complete the remaining steps in this Local Infrastructure Trial Test Guide. Step 3 (As Needed): Generate Sample Students This year Pearson will load sample students and generate test sessions for the Local Infrastructure Trial and the Statewide Readiness Test. All student data will be generic or generated randomly. However, if you want to create more sample students, here is an easy way to do so: A. Select Students from the Setup drop-down menu. B. This will bring you to the Students setup page. From the Select Tasks drop-down menu, select Generate Sample Students, then select Start. 32


33 C. From the Generate Sample Students page, select your Organization. D. Click Create New Group. The new group name can be a handy way of keeping track of which test each set of sample students you create is assigned to take. Please note that if you are planning to administer multiple Infrastructure Trial test forms, you need to create one or more sets of sample students for each form. E. Select an Enrolled Grade. It does not matter which grade you select for the Local Infrastructure Trial. F. Select the Test that will be assigned to this set of sample students. G. For the Type of test, select Online. H. Select the Number of Students (1 99). I. Click Generate. J. If you have successfully generated sample students, you will see the message below. Click the Exit Tasks button in the top right corner of the page, and you will exit to the Students page. Step 4 (As Needed): Create a Session Pearson will load sample students and generate test sessions for the Local Infrastructure Trial and the Statewide Readiness Test. The sessions will be created using the names Local Infrastructure Trial or Statewide Readiness Test. All other data will be generic or generated randomly. However, as with students, if you want to create more sessions, this process may be used. A. From the home screen, select Sessions from the Testing drop-down menu. B. From the Select Tasks drop-down menu, select Create / Edit Sessions and click Start. 33

34 C. From this screen, you will be able to assign the specific details to your session. See more details for this task below the screenshot. First, name your session. You should be descriptive enough to be able to recognize the session from the list of sessions you will create for your school. Next, assign the Organization where this session will be conducted. Under the Test Assigned drop-down menu, you will see the various Infrastructure Trial tests. Select the test that you will be administering with this session.. After you select the Test Assigned, the Form Group Type drop-down menu will become editable. Select Main. Choose your Start Date, Start Time, and Lab Location. These date and time fields are meant to provide you with additional sorting and filtering criteria to manage your online sessions. You will not be restricted to the day and time you select for a given session. For example, you can create a session that is scheduled to begin on the first day of the testing window. If you do not start that session as scheduled, you retain the ability to start it at any time you choose. You do not need to update the session details because the actual session start time will be updated when you start the session. 34
35 If your CITC successfully and correctly completed the tasks in Step 2, when you select your organization at the top of this page, your precaching computers should show in the Precaching Computer drop-down menu. Select the precaching computer from which the testing session will access the testing content. If your precaching computers do not appear, you can select the Custom TestNav button and specify a separate precaching computer there. Select students to add to this session. Any unassigned sample students created for the same organization / school and test specified in this session will appear in the Add students to session box once you click on the box. Students already assigned to another session, to a different test, or for another organization / school will not be available for you to select in this session. You can also add students to your session in bulk using the Find by Group option. To add students by group, click the Find by Name or ID drop-down, select Find by Group, and then click in the entry space to select the group containing the sample students you want to add to the session. After you have made all of your selections, click the Create button. The message below should appear and the sample students you selected should be listed as Assigned Students at the bottom of the page. Click the Exit Tasks button, and you will return to the Sessions page. 35

36 Step 5: Precache Content A. From the Sessions page, search to find the test sessions you want to precache. On this screen, all created sessions are displayed by default. Select the sessions you want to precache. B. Open the task list, select Precaching Test Content and click Start. The precaching servers used in the sessions you selected will be listed below. NOTE: Pop-ups and the Java plugin must be allowed. C. Select Precache. You can also select View Status at any time to view caching status. If content is not appearing when precaching and there are no students in the session, add students to the test session and try again. Depending upon the browser you are using, you will need to allow pop-ups, and you can precache content with or without using the ProctorCache Java applet. You may need to enable Java to run. Instructions for your specific browser can be found here: D. An information screen will appear to let you know that caching is in progress and what parameters are in use. At the same time, the ProctorCache application will open. From that application, you can monitor caching progress. E. Repeat steps C and D for each server listed. The IP address of the selected server will 36


37 appear in the URL address bar on the ProctorCache Status Monitoring screen. Step 6: Manage Sessions Note: Before students can begin testing, the session must be prepared, started, and then unlocked. This safety measure prevents students from launching tests until the examiner is ready to begin. A. From the home page, select Testing, and then select Sessions from the drop-down menu. B. On this screen, all created sessions are displayed by default if PearsonAccess next is focused on an individual institution. Use the filters on the left side of the page to reduce the list and make it easier to locate the session or sessions you want to start. Select the sessions you want to prepare and start from this screen, or add them in the next screen if you know the session name. 37


38 C. From the Select Tasks drop-down menu at the top of this page, click Go to Students in Sessions and the page below will appear. (If you selected multiple sessions on the Sessions screen, they would all be listed to the left under an additional Combined View row.) If you want to add sessions from this screen, you can use the Add a Session button and enter the session name manually. The session name will auto-fill as you type. NOTE: To view session details or to edit a session, click on the Details or Edit links at the top right of the screen. D. You will need to use the Prepare Session button. Before a session can be started, you must prepare your session. This should be done at least 48 hours in advance. To start your test sessions, select a session from the Session List on the left and click the Prepare Session button. To start all listed sessions at once, select Combined View and click the Prepare all Sessions button. If nothing happens after a few moments, select the Refresh button. E. After you have prepared your sessions, you will be able to start the sessions using Start Session. F. Sessions will need to be unlocked after starting. Unlock a test by moving the lock-unlock toggle to the unlocked position. This prevents students from starting the test until the examiner is ready to begin. 38


39 G. The students in the selected sessions will be listed at the bottom of the page. The Student Test Status will appear for each student as shown below. Student Test Status is colorcoded according to the legend shown on the Students in Sessions screen. Step 7: Create and Print Student Testing Tickets Before students can begin testing, they need to have a student testing ticket to access their unique, secure assessment test. A. Select one of the sessions listed to the left on the Students in Sessions screen. NOTE: You cannot create and print student testing tickets for more than one session at a time. B. Click the Resources drop-down menu. C. Select either Print all for this session or Print selected for this session. Print all for this session enables you to print every ticket for your chosen session. Print selected for this session lets you select individual students from the Assigned Students list, and print only those selected tickets. This menu is the same as the one used to obtain Seal Codes; however, Seal Codes are not used in Infrastructure Trials. You can view and print testing tickets in four different formats: 39

40 Grid View Creates two columns of students and fills an 8 x 10 page that can be cut into individual tickets and distributed to the corresponding students. List View Creates a line for each student and extends to the bottom of the page. This type of ticket also needs to be cut before distribution. Multiple per page Includes multiple students on a page in a grid layout. These tickets need to be cut before distribution. 1 per page Includes one student per page and does not need to be cut before distribution. D. After you select a view and the tickets display, press Ctrl+P to print your tickets. Step 8: Student Login A. Have students / volunteers access the TestNav Login screen by entering the URL shown on their student testing tickets ( into the address bar of their browser or by opening the app installed on their desktop or mobile device. The Local Infrastructure Trial is designed to test your school s technology setup. It is recommended that you take the test with the same devices your students will use during actual testing. NOTE: Browser-based testing is only supported using Firefox ESR bit. B. Have students / volunteers enter their usernames and passwords exactly as they appear on the testing tickets. NOTE: Passwords are case sensitive. C. Students / volunteers can begin testing. 40


41 Step 9: Manage Test Sessions When students have launched their tests, their Student Test Statuses change to reflect their current respective testing status, and the summary bar above the legend will provide summary counts for each test status. You can select the blue Refresh button at any time to update the page display If a student exits the test without submitting, the student will be shown in Exited status. An Exited student must be Resumed before the student can re-enter the test after exiting for a break. This security feature is designed to prevent students from accessing tests without authorization by a test examiner. A student will use the same testing ticket to resume an exited test and will be restarted on the item the student was viewing before exiting the test. Once a student has successfully launched a test, the test status can be updated from within the Students in Sessions page. By selecting the drop-down next to the status indicator, the options below are available. 41

42 It may be necessary to resume a student who has returned from a break so the student can reenter the test using the same login credentials as when the test first launched. In live testing, students who are in Resumed or Active status may be updated to Resume Upload status. This status sends a request to TestNav 8 to check for any unsent saved student response files (SRFs). Since the ISTEP+ Infrastructure Trial Test forms are not scored, uploading student response files is not necessary. However, uploading them may be desirable if your technology staff wants to clean out any un-needed SRFs from a desktop, laptop, tablet, or Chromebook device after your Local Infrastructure Trial if a connection was lost during testing. If you select the status itself, a pop-up will appear, providing information about student progress. You will not be able to see the student s responses, but you can see which questions the student has visited, answered, and how many remain. Other portions, such as instructions and reading passages, are indicated with a message of No Response Required. Timestamps are also available. With them you can determine whether a student is actively testing. A number of additional tasks can be performed from the Students in Sessions page, including adding, removing, and moving students from one session to another. We will expand on those tasks below. 42


43 To add a student to a session: A. From the Students in Sessions screen, be sure your intended session appears on the Session List on the left. Use the Add a Session button, and enter a session name. If your intended session is not already listed, select Add Students to Sessions from the Select Tasks drop-down menu and select Start. B. From this screen, you will select a target session from the Session drop-down menu. C. Next, you will search for a student by name, or by group name. Select within the your school drop-down to toggle between searching by name or group. Select Search to see the results. D. Select the students or group from the list that you want to move and select Add to add the students to the session. You will see the screen below if your move was successful. The Add Students to Sessions task will remain open if you want to add more students. Otherwise, select Exit Tasks to return to the Students in Sessions screen. 43


44 To remove a student from a session: A. From the Students in Sessions screen, be sure your intended session appears on the Session List on the left. Use the Add a Session button and enter an existing session name if your intended session is not already listed. Select your desired session and the assigned students will populate the bottom of the screen. Check the students you want to remove and select Remove Students from Sessions from the Select Tasks drop-down menu, then select Start. B. On the next screen, you will finalize the selection of students that you want to remove. With Verify the Student Test Status, because a student must be in Ready Status to be removed from a session. Check the students you want to remove and select the Remove button. C. You will see the screen below if your removal was successful. The Remove Students from Sessions task will remain open if you want to remove more students. Otherwise, select Exit Tasks to return to the Students in Sessions screen. 44

45 To move a students between sessions: A. From the Students in Sessions page, you must first locate the students you want to move. You can do this by selecting a session from the Session List, and assigned students will populate the screen. Use the Add a Session button and enter an existing session name, if your intended session is not already listed. You can also search for a student using the Find Students search field. Check the students you want to move. B. Once you have chosen students to move, select Move Students between Sessions from the Select Tasks drop-down menu and select Start. 45


46 C. The Move Students between Sessions screen is next. This screen is populated with all of the students you previously selected. The greyed out checkboxes reflect the student s current assigned session. You can toggle between tests using the Tests drop-down menu. To move a student, check the box under the session name where you want to move the student. If your existing destination session is not listed, select the Sessions drop-down menu to display all sessions, and add your desired session to the screen. You may also select Create Session to create a new session. D. As an example, in the screen below, we will move STUDENT, NEW ( ) from the currently assigned (greyed out) TEST session to the JHTEST session by checking the box under JHTEST. E. Click Move to initiate the move. If the move was successful, you will see the screen below. Note that STUDENT, NEW ( ) is now assigned to the JHTEST session. F. Each move will return you to the Move Students between Sessions screen. Select Exit Tasks to return to the Students in Sessions screen. 46

47 Step 10: Mark Student Tests Complete You can also mark a student s test as complete on the student s behalf. This feature is used when a student will not be completing the test, which may occur in the Local Infrastructure Trial. At the end of the Local Infrastructure Trial, any remaining students still in Exited, Resumed, or Resumed Upload status can be marked as Complete. All students must be in Complete or Marked Complete status to stop the session. A. At the bottom of the Students in Sessions page, select the students you want to set as Marked Complete, as seen in the image below. NOTE: This action can be taken for multiple sessions simultaneously by using the Combined View option at the top of the session list to the left. B. From the Students in Sessions page, click the Select Tasks drop-down menu. C. Click Mark Student Tests Complete and then click Start. D. The page below should appear. 47


48 E. Select the checkbox next to the name of the students on the list to confirm your selections. Enter a reason and select Mark Complete. All tests must be in a Complete or Marked Complete status to stop the session. F. You do not need to provide a valid reason for the Local Infrastructure Trial, but at least one character must be entered in this field to mark the students Complete. G. If you have completed the steps successfully, the screen below should appear. Step 11: After the Local Infrastructure Trial Stopping a Session A. To stop a session, you will need to Mark Complete any students not in Ready status and remove any remaining Ready students. These actions can be completed simultaneously for multiple sessions by selecting the Combined View option from the list on the left of the Students in Sessions screen. B. To remove the Ready students from a test session, check the box beside each student to be removed or click on Toggle secondary filters from the Filters box to the left. Select Ready in the Student Test Status box at the bottom, and select the top box just above the list of students to mark all students in Ready status for removal. C. Select Remove Students from Sessions from the Select Tasks drop-down menu and select Start. 48

49 D. Select the box at the top of the list to choose all students and select Remove. E. To stop the session, select Stop Session on the Students in Sessions page. After Stop Session is selected, the session status will be changed to Stopped, denoted by a red circle. You will have the option to restart the session, if desired, with the Restart Session button. You can stop multiple sessions simultaneously by using the Combined View option at the top of the session list on the left of the Students in Sessions screen. Step 12: Evaluation A. Take note of any technical issues you may have experienced. Were the issues a result of configuration errors, or were the issues technology related? If the issues were technology related, can they be addressed before live testing? B. Take note of any logistical issues you may have experienced. Did you encounter any logistical issues related to the Local Infrastructure Trial? If so, how will you address those issues before live testing. 49
50 The Statewide Readiness Test The Statewide Readiness Test (SRT) for the Spring 2018 ISTEP+ and IREAD-3 online test administration is scheduled at a.m. Eastern Time February 7, backup date February 15. The SRT is a statewide version of a Local Infrastructure Trial that your schools conducted in November. Additional Local Infrastructure Trials also can be conducted after the SRT and prior to IREAD-3 or ISTEP+ Part 1 or Part 2 testing. As a Corporation IT Coordinator (CITC) or School IT Coordinator (SITC), your responsibilities for supporting the SRT include: A. Technology setup and session creation support for your Corporation Test Coordinators (CTCs) or School Test Coordinators (STCs) prior to the SRT. B. On-call technical support and troubleshooting during the SRT. C. Making needed improvements to setup and configurations after the SRT. If you do not have a Username and Password for the PearsonAccess next Training Site, please ask your CTC or STC to create one for you. For more information on the permissions included in your role, please refer to the User Role Matrix on the Indiana ISTEP+ and IREAD-3 Resource Center. The SRT will be conducted on the PearsonAccess next Training Site using the Infrastructure Trial forms found under the Infrastructure Trial administration. The checklist in the appendix ensures that your schools, test coordinators, students, or other SRT participants are ready for a successful SRT experience. The process for conducting the Satewide Readiness Test is the same for the Local Infrastructure Trial, except for the specific date and time mentioned above. For the SRT, you should utilize every device that will be used for live testing. NOTE: This year Pearson will load sample students and generate test sessions for the Local Infrastructure Trial and the Statewide Readiness Test. All student data will be generic or generated randomly. For a complete set of step-by-step instructions use Local Infrastructure Trial Instructions above. Online Practice Test Before Administering the Online Practice Test For the Grade 10 Winter Retest 2017, the Calculator Form Group Type will be changed from Main to Calculator on all test sessions auto-created by Pearson. Manually created sessions will still need to have the Form Group Type changed to Calculator if the testers need the Accommodation. Starting in January, Calculator Accommodations will be assigned in the Personal Needs Profile (PNP) section in PearsonAccess next. This new functionality eliminates the need for a Calculator Form Group Type. When implemented for the Spring 2018 ISTEP+ Test Administrations, students with or without TTS Accommodations and Calculator Accommodations can be tested in the same session, providing greater flexibility for session planning and logistics. 50

51 Pearson will load sample students and generate test sessions for practice tests. The number of sample students will approximate the number of students submitted on the DOE-TL. The sessions will be created using the IDOE Session Name that is submitted on the DOE-TL. Sample data will include student First Name and Accommodations for efficient distribution of test tickets. All other data will be generic or generated randomly. For detailed steps, see the Online Practice Test Setup Instructions in the Appendix. Step 1: Log into to the Training Site Step 2: Access preloaded test sessions Step 3: Edit a session to change the password to a simpler word or number combination so that students can easily log in to the test Once you have made any adjustments to test sessions, you may Prepare, Start, and Unlock your test sessions and print Test Tickets and Seal Codes. NOTE: The IREAD-3 practice test has only one section, so you use only the first Seal Code. NOTE: To easily identify and sort students with Text-To-Speech (TTS) Accommodations in your sessions, the student Last Name was created beginning with TTS XXXXXX followed by random alpha characters. To sort for TTS students, simply enter TTS into the Find Students search box on the Students in Sessions screen as pictured below. In addition to the TTS naming convention, a TTS indicator box appears next to the STN. Step 4: Generate sample students for each of your schools (As Needed) Step 5: Complete the Generate Sample Students (As Needed) Step 6: Create Online Testing Sessions (As Needed) Step 7: Complete the New Session screen (As Needed) 51
52 Step 8: Creating practice test sessions for Text-To-Speech accommodated tests (As Needed) Step 9: Precache test content after all sessions are created. Coordinate activity with CITCs or SITCs Step 10: Prepare, then start and unlock your sessions Step 11: Print student testing tickets Online Experience Items Pearson offers ISTEP+ Experience items. The purpose of the Experience tests is for students, educators, parents, and community members to see how test items similar to those on the ISTEP+ assessment are presented in the online system. Experience tests are open to everyone. Experience items can be accessed through your web browser, mobile app, or desktop app. The browser-based version can be accessed online here: Experience items may also be launched directly from the TestNav 8 app using an ipad, Android tablet, or Chromebook. The app is available from the device s app store. Launch the app and select Indiana from the list. If a different destination is accidently selected, click on the user icon in the upper right corner of the Sign In page and select "Choose a different customer", then select Indiana from the list. Select the Experience link to start the test. A username and password is not required. To download the desktop app, visit for links to download the app. Launch the app and select Indiana from the list. If a different destination is accidently selected, click on the user icon in the upper right corner of the Sign In page and select "Choose a different customer", then select Indiana from the list. Select the Practice Tests link to start the test. A username and password is not required. 52
53 Tasks During Test Administration Material Management and Additional Materials Order Guidelines The following guidelines are provided to assist you in the process of managing Paper-Pencil testing materials and placing orders for additional materials, if needed. # IF THEN Testing on paper and materials haven t been received Summary or detail information of shipped test materials is needed Packing Lists or breakdown of materials by box are needed Initial shipment of materials doesn t match enclosed packing list or if quantity received is Check PearsonAccess next for status of initial shipment. From Setup > Orders & Shipment Tracking, search to find your order. Change the search to find orders during a specific period of time by changing the setting in the box next to the Search button. Use the filters on the left to filter by Organization Type (initial or additional). Click on the blue information bubble next to the order number to view order details. Order details are found on the four displayed tabs Details & Status, Ship To, Materials Order, Shipments. Note: Freight orders are not displayed in Orders & Shipment Tracking. If an initial shipment order isn t displayed contact Pearson Help Desk ( ) to see if the order was shipped via freight. For additional information on freight shipments following guideline #2. From Reports > Operational Reports select Report Category Orders & Shipment Tracking. Select Material Summary to create a report summarizing materials shipped (across orders) at the selected organization. Select Material Detail to create a report detailing materials shipped (across orders). When created at the corporation level, this report will display materials by school. Note: this report will NOT show the status of backordered items. From Reports > Operational Reports select Report Category Orders & Shipment Tracking Select Packing List to create a packing list view of a specific order. Enter the specific order number displayed on the Orders & Shipment Tracking page. Survey all schools for material shortages. Use corporation overage to fill school orders first. Consolidate school orders and place AMO through PearsonAccess next following steps in guideline #5. 53
54 insufficient Additional materials are needed Testing online and a paper version is needed for a student with an Accommodation Unable to find status or view details of AMO AMO was approved but unable to locate shipment information and tracking number Practice Test Examiner s Manuals are needed... Edits need to be made to a submitted AMO Place AMO through PearsonAccess next. From Setup > Orders & Shipment Tracking, click the Select Tasks drop-down and select Create / Edit Orders. Click Start. Select Create Additional Order. Enter the required detail about the order. Click Add Items under Materials Order. Enter the amount of each item and click Save. Click Create. Use the Part 2 materials list found on page 22 of the ISTEP+ Spring 2017 Test Coordinator s Manual to determine materials needed. Place AMO through PearsonAccess next following steps in guideline #5. Check PearsonAccess next for status and order details, following the steps in guideline #1. Find order details by following steps in guideline #1. Tracking numbers for each box are located on the Shipment tab. Place AMO through PearsonAccess next following steps in guideline #5. OR download practice test examiner s manuals from the IDOE Test Coordinator Corner Learning Connection Community. Check status of order in PearsonAccess next. An order in a submitted status may be edited. From Setup > Add l Material Order Tracking, search to find your order. Click the Select Tasks drop-down and select Create / Edit Orders. Click Start. Select your order from the Additional Orders list. Click Add / Edit Items under Materials Order. Enter the amount of each item and click Save. Click Save. A new order will need to be created if the order has a pending, processing, transit or delivered status. 11 An AMO needs to be cancelled Check status of order in PearsonAccess next. An order in a submitted status may be edited. From Setup > Orders & Shipment Tracking, search to find your order. Click the Select Tasks drop-down and select Cancel Orders. Click Start. Select your order from the Additional Orders list. Click Cancel Orders. 54
55 12 STC wants to place AMO Click Exit Tasks. An order in a submitted status may be cancelled. If order has a pending or processing status, contact Pearson Help Desk ( ) to see if the order can be cancelled. AMOs are placed by CTCs. STCs should contact their CTC for additional materials. Student Transfer Process When a student transfers into your school from another school within the state, one of the following processes must be followed. Two methods are used for the transfer. One method is using the file import / export features to transfer multiple students at once. The manual method is used for small numbers of transfer students. You will not be able to register a transfer student in your organization until the Student Transfer Process has taken place. If a student s former school does not approve the transfer request in PearsonAccess next within 1 business day, the student s new school should contact Pearson to request assistance. The following sections provide step-by-step directions on how to move students through the use of the PearsonAccess next user interface or import / export process. These directions apply to computer and paper-based formats. How to Create a Work Request for Transfer Students Only users assigned the CTC role can create a transfer Work Request. Before submitting the request, the school will need the student s STN, last name, first name, and date of birth from the student s previous school. Step 1: Getting Started A. Click the Setup drop-down menu. B. Select Work Requests. Step 2: A. Click the Select Tasks drop-down menu. B. Mark the checkbox next to Request / Edit Enrollment. C. Click Start. 55

56 Step 3: Searching for the student to be transferred A. Enter the Student Test Number. B. Enter last name of the Student. C. Enter the Student s date of birth. D. Click Search. NOTE: If the student was not found, double-check that the demographic information you entered is correct. The STN, Last Name, First Name, and Date of Birth fields must match for the record to be found. If you experience difficulties, please fill out the Electronic Help Request for support. Step 4: A. Click the Change Enrollment to drop-down menu B. Type the name or ID of the school in the field. 56

57 C. Click Send Request. NOTE: The student will be transferred after the request is approved by the transfer-from organization. D. Click Exit Tasks. To check the status of your transfer request go to Setup, the click on Work Request. Use the filter on the left to search of the appropriate request type. Once the student transfer request is approved by the sending school, verify the student registration data and test assignments. 57

58 Verifing the Student Registration data and test assignments Step 1: A. Click the Setup drop-down menu. B. Select Students. C. Search for the Student who was transferred. D. Mark the checkbox next to the student record to verify. E. Mark the checkboxes for Register Students and Manage Student Tests under the Select Tasks dropdown menu. F. Click Start. Step 2: A. Verify the responsible school code and demographic fields. B. Make any updates C. Click Save. D. Click Exit Tasks. Approving a Transfer Work Request Only CTCs can approve a transfer Work Request. The CTC should check in PearsonAccess next frequently and look for the Bell icon, which indicates a transfer request. Step 1: Checking Work request Notifications A. Choose the administration from the dropdown in the top banner in PearsonAccess next. B. Select the Bell Icon, check for a Transfer Request. C. If so, click Transfer Requests. NOTE: This action automatically takes you to the Work Request screen. Step 2: A. Mark the checkbox next to the transfer requests. B. Click Select Tasks. C. Select Approve / Reject Enrollment Transfer. D. Click Start. E. Click Approve or Reject. NOTE: A Reject Enrollment Transfer Reason is required when rejecting a transfer. F. Click Exit Tasks. Note: If student s former school does not approve the transfer request in PearsonAccess next within 1 business day, the student s new school should contact Pearson to request assistance. 58

59 Using Import/Export to Perform an Enrollment Transfer A method now exists for completing multiple transfers at one time via the Enrollment Transfer Export / Import Feature. Step 1: A. Under Setup, select Import / Export. 59


60 B. Click Select Tasks, then select Import/Export. C. Select Enrollment Transfer Export, then click Process. D. Open the CSV and populate with the required fields. Note: Only the fields that are required have been populated on this file. The Student Code, or STN is needed, as are the first and last names. The organization code is needed, if the student is transferring to a corporation. And the Action, which is C for Create also is needed. You can also use this process for approvals. If you have many transfer requests from your school, you can simply do this same process and type A for Approve or R for Reject in the Action field to approve or reject students transferring from your organization. E. From the same location in PearsonAccess next, you select Enrollment Transfer Import, browse for the file, then click Process. If you receive any errors, fix those entries and reimport. NOTE: Leaving only rows populated that you intend to modify with the import on which you are currently working. If you are not transferring or approving / rejecting every entry on the spreadsheet is recommended. Temporarily removing those rows reduces the likelihood of errors 60

61 Manage Online Tests During Testing Perform the tasks in this section to run an online test session, start online tests, or print testing tickets. If the program uses them, print your session Seal Codes from here. Monitor student testing status and make any needed adjustments. Before a student can take a test in TestNav 8, perform the following tasks in the chronological order (see table below for details): Create an online test session. Prepare an online test session. Start an online test session. Unlock the student test. When the testing is complete, you can stop the test session. If needed, you can restart a stopped session. Status Not Prepared Ready In Progress Stopped Preparing Errors Not Prepared Description Initial status of a session, when a session is created. All forms and seal codes have been assigned to the session. A session is active and the students are testing. All testing is complete and students cannot be added to the session. A session is in queue for form and seal code assignment. Contact Pearson Support for assistance. For more information: Unlock or Lock a Test After starting a test session, you can unlock or lock a test (or sections of a test) for students in that test session. 61
62 Unlocking makes a test available to students for testing. Locking makes a test unavailable to students for testing. For more information: Retrieve Student Test Tickets and Seal Codes Operational tests will have multiple sections that are controlled using an electronic Seal Code. The Corporation or School Test Coordinator is responsible for printing Student Testing Tickets, Seal Codes, and Session Student Rosters. These are secure test materials that must be securely stored and distributed to Test Examiners before testing and collected after testing each day. Test Examiners may access this information in PAN; however, they should not be responsible for printing or securely storing these materials. Retrieve Student Test Tickets and Seal Codes Monitor or Change Student Status Manage Student Tests View and Edit Student Test Details TestNav 8 Testing Features TestNav 8 s current capabilities include a wide range of tools and features. TestNav 8 uses App Check to confirm that the device or computer can connect to TestNav 8 and that it is configured to start TestNav 8 in Kiosk mode. An optional configuration identifier may be entered to validate additional TestNav 8 configurations from PearsonAccess next. TestNav 8 includes a built-in Early Warning System (EWS) that triggers and initiates safeguards for student testing and options for accessibility. The TestNav 8 EWS saves the student's responses to a local, encrypted backup file called a saved response file (SRF) if TestNav 8 cannot communicate with the Pearson server. This allows the student to either continue testing or exit the system without losing data. A plan should be developed by CTCs and STCs for tracking the computers or devices on which students test. Students testing on tablets and Chromebooks must complete the entire test on the same device. It is also a best practice for students using a computer to complete the test on the same computer. TestNav 8 Early Warning System Overview TestNav 8 Early Warning System Triggers TestNav 8 Online Troubleshooting TestNav 8 Error Codes Resume and Resume Upload These instructions provide information on how and when to use Resume and Resume Upload on the Students in Sessions screen in PearsonAccess next. 62
63 When to Resume vs. Resume Upload During testing, Test Coordinators and Test Administrators may need to use the Resume or Resume Upload status options to allow students to continue testing in a section that was previously started but not completed. Resume will be used in most situations: A. A student receives a TestNav 8 error message and appears in Exited status in PearsonAccess next but needs to continue testing on the same testing device. B. A student signs out of TestNav (either intentionally or unintentionally) before submitting final answers for the section or signs out because of an emergency (e.g., illness). Note: Test Coordinators should develop a plan for tracking which computers or devices each student uses to test. It is best practice to have students resume on the same computer. For tablets and Chromebooks, students must resume testing on the same device. Resume Upload is used only in rare circumstances when TestNav 8 cannot find a Student Response File (SRF) (e.g., a student has changed testing devices and the SRF is saved to an external drive to move to the new device). When this situation occurs, an error code will appear on the student s testing device, and the Test Administrator should record the specific error code that appears. A list of error codes can be found through TestNav Online Support. Resume Upload status directs the user to browse for an SRF on the testing machine when the student signs back in to continue testing. If this occurs, a Test Administrator should contact the School Test Coordinator or Technology Coordinator to complete this process. NOTE: In PearsonAccess next, users do not initially have the option to select Resume Upload for students in Exited status. Instead, users need to Resume the student first. The occasions for which a student needs to be resumed are rare, but they may still be listed in Active status (e.g., when a computer is powered off during testing). When this happens, the only option that can be chosen is Resume Upload, because TestNav 8 is not being able to communicate with PearsonAccess next when the student is exited from the test. For more information: Early Warning System Recovery - Resume a Test Reviewing Student Test and Item Progress PearsonAccess next has the ability to display information regarding the progress of a Student Test. Following the steps below will display a list of items on the test and show whether the student visited or answered each question. For more information: 63
64 Post-Test Procedures As you begin to complete ISTEP+ Part 1, Part 2, Grade 10 Winter Retest, and IREAD-3 online testing, several important steps are part of the process for confirming that all students have completed all of their online testing assignments. By following these instructions as sessions are completed, you should be able to finish most of these post-administration tasks before the end of the operational testing. Keep in mind that for some students, you may need to wait until the end of the window to determine whether they will be completing their tests before making these final updates. The table describes the main test session management tasks that are performed after testing. These tasks must be completed by 5:00 p.m. (Eastern Time) on the final day of testing for each administration. A complete explanation of these processes is included in the pages below the chart. Task Mark a Student s Test Complete Invalidate Test Sections Mark Tests as Do Not Report Remove Tests in Ready Status Stop Test Sessions Description Mark a student s test complete if he or she finishes on a section other than the final section (e.g. a make-up) or if you know the student will not be resuming the test at all. Invalidate a section of a test when a student does something they should not (e.g. looking at another student s test). Tests that have been started, but should not be scored at all, should be marked as Do Not Report. Students in Ready status need to be removed from a session before stopping it. Stopping sessions provides a convenient means for ensuring that all non-completed student tests have been reviewed and resolved. A test session cannot be stopped until all students are in Completed or Marked Complete status and all Ready students have been removed. For more information: Marking Tests Complete A test session cannot be stopped until all students in the session are in Completed or Marked Complete status and any Ready students have been removed from the session. The three scenarios in which it will be necessary to manually mark a student s test complete are: 1 If a student accidentally exits his or her test instead of submitting on the final section. 2 If a student is taking a make-up test and finishes his or her test on a section other than the final section of the test. 64
65 3 If a student has completed a portion of his or her test and will not be returning to finish before the end of the testing window. IMPORTANT NOTES: Do NOT mark a student s test complete if the student completed one section of a multisection test and will return to complete the rest of the test, or if the student was absent and is still in Ready status. Absent students can be moved to a make-up session, if desired, and should be removed from sessions at the end of the testing window. If you mark a student test complete and that student has not completed a section, the student will receive an Undetermined result which cannot be changed. If you mark a student s test complete that is still in Ready status, the test will be scored. Do not mark Ready tests complete. Remove tests in Ready status from the session. Tests that have not been attempted will not be scored. Before marking a student s test complete, ensure that you understand the reason the student exited the test without submitting it. This reason must be entered in PearsonAccess next. Student tests can be Marked Complete by following a process similar to that used to resume student tests during testing. For more information: Invalidating Test Sections or Marking as Do Not Report If the need should arise to mark a student s test as Do Not Report or to invalidate one or more sections of a student s test per IDOE guidance, you can do so through the Manage Student Tests function. NOTE: You can invalidate a test section or mark a test as Do Not Report only after the test has been started (i.e., any Student Test Status except Ready). Remember that invalidations and Do Not Report statuses must be recorded in PearsonAccess next by 5:00 p.m. (Eastern Time) on the final day of testing for each administration. Step 1: Getting Started A. Click the drop-down menu under Testing. B. Click Sessions. Step 2: Select the Sessions A. Use the Find Sessions field to search for the session name or click the drop-down menu on the Search button to Show all results. B. Mark the checkbox next to the sessions. C. Click the Select Tasks drop-down menu. D. Click Go to Students in Session. 65
 filter to locate an individual student s tests. B. Type the last name of the student whose test sections you want to invalidate.")
66 Step 3 A. From the Sessions List on the left side, select the Combined View or mark the checkboxes next to individual sessions with which you want to work. NOTE: Use the Student Test Number (STN) filter to locate an individual student s tests. B. Type the last name of the student whose test sections you want to invalidate. NOTE: If multiple students with the same last name appear in the selection list, find the correct one and select his or her name. C. Select the student s tests you want to mark Do Not Report or Invalidate. NOTE: Only tests in Active, Exited, Resume, Resumed Upload, Completed, or Marked Complete status can be marked Do Not Report or Invalidate. D. Click the Select Tasks drop-down menu. E. Mark the checkbox for Manage Student Tests. F. Click Start. Step 4: A. On the left side of the Manage Student Tests screen. Select the Triangle icon next to the Battery entry to access the individual test assignment. B. Select the test assignment containing the section. NOTE: The status must show as either Complete or In Progress. C. On the right side of the Manage Student Tests screen, you will see all the details for the selected test assignment, including a section near the bottom that appear as follows: For ISTEP+: 66

67 For IREAD-3: Step 5: A. Select the test sections you want to invalidate. Use the guidance listed in the middle of this portion of the screen to determine which sections are invalid for each subject area test. For example: If you are invalidating a section of an ELA Part 2 test, check only Section 1, Section 2, or Section 3 (or, for Grade 10 only, Section 4). If you are invalidating a section of a Part 2 Math test, check only Section 1, Section 2, or Section 3. Be sure to check only sections that are to be invalidated for the test in question. B. Click Save. OR A. To mark the selected test as Do Not Report, select the Do Not Report checkbox and select a Do Not Report Reason from the drop-down. If the student has a completed test for the same grade / subject area and the test you have selected was a partiallycompleted duplicate, select the Duplicate checkbox as well. B. Click Save. Removing Student Tests in Ready Status If you have student test assignments for a student who is no longer enrolled in your schools, if a student was absent for all of testing, or if a student will not be taking an assigned test for any other reason, the student s tests will remain in Ready status within the session to which each such test was assigned. Student tests in Ready status can be removed from a session at any time, regardless of whether the session has been started. You will not be able to stop a session if it still contains 67
68 student tests in Ready status. Tests in Ready status will need to be removed (and any other incomplete tests marked complete) before the session can be stopped. Tests that have not been attempted will not be scored. For more information: Sessions Stop Test Sessions As testing sessions are completed, or at the end of the testing window, it is strongly recommended that each session be reviewed to ensure all students tests are accounted for and properly submitted, removed, or marked complete. After doing so, stop the session. Completing this process ensures that all tests have been properly reviewed. A session can be stopped only when testing is complete and all students statuses are either Complete or Marked Complete, as described in Monitor or Change Student Status. Test sessions may remain in started status during testing but should be stopped after all students have completed testing or the administration window is closing. All sessions should be stopped in PearsonAccess next by 5:00 p.m. (Eastern Time) on the final day of testing for each administration. To stop a session select the appropriate administration from the menu at the top of the screen. Under Testing, Sessions, locate the sessions you wish to stop. You may select all sessions at once. Select Go to Students in Sessions. You may stop each session one at a time, or select Combined View and click Stop All Sessions. Tasks After Test Administration Rejected Test Attempts Cleanup Process This document outlines steps needed for resolving paper-based Rejected Student Test Alerts for ISTEP+ and IREAD-3 assessments. Users must be assigned the Corporation Test Coordinator (CTC) role to complete the data cleanup. Grade 10 Winter Retest 12/20/17 12/22/17 ISTEP+ Part 1 3/15/18 4/13/18 ISTEP+ Part 2 5/10/18 5/17/18 IREAD-3 3/26/18-4/5/18 Rejected Student Test Alerts are created when a scanned paper-based student test cannot be matched to a current student record in PearsonAccess next. These mismatches occur because of errors in hand gridding on paper test documents and are required to be addressed locally by CTCs. Having two monitor screens is helpful when resolving rejected test attempts. Having one screen showing the Manage Student Tests screen and the other showing the Rejected Student Tests 68

69 screen makes it easier to compare what data is in PearsonAccess next versus what was returned on the student s written test. Some common causes for a rejected test attempt are: First and last name were reversed when gridded. Incorrect date of birth. Student Test Number (STN) is missing completely, or was gridded incorrectly. The STN must be nine digits in length, including leading zeros when applicable. The student has had a name change, but was not updated in PearsonAccess next. Rejected Student Test Categories: Alert Demographic Mismatch Student Not Found Failed Validations Description Demographic information (STN, Name, DOB,) was incorrectly gridded on the student test booklet, or is incorrect on the student profile in PearsonAccess next. All of the demographic fields were not gridded and the information that was gridded cannot be matched to an existing student record or is insufficient to auto-create a student record. Failed validations happen when online PNP values are selected and prevent the mode from changing to paper from online in PearsonAccess next. This can also occur when appropriate paper Accommodations are not assigned correctly in the student profile. NOTE: Check for rejected tests in the IREAD-3 and ISTEP+ test administrations. A red flag for Student Errors denotes rejected tests for that test administration. You can select Student Errors to navigate directly to the Rejected Student Tests screen. Demographic Mismatch: Cause: Demographic information either is missing, incorrectly gridded, or does not match what is in the student profile. Action: Update Student Test Number, First Name, Last Name, or Date of Birth fields on the Edit Rejected Student Tests screen. If the data in PearsonAccess next is wrong, use the Manage Student Tests task or Create / Edit Students to correct the student data. Then return to the Rejected Student Tests screen to confirm the student error is no longer listed. 69

70 To access Rejected Student Tests: Step 1: Getting Started A. Click the drop-down menu under Testing. B. Click Rejected Student Tests. Step 2: A. Under Filters, click the Reject Status drop-down menu. B. Select Demographic Mismatch. C. Mark the checkboxes for the students. D. Click the Select Tasks drop-down menu. E. Select Edit Rejected Student Tests. F. Click Start. Step 3: A. Select the student listed under Rejected Tests on the left side of the screen under Rejected Tests. B. Review the information below Details and compare it to the information in the Attempt Attributes fields. C. Based on the information, update values in the form or on the Student Demographic screen as needed. D. Click Save. To edit Demographic Mismatch tests: Step 1: Getting Started A. Click the drop-down menu under Testing. B. Select Rejected Student Tests. Step 2: A. Select the student listed under Rejected Tests on the left side of the screen. B. Review the information below Details and compare it to the information in the Attempt Attributes fields. C. Based on the information, update values in the form or on the Student Demographic screen as needed. D. Scroll to the bottom or top right of the screen to select Save. 70


71 Step 3: Confirmation A. This confirmation appears after the alert is resolved. If the green bar does not appear, notice that the rejected student test attempt went into another rejected scenario. B. The next name in the list automatically loads on the form. 71
72 Step 4: Confirmation A. This confirmation appears after the alert is resolved. If the green bar does not appear, notice that the rejected student test attempt went into another rejected scenario. B. The next name in the list automatically loads on the form. Failed Validations: Causes: The student is registered for online testing and a paper test booklet is processed for the student. If online Personal Needs and Preferences (PNP) values are selected in PearsonAccess next, it will prevent the mode from automatically changing from online to paper. This error can also occur when appropriate paper Accommodations are not assigned correctly in the student profile. Actions: Remove the TTS Accommodation from the student s profile, and confirm that all other Accommodations are assigned correctly. 72

73 Step 1: A. Click the drop-down menu under Testing. B. Select Rejected Student Tests. Step 2: A. Under Filters, choose Failed Validations from the Reject Status drop-down. B. Mark the checkbox next to the Students in the list. C. Click the Select Tasks drop-down menu. D. Click Start. Step 3: A. On the Edit Rejected Student Tests screen the Test Code field will display the specific test that will need Text-to-Speech removed to resolve the Failed Validation. Use the Test Code Matrix to help identify the correct test to edit from Manage Student Tests. 73

74 To access Manage Student Tests Step 1: A. From the home screen click the drop-down menu under Setup. B. Select Students. Step 2: A. Search for the student by last name using the Find Students search bar. You may use the Filters to help limit your results. B. Check the boxes for the students you want to edit. C. Click the Select Tasks drop-down menu. D. Select Manage Student Tests. E. Click Start. 74


75 To remove the Text-to-Speech Accommodation Step 1: A. Based on the test code information obtained from Edit Rejected Student Tests, expand the test assignments on the left side of the screen by clicking the Triangle icon next to each battery and select an individual part. B. Change Type to Paper. C. Deselect the Text-to-Speech box. D. If applicable, change Read Aloud (Paper) to Yes. Change this field only if the student received the Read Aloud Accommodation for the Paper-Pencil test. E. Confirm that other Accommodations are assigned appropriately. F. Select Save. G. You will need to repeat this process for each Failed Validation test. To clear the Failed Validation Step 1: A. From the Home screen, click the drop-down menu under Testing. B. Select Rejected Student Tests. 75
76 Step 2: A. Under Filters, choose Failed Validations from the Reject Status drop-down. B. Select the results that you have corrected. C. Select Edit Rejected Student Tests under the Tasks drop-down menu. D. Select Start. E. When the Edit Rejected Student Tests screen loads, the Failed Validations will resolve. Step 3: Confirmation A. This confirmation appears after the alert is resolved. If the green bar does not appear, notice that the rejected student test attempt went into another rejected scenario. B. The next name in the list automatically loads on the form. Undetermined Results Resolution Guide Important: Some Undetermined status results may be reconciled and scores provided for a student. Corporations and schools are responsible for researching student test submissions in an Undetermined status, verifying the Undetermined status is accurate. When applicable, corporations and schools will provide resolution to Pearson for the student s test record clean-up. Please thoroughly review this entire document for guidance on researching student s test submissions with an Undetermined status, as well as how to resolve any test submissions that should be reported. It is possible that the resolution provided will not lead to a completed score for the student. Locating Students with Undetermined Status Results To locate students who have an undetermined status on their tests, use OnDemand Reports in PearsonAccess next. 76

 One or more")
77 Step 1: A. Click the drop-down menu under Reports. B. Select OnDemand Reports. Step 2: A. Click the Performance Level drop-down menu located on the left side of the screen. B. Select Undetermined. The OnDemand Reports can be found in PearsonAccess next. The Performance Level filter can be found to the left of the OnDemand Reports screen. Understanding and Researching Undetermined Status Undetermined status is assigned one of three categories: Test Not Taken (TNT) One or more sections left blank. Test Not Received (TNR) A completed paper answer document or an online test was 77

78 not submitted. Invalid by School (INV) One or more sections were invalidated by the school. Reviewing Details for Undermined Status on Student Tests Step 1: A. From the OnDemand Reports page click the Manage Columns drop-down menu. B. Mark the checkboxes for all options beginning with Undetermined Status. This feature provides the status by test section, displaying the section that resulted in an Undetermined status. The Manage Columns feature can be found at the top right of the screen. Be sure to select all the Undetermined options. Undetermined Status Results TEST NOT TAKEN (TNT) This status is assigned when one or more sections of a test were not taken. This status would be expected if a student had been absent during the administration of a section and was not available for a make-up session. If TNT was not expected, this may be a result of a student with multiple paper documents or online test submissions for either the Part 1 or Part 2 administrations. This may occur when a student transfers to a new school, switches testing modes (paper to online or vice versa) or changes forms (because of an Accommodation) in the middle of either Part of the administration and the student responses weren t transcribed into a single test attempt. Test Not Taken scenarios cannot be corrected. Here are a few actions you can take to understand why a Test Not Taken status has been set for a specific Student Test: Search by student name or STN to see if there are multiple records with Undetermined status (UND). For example, one record may show Part 2, section 1 with a TNT status. A 78
79 second record for the same student may show Part 2, section 2 and 3 with a TNT status. Review Student Test and Item Progress (see instructions below) to see if students answered test questions and submitted test sections. Test sections with no student responses (i.e. student only visited questions) are considered non-attempted. For students that transferred mid-administration, provide the information and request that Pearson check for test attempts at the previous school. If a school had a situation that involved switching from online to paper (or vice versa) mid-testing, check the manage student tests page to see if the student has two of the same test with one marked as duplicate and Do Not Report. The initial test attempt will always be the one counted by the system, which can lead to the only partially finished test being scored instead of the completed test taken later. TEST NOT RECEIVED (TNR) This status is assigned when there is no test attempt recorded for an entire Part of the test. No online test attempt was submitted or no completed paper document was received at Pearson for processing. This status would be expected if a student had been absent during the entire Part 1 or Part 2 administration. If TNR was not expected, this may be a result of unmatched test attempts because of inconsistent names, STNs, or dates of birth. TNR may also occur when a student transfers to a new school between administration and a transfer request was not submitted and/or approved. Here are a few actions you can take to understand why a Test Not Received status has been set for a specific Student Test: Check attendance records to see if students were present during testing. Was the student s paper document returned with non-scorable materials and marked Do Not Score? These documents will not be processed as part of Undetermined resolution. Was the student s online test attempt marked Do Not Report? Check the Student Test page within PearsonAccess next. Do Not Report for these test attempts will not be reversed as part of the Undetermined resolution. Did student use the correct STN on both Parts of the test? Did the student test under two names (student s name was changed between Part 1 and Part 2 administrations)? Was a Student Barcode Label used on a paper document or was demographic information gridded? Search for the student s last name under the Students tab, to see if multiple results display. In the case of a misspelled last name during testing, search using only a few letters of the student s last name so the search will return any misspellings. Did the student test using another student s barcode label or testing ticket? Were responses from a Part 2 Large Print test, Braille test or computer-generated responses transcribed at the school into a scorable response document? INVALID BY SCHOOL (INV) This status is assigned when test sections are invalidated by the school. Invalidations for paper documents are gridded on the student document and are displayed in PearsonAccess next after the test document has been processed. Invalidations for online tests are checked on the Student Tests page. 79

80 Submitting Undetermined Status Resolutions to Pearson After reviewing test attempts with Undetermined status as explained in this guide, records that may be resolved should be submitted to Pearson for data cleanup. You must complete all fields in the data template and provide the document to Pearson to resolve the student records. It is imperative that all data fields are completed accurately and provided to Pearson in exactly the format provided in the template, as a Microsoft Excel formatted file (or.csv). Late resolution submissions or resolutions with incomplete information may result in delays in data cleanup and inclusion in final reporting. For the Details of Issue field on the spreadsheet, please include a brief explanation of what needs to be done for the student, such as Student tested ELA Part 1 under incorrect STN XXXXXXXXX, or Student date of birth is incorrect, should be XX/XX/XXXX. The Excel template is posted on the Indiana ISTEP+ and IREAD-3 Resource Center: Go to: Reporting Resources, select the menu (down arrow), and find the template titled, Undetermined Results Resolution Cleanup Template.xlsx. Reporting Resources can be found in the Resource Center. When all data has been populated in the Excel (or.csv) file, upload the data to the PearsonAccess next support page: 80

81 Uploading Undetermined Status Resolution data to Pearson Step 1: A. Log on to PearsonAccess next. B. Click Support from the top menu. C. Select Support Requests. Step 2: A. Click the drop-down menu Select Tasks. B. Mark the checkbox next to Create / Edit Requests. C. Click Start. 81
 file you have saved for the upload. F. Click Create. 82")
82 Step 3: A. Fill out the form. NOTE: Required fields are marked with a red asterisk. B. For Category, Click the Category drop-down menu. C. Select Import / Exporting files. D. Click Chose Files. E. Browse to and Select the.xls (or.csv) file you have saved for the upload. F. Click Create. 82
83 Once the data file is successfully submitted, Pearson staff will update the student s records according to the instructions provided on file. Once the process is complete, you will be notified by Pearson of its completion. Reporting Groups This provides information about how to Manage Reporting Groups in PearsonAccess next. A reporting group simply groups students together so that their reporting results can be shared with school staff and remain compliant with FERPA requirements. Reporting groups are imported into PearsonAccess next by Pearson using the name supplied in Field 17 on the DOE- TL file. If your school did not submit a reporting group name on the DOE-TL file you will need to create reporting groups. In advance of reporting, Corporation Test Coordinators (CTCs) or School Test Coordinators (STCs) need to ensure that reporting groups are created to their specifications. CTCs or STCs should complete the following tasks: 1. Complete a Student Test Reporting Group Export. NOTE: The exported files will contain two records per subject for ISTEP+ Part 1 and Part 2 for each student tested. 2. Review the Student Test Reporting Group Export and verify that the reporting groups submitted by the school contain the correct students. If they do not, move students to the appropriate reporting group. 3. Add the users to PearsonAccess next who will need access to reporting groups. If a large number of users need to be added to the system, consider utilizing the User Import file. A User Upload Template can be found at under User Information. NOTE: Users who are being assigned to reporting groups will need to be created as School Users or Teachers in PearsonAccess next. Once users have been added to the system, they can be added to reporting groups via the User Reporting Group import file. NOTE: Users can see only results for the reporting groups to which they have been assigned. Multiple users can be assigned to a single reporting group. Be aware of FERPA guidelines when assigning user roles and adding 83

84 users to reporting groups. Instructions for adding users can be found here. A link to the User Upload Data File Layout can be found here. Manage Reporting Groups Two methods may be used to manage reporting groups, importing a file and entering details directly in PearsonAccess next. For more information: Entering Data with Import / Export in PearsonAccess next This process is commonly done for additions or changes that involve multiple reporting groups. This process involves exporting a file, reviewing and editing the file, and importing the edited file. Exporting a File Step 1: A. Click the drop-down menu under Setup. B. Select Import / Export Data. Step 2: A. Click the Select Tasks drop-down menu. B. Mark the checkbox next to Import / Export Data. C. Click Start. 84


85 Step 3: A. Click the Type drop-down menu. B. Select Student Test Reporting Group Export. C. Check the boxes next to Include Attempts and Include Test Assignments. D. Click Process. E. Click the circling refresh arrows next to DETAILS to refresh the page. F. When the page has refreshed and the file is Complete. G. Click Download file. Step 4: A. Open the file in a spreadsheet program such as Excel, and check to make sure the information is correct. NOTE: The Test Code in Column K will contain two records per subject, Part 1 and Part 2, for each student tested. EB104 indicates the test is Grade 4, ELA Part 1 and EB204 is Grade 4, ELA Part 2. B. Unassigned students can be added to a reporting group by including the reporting group name in Column C. Students can also be moved to new reporting groups via an import 85
.")
86 of this file when a new reporting group is entered for a student in Column C. The Reporting Organization Code is a required field. Be sure to include this information before saving the file as a CSV. Demographic data cannot be corrected in this upload (e.g. student s name, date of birth, gender, or test assignments). Adding a reporting group or an organization code are the only changes that can be made in this file. Importing a File Step 1: A. Click the drop-down menu under Setup. B. Select Import / Export Data. Step 2: A. Click the Select Tasks drop-down menu. B. Mark the checkbox next to Import / Export Data. C. Click Start. Step 3: A. Click the Type drop-down menu. B. Select Student Test Reporting Group Import. C. Click Browse to find the file you edited and want to import. D. Click Process. NOTE: Once the file has processed, if there are errors in the upload, review the errors and make corrections. E. Click Exit Tasks. 86

87 A common error is Organization Code is required. To correct this error, click on Download Records in Error. Open the file and add the Organization Code to Column B. Save as a CSV and import the corrected file. Once the file has successfully uploaded, verify the information that was uploaded in the file is displaying correctly. From Reports, select Reporting Groups. Find reporting groups by searching or clicking the arrow next to the Search button, and select Show all results. Select the group to verify. Step 1: A. Click the drop-down menu under Reports. B. Select Reporting Groups. Step 2: A. Search for the reporting group or click the drop-down arrow on Start and mark the checkbox next to Show all results. B. Mark the checkbox next to the Reporting Group. C. Click the drop-down menu Select Tasks. D. Mark the checkbox next to Manage Student Test in Reporting Groups. E. Click Start. 87


88 Step 3: A. Verify the information is correct B. If you need to make additional changes, you can modify the reporting groups. NOTE: If multiple versions of a file are imported, the data in the system will be updated to reflect any changes to existing records. Any changes made to the uploaded file will overwrite the existing data in PearsonAccess next, so use caution when importing data. Updating User Reporting Groups Exporting a File Step 1: A. Click the drop-down menu under Setup. B. Select Import / Export Data. Step 2: A. Click the Select Tasks drop-down menu. B. Mark the checkbox next to Import / Export Data. C. Click Start. Step 3: 88

89 A. Click the Type drop-down menu. B. Select User Group Export. C. Click Process. D. Click the circling refresh arrows next to DETAILS to refresh the page. E. When the page has refreshed and the file is Complete. F. Click Download file. Correct or add user information on the downloaded file using the other entries as a template, and save as a CSV file. Importing a File Step 1: A. Click the drop-down menu under Setup. B. Select Import / Export Data. Step 2: A. Click the Select Tasks drop-down menu. B. Mark the checkbox next to Import / Export Data. C. Click Start. Step 3: A. Click the Type drop-down menu. B. Select User Group Import. C. Click Browse to find the file you edited and want to import. D. Click Process. NOTE: Once the file has processed, if there are errors in the upload, review the errors and make corrections. E. Click Exit Tasks. 89

90 Once the file has processed, if there are errors in the upload, review the errors and make corrections. Another common error code is The user XXXXX does not have access to the organization. If a user does not have access to the organization, the user will need to be added. Importing users is an efficient way to add or change multiple users. Users must be assigned specific user roles to access their data. Please refer to the User Role Matrix located on the Indiana ISTEP+ and IREAD-3 Resource Center under User Information to help determine which roles a user should be assigned. A link to the User Role Matrix can be found at: NOTE: FERPA guidelines need to be taken into consideration when user roles are assigned. Creating / Editing Reporting Groups Manually in PearsonAccess next The second method for entering information into PearsonAccess next is by manually entering the data. This method might be chosen when only a few data points need to be added, such as creating a couple of reporting groups or adding a couple of students or users to a group. The steps to manually enter details in PearsonAccess next include creating and editing reporting groups, managing student tests in reporting groups, and assigning users to reporting groups. Step 1 A. Click the drop-down menu under Reports. B. Select Reporting Groups. 90
 an existing Reporting Group search for it using the Find Reporting Groups field or click the drop-down menu arrow on Search and mark the checkbox for Show all results. B.")
91 Step 2: A. If editing (if not skip to C) an existing Reporting Group search for it using the Find Reporting Groups field or click the drop-down menu arrow on Search and mark the checkbox for Show all results. B. Mark the checkboxes next to the Report Groups you want to edit. C. Click the drop down-menu arrow on Start. D. Select All Tasks. Step 3: A. Click New Reporting Group or click the name of the Reporting Group you want to edit for the list on the left. B. Enter or edit the information. C.Click Save or Create. Step 4: A. Click Manage Student Tests in Reporting Groups in the top task bar. B. Use the search field Find by name or ID within to begin searching for students. C. Select Student. D. Mark the checkboxes next to the Student test to include in Reporting group. NOTE: To remove a previously assigned test, deselect the checkbox. E. Click Save. 91


92 Step 5: A. Click Assign Users to Reporting Groups in the top task bar. B. Select the groups to be assigned users by checking the box next to the group name. C. Type the user s name in the Authorized Users field to begin searching for the user. D. Select a user. E. Click Assign. F. Click Save. G. Click Exit Task. A user can be assigned to more than one group, and multiple users can be assigned to a group. To remove a user, click on the X next to the username and click Save. If you do not see a specific user when trying to assign him or her to a reporting group, it is possible that user does not have the appropriate rights based upon the role assigned. Check the user account under Setup to verify the user is linked to the appropriate school. To delete a Reporting Group, Select the Delete Reporting Groups tab. Select the checkbox next to the group to be deleted. Click Delete. NOTE: All tests must be removed before a reporting group can be deleted. Reporting groups may not be deleted via an upload. 92
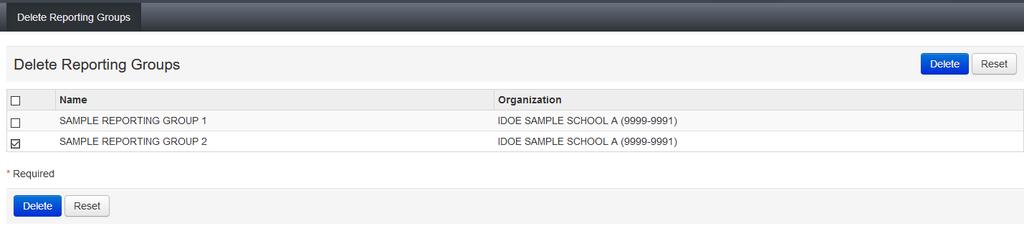
93 93
94 Appendix 1 Statewide Readiness Test Appendix 1.1 Statewide Readiness Test IT Checklists Appendix Before the Statewide Readiness Test IT Checklist: Read the latest software and hardware guidelines to verify devices meet minimum requirements and ensure that you understand the system requirements. If you are using browser-based TestNav 8 with a desktop or laptop machine, make sure Java is installed and enabled and that pop-up windows are allowed for in.testnav.com addresses. Only Firefox ESR-52 is supported for browser-based TestNav 8. If you are using the TestNav 8 desktop or mobile app, make sure the newest version 8.9 is installed. NEW! Develop a system to keep a record of which student uses which device for testing. Ensure firewalls, content filters, and other security filtering devices have been configured appropriately. See TestNav 8, ProctorCache and PearsonAccess next system requirements at for a list of URLs and ports to whitelist as approved sites. Create secondary save locations. This is a critical step in preparing for a successful online testing experience. For Windows, Mac, and Linux testing machines, you may use a network share or an SFTP server as your secondary response file (SRF) location. For Android, ios, or ChromeOS you must utilize an SFTP server for a SRF file location. NOTE: For detailed directions visit kup+locations Allow browser pop-ups for PearsonAccess next. Provide the names of each ProctorCache machine defined in your TestNav 8 Configurations to your CTCs or STCs and make sure they understand how you intend each of them to be used for testing, including which devices, areas, labs, and other groups you intend for each ProctorCache machine to serve. This information is necessary for creating sessions for administering each test. Call your Internet Service Provider (ISP) to make sure it is aware of your testing schedules, and determine whether the ISP is planning any maintenance or other activities that might interfere with testing. Verify that you or your CTCs or STCs have precached the tests they are administering on the ProctorCache machines their sessions are using. You can access the ProctorCache monitoring console on each ProctorCache machine by entering the static IP address with port 4480 into your browser ( IP>:4480). Make sure your CTCs or STCs, Examiners, and Proctors know how to access the Pearson System Status page at before testing begins and that they know how to reach you for troubleshooting during testing. Familiarize yourself with TestNav 8 navigation and test-taking tools by reviewing the online experience forms at in.testnav.com (select Practice Tests to access the Experience TestNav 8 menu). 94
95 Bookmark the Pearson System Status page at Log in to the PearsonAccess next Training Site and select Spring 2017 in the Infrastructure Trial administration. Appendix During Statewide Readiness Test IT Checklist Monitor your ProctorCache machines to make sure test takers are able to connect to them. Identify any issues with devices and look for devices that should not be used for live testing. New! Implement and test your system for tracking and recording which student uses what device during testing. Monitor your network to identify any issues, bottlenecks, or other technology challenges. Keep detailed notes on any reported technology, communication, logistics, or other issues to share with your team. Ensure that no other applications are running on the testing computers or mobile devices. Distribute Student Testing Tickets to each student or participant. Launch the TestNav 8 desktop or mobile app or enter in.testnav.com into the address bar of a standard Internet Explorer, Firefox, or Safari desktop or laptop browser. It is recommended that you take the test with the same devices your students will use. Browser-based testing is only supported using Firefox ESR 52. Read Aloud the script at the end of these instructions to your test takers. Help test takers log in by entering the Username and Password from their Student Testing Ticket into the TestNav 8 Sign In screen as shown on the following page. NOTE: Passwords are case sensitive. Monitor testing progress by using the Students in Sessions screen. Use the Session List and Filters to help zero in on specific students in specific schools or sessions, tests, and / or testing statuses. Examiners only: Click Refresh periodically to get an update on testing statuses for individual students and overall for a selected session. If a tester exits his or her test before completing it and would like to finish the test, click the drop-down next to his or her Active or Exited testing status and select Resume. If testers are involuntarily exited from the test because of a technical issue, select the drop-down again and select Resume Upload. This forces TestNav 8 to look for an unsent Student Response File. NOTE: The Statewide Readiness Test and Local Infrastructure Trial tests are not scored. If a technology issue impacts multiple students, check the Pearson System Status page before contacting your CTC, STC, CITC, or SITC. Keep detailed notes on any reported technology, communication, logistics, or other issues to share with your team. Verify that all students have logged out and are in a Completed or Marked Complete 95
96 status and select Stop Session to stop the test session. This concludes the Statewide Readiness Test! Appendix After the Statewide Readiness Test IT Checklist Meet with your CTCs or STCs to discuss any issues that arose during testing and how those issues were addressed or will be addressed during live testing. Identify and address any gaps in contingency and communication plans. Contact Pearson Support to resolve issues that you were not able or fully address on your own, well in advance of when live testing begins. Mark all students Complete and Close all testing sessions. Before live testing begins, conduct another small-scale Local Infrastructure Trial to verify that any changes made to technology setups are successful. Appendix 1.2 Statewide Readiness Test CTC & STC Checklists Appendix Before the Statewide Readiness Test: Attend Pre-Statewide Readiness Test Q&A sessions o Dates for Winter ISTEP+ are November 11 30, 2018 o Dates for Spring 2018 ISTEP+ : Part 1: February 13 21, 2018 Part 2: April 2 May 3, 2018 o Dates for Spring 2018 IREAD-3 are March 1 6, 2018 Review the Indiana Online Testing Guide (this document). Review PearsonAccess next training videos and materials. Bookmark the Pearson System Status page at Log in to the PearsonAccess next Training Site and select the Infrastructure Trial administration. Generate additional Sample Students for each of your schools and the tests they will be using as needed. NOTE: See Step 3 under Local Infrastructure Trial Instructions in this document above for set-by-step instructions Create Online Testing Sessions. NOTE: See Step 4 under Local Infrastructure Trial Instructions in this document above for set-by-step instructions Precache Test Content after you have finished creating sessions. Coordinate this activity with your CITCs or SITCs, or follow the instructions in the Statewide Readiness Checklist for CITCs and SITCs. NOTE: See Step 5 under Local Infrastructure Trial Instructions in this document above for set-by-step instructions Prepare and Start your sessions. This step also can be completed by the Examiner or Proctor responsible for overseeing testing sessions. NOTE: See Step 6 under Local Infrastructure Trial Instructions in this document above for set-by-step instructions Print Student Testing Tickets. This step also can be completed by the Examiner or 96
97 Proctor. NOTE: See Step 7 under Local Infrastructure Trial Instructions in this document above for set-by-step instructions Appendix During the Statewide Readiness Test Monitor testing progress using the Students in Sessions screen. Use the session list and filters to zero in on specific students in specific schools or sessions, tests, or testing statuses. You can click on Refresh periodically to get an update on testing statuses for a selected session. Assist Examiners and Proctors with managing student testing status as needed. If a tester exits his or her test before completing it and would like to finish the test, click on the drop-down next to his or her Active or Exited testing status and select Resume. If testers are involuntarily exited from the test because of a technical issue, select the drop-down again and select Resume Upload. This forces TestNav to look for an unsent Student Response File. NOTE: The Statewide Readiness Test and local Infrastructure Trial tests are not scored. Keep detailed notes on any reported technology, communication, logistics, or other issues. Appendix After the Statewide Readiness Test Meet with your CITCs, SITCs, Examiners, and Proctors to discuss any issues that arose during testing and how those issues were addressed or will be addressed during live testing. Identify and address any gaps in contingency and communication plans. For issues that you were not able to resolve or fully address on your own, contact Pearson Helpdesk and begin to work on resolving any technical issues before live testing begins. (Optional) Mark all students Complete and Close all testing sessions. Follow the 97
98 instructions in the Statewide Readiness Test Guide if you are unsure of the specific steps to take. Before live testing begins conduct another small-scale local Infrastructure Trial to verify that any changes made to technology setups are successful. Appendix 1.2 Statewide Readiness Test Examiner and Proctor Checklists Appendix Before the Statewide Readiness Test: Familiarize yourself with TestNav navigation and test-taking tools by reviewing the online experience forms at in.testnav.com (select Practice Tests to access the Experience TestNav 8 menu). Bookmark the Pearson System Status page at Log in to the PearsonAccess next Training Site and select Spring 2017 in the Infrastructure Trial administration. Prepare and Start your sessions. This step also can be completed by the CTC or STC responsible for overseeing testing sessions. NOTE: See Step 6 under Local Infrastructure Trial Instructions in this document above for set-by-step instructions. Print Student Testing Tickets. This step also can be completed by the Examiner or Proctor. NOTE: See Step 7 under Local Infrastructure Trial Instructions in this document above for set-by-step instructions Make sure you understand how to access the Pearson System Status page at before testing begins and how to reach your CTC or STC and Corporation and School IT Coordinators (CITC and SITC) if issues arise during testing. Appendix During the Statewide Readiness Test Ensure that no other applications are running on the testing computers or mobile devices. Distribute Student Testing Tickets to each student or participant. Launch the TestNav desktop or mobile app or enter in.testnav.com into the address bar of your browser. Browser-based testing is only supported using Firefox ESR 52. For the SRT, you should utilize every device that will be used for live testing. Read Aloud the script at the end of these instructions to your test takers. Help test takers log in by entering the Username and Password from their Student Testing Ticket into the TestNav Sign In screen as shown on the following page. NOTE: Passwords are case sensitive. 98
99 Student Testing Ticket: Desktop or mobile app Sign In screen: 99

100 Standard browser Sign In screen: Monitor testing progress by using the Students in Sessions screen. Use the Session List and Filters to help zero in on specific students in specific schools or sessions, tests, and/or testing statuses. Examiners only: Click Refresh periodically to get an update on testing statuses for individual students and overall for a selected session. If a tester exits his or her test before completing it and would like to finish the test, click on the drop-down next to his or her Active or Exited testing status and select Resume. If 100

101 testers are involuntarily exited from the test because of a technical issue, select the drop-down again and select Resume Upload. This forces TestNav to look for an unsent Student Response File. NOTE: The Statewide Readiness Test and Infrastructure Trial tests are not scored. If a technology issue impacts multiple students, check the Pearson System Status page before contacting your CTC, STC, CITC, or SITC. Keep detailed notes on any reported technology, communication, logistics, or other issues to share with your team. Verify that all students have logged out and are in a Completed or Marked Complete status and select Stop Session to stop the test session. This concludes the Statewide Readiness Test! Appendix After the Statewide Readiness Test Meet with your CTCs, STCs, CITCs, and SITCs to discuss any issues that arose during testing and how those issues were addressed or will be addressed during live testing. Identify and address any gaps in contingency and communication plans. For issues that you were not able to resolve or fully address on your own, contact Pearson Helpdesk and begin to work on resolving any technical issues before live testing begins. (Optional) Mark all students Complete and Close all testing sessions. Follow the instructions above in the section titled Post-Test Procedures: Mark Test Complete under Tasks During Test Administration. Before live testing begins conduct another small-scale Local Infrastructure Trial to verify that any changes made to technology setups are successful. 101
Appendix L: Online Testing Highlights and Script
 Online Testing Highlights and Script for Fall 2017 Ohio s State Tests Administrations Test administrators must use this document when administering Ohio s State Tests online. It includes step-by-step directions,
Spring 2015 Achievement Grades 3 to 8 Social Studies and End of Course U.S. History Parent/Teacher Guide to Online Field Test Electronic Practice
 Spring 2015 Achievement Grades 3 to 8 Social Studies and End of Course U.S. History Parent/Teacher Guide to Online Field Test Electronic Practice Assessment Tests (epats) FAQs, Instructions, and Hardware
Spring 2015 Online Testing. Program Information and Registration and Technology Survey (RTS) Training Session
 Training Session") Spring 2015 Online Testing Program Information and Registration and Technology Survey (RTS) Training Session Webinar Training Sessions: Calls will be operator assisted. Submit questions through the chat
Spring 2015 Online Testing Program Information and Registration and Technology Survey (RTS) Training Session Webinar Training Sessions: Calls will be operator assisted. Submit questions through the chat
Online Testing - Quick Troubleshooting Tips
 Online Testing - Quick Troubleshooting Tips This document outlines quick troubleshooting tips for some common issues related to online testing that may impact the Test Coordinators/ Administrators or the
Test Administrator User Guide
 Test Administrator User Guide Fall 2017 and Winter 2018 Published October 17, 2017 Prepared by the American Institutes for Research Descriptions of the operation of the Test Information Distribution Engine,
Houghton Mifflin Online Assessment System Walkthrough Guide
 Houghton Mifflin Online Assessment System Walkthrough Guide Page 1 Copyright 2007 by Houghton Mifflin Company. All Rights Reserved. No part of this document may be reproduced or transmitted in any form
MOODLE 2.0 GLOSSARY TUTORIALS
 BEGINNING TUTORIALS SECTION 1 TUTORIAL OVERVIEW MOODLE 2.0 GLOSSARY TUTORIALS The glossary activity module enables participants to create and maintain a list of definitions, like a dictionary, or to collect
Intel-powered Classmate PC. SMART Response* Training Foils. Version 2.0
 Intel-powered Classmate PC Training Foils Version 2.0 1 Legal Information INFORMATION IN THIS DOCUMENT IS PROVIDED IN CONNECTION WITH INTEL PRODUCTS. NO LICENSE, EXPRESS OR IMPLIED, BY ESTOPPEL OR OTHERWISE,
PowerTeacher Gradebook User Guide PowerSchool Student Information System
 PowerSchool Student Information System Document Properties Copyright Owner Copyright 2007 Pearson Education, Inc. or its affiliates. All rights reserved. This document is the property of Pearson Education,
Using SAM Central With iread
 Using SAM Central With iread January 1, 2016 For use with iread version 1.2 or later, SAM Central, and Student Achievement Manager version 2.4 or later PDF0868 (PDF) Houghton Mifflin Harcourt Publishing
Experience College- and Career-Ready Assessment User Guide
 Experience College- and Career-Ready Assessment User Guide 2014-2015 Introduction Welcome to Experience College- and Career-Ready Assessment, or Experience CCRA. Experience CCRA is a series of practice
Your School and You. Guide for Administrators
 Your School and You Guide for Administrators Table of Content SCHOOLSPEAK CONCEPTS AND BUILDING BLOCKS... 1 SchoolSpeak Building Blocks... 3 ACCOUNT... 4 ADMIN... 5 MANAGING SCHOOLSPEAK ACCOUNT ADMINISTRATORS...
SECTION 12 E-Learning (CBT) Delivery Module
 Delivery Module") SECTION 12 E-Learning (CBT) Delivery Module Linking a CBT package (file or URL) to an item of Set Training 2 Linking an active Redkite Question Master assessment 2 to the end of a CBT package Removing
SECTION 12 E-Learning (CBT) Delivery Module Linking a CBT package (file or URL) to an item of Set Training 2 Linking an active Redkite Question Master assessment 2 to the end of a CBT package Removing
STUDENT MOODLE ORIENTATION
 BAKER UNIVERSITY SCHOOL OF PROFESSIONAL AND GRADUATE STUDIES STUDENT MOODLE ORIENTATION TABLE OF CONTENTS Introduction to Moodle... 2 Online Aptitude Assessment... 2 Moodle Icons... 6 Logging In... 8 Page
Preferences...3 Basic Calculator...5 Math/Graphing Tools...5 Help...6 Run System Check...6 Sign Out...8
 CONTENTS GETTING STARTED.................................... 1 SYSTEM SETUP FOR CENGAGENOW....................... 2 USING THE HEADER LINKS.............................. 2 Preferences....................................................3
Smarter ELA/Literacy and Mathematics Interim Comprehensive Assessment (ICA) and Interim Assessment Blocks (IABs) Test Administration Manual (TAM)
 and Interim Assessment Blocks (IABs) Test Administration Manual (TAM)") Smarter ELA/Literacy and Mathematics Interim Comprehensive Assessment (ICA) and Interim Assessment Blocks (IABs) Test Administration Manual (TAM) January 2015 Delaware Department of Education American
Smarter ELA/Literacy and Mathematics Interim Comprehensive Assessment (ICA) and Interim Assessment Blocks (IABs) Test Administration Manual (TAM) January 2015 Delaware Department of Education American
USER GUIDANCE. (2)Microphone & Headphone (to avoid howling).
Microphone & Headphone (to avoid howling).") Igo Campus Education System USER GUIDANCE 1 Functional Overview The system provide following functions: Audio, video, textual chat lesson. Maximum to 10 multi-face teaching game, and online lecture. Class,
Igo Campus Education System USER GUIDANCE 1 Functional Overview The system provide following functions: Audio, video, textual chat lesson. Maximum to 10 multi-face teaching game, and online lecture. Class,
Millersville University Degree Works Training User Guide
 Millersville University Degree Works Training User Guide Page 1 Table of Contents Introduction... 5 What is Degree Works?... 5 Degree Works Functionality Summary... 6 Access to Degree Works... 8 Login
DegreeWorks Advisor Reference Guide
 DegreeWorks Advisor Reference Guide Table of Contents 1. DegreeWorks Basics... 2 Overview... 2 Application Features... 3 Getting Started... 4 DegreeWorks Basics FAQs... 10 2. What-If Audits... 12 Overview...
Schoology Getting Started Guide for Teachers
 Schoology Getting Started Guide for Teachers (Latest Revision: December 2014) Before you start, please go over the Beginner s Guide to Using Schoology. The guide will show you in detail how to accomplish
Outreach Connect User Manual
 Outreach Connect A Product of CAA Software, Inc. Outreach Connect User Manual Church Growth Strategies Through Sunday School, Care Groups, & Outreach Involving Members, Guests, & Prospects PREPARED FOR:
Introduction to Moodle
 Center for Excellence in Teaching and Learning Mr. Philip Daoud Introduction to Moodle Beginner s guide Center for Excellence in Teaching and Learning / Teaching Resource This manual is part of a serious
Attendance/ Data Clerk Manual.
 Attendance/ Data Clerk Manual http://itls.saisd.net/gatsv4 GATS Data Clerk Manual Published by: The Office of Instructional Technology Services San Antonio ISD 406 Barrera Street San Antonio, Texas 78210
CHANCERY SMS 5.0 STUDENT SCHEDULING
 CHANCERY SMS 5.0 STUDENT SCHEDULING PARTICIPANT WORKBOOK VERSION: 06/04 CSL - 12148 Student Scheduling Chancery SMS 5.0 : Student Scheduling... 1 Course Objectives... 1 Course Agenda... 1 Topic 1: Overview
RETURNING TEACHER REQUIRED TRAINING MODULE YE TRANSCRIPT
 RETURNING TEACHER REQUIRED TRAINING MODULE YE Slide 1. The Dynamic Learning Maps Alternate Assessments are designed to measure what students with significant cognitive disabilities know and can do in relation
2 User Guide of Blackboard Mobile Learn for CityU Students (Android) How to download / install Bb Mobile Learn? Downloaded from Google Play Store
 How to download / install Bb Mobile Learn? Downloaded from Google Play Store") 2 User Guide of Blackboard Mobile Learn for CityU Students (Android) Part 1 Part 2 Part 3 Part 4 How to download / install Bb Mobile Learn? Downloaded from Google Play Store How to access e Portal via
2 User Guide of Blackboard Mobile Learn for CityU Students (Android) Part 1 Part 2 Part 3 Part 4 How to download / install Bb Mobile Learn? Downloaded from Google Play Store How to access e Portal via
EdX Learner s Guide. Release
 EdX Learner s Guide Release Nov 18, 2017 Contents 1 Welcome! 1 1.1 Learning in a MOOC........................................... 1 1.2 If You Have Questions As You Take a Course..............................
Adult Degree Program. MyWPclasses (Moodle) Guide
 Guide") Adult Degree Program MyWPclasses (Moodle) Guide Table of Contents Section I: What is Moodle?... 3 The Basics... 3 The Moodle Dashboard... 4 Navigation Drawer... 5 Course Administration... 5 Activity and
Adult Degree Program MyWPclasses (Moodle) Guide Table of Contents Section I: What is Moodle?... 3 The Basics... 3 The Moodle Dashboard... 4 Navigation Drawer... 5 Course Administration... 5 Activity and
TotalLMS. Getting Started with SumTotal: Learner Mode
 TotalLMS Getting Started with SumTotal: Learner Mode Contents Learner Mode... 1 TotalLMS... 1 Introduction... 3 Objectives of this Guide... 3 TotalLMS Overview... 3 Logging on to SumTotal... 3 Exploring
TA Certification Course Additional Information Sheet
 2016 17 TA Certification Course Additional Information Sheet The Test Administrator (TA) Certification Course is built to provide general information to all state programs that use the AIR Test Delivery
POWERTEACHER GRADEBOOK
 POWERTEACHER GRADEBOOK FOR THE SECONDARY CLASSROOM TEACHER In Prince William County Public Schools (PWCS), student information is stored electronically in the PowerSchool SMS program. Enrolling students
Getting Started Guide
 Getting Started Guide Getting Started with Voki Classroom Oddcast, Inc. Published: July 2011 Contents: I. Registering for Voki Classroom II. Upgrading to Voki Classroom III. Getting Started with Voki Classroom
TeacherPlus Gradebook HTML5 Guide LEARN OUR SOFTWARE STEP BY STEP
 TeacherPlus Gradebook HTML5 Guide LEARN OUR SOFTWARE STEP BY STEP Copyright 2017 Rediker Software. All rights reserved. Information in this document is subject to change without notice. The software described
School Year 2017/18. DDS MySped Application SPECIAL EDUCATION. Training Guide
 SPECIAL EDUCATION School Year 2017/18 DDS MySped Application SPECIAL EDUCATION Training Guide Revision: July, 2017 Table of Contents DDS Student Application Key Concepts and Understanding... 3 Access to
Once your credentials are accepted, you should get a pop-window (make sure that your browser is set to allow popups) that looks like this:
 that looks like this:") SCAIT IN ARIES GUIDE Accessing SCAIT The link to SCAIT is found on the Administrative Applications and Resources page, which you can find via the CSU homepage under Resources or click here: https://aar.is.colostate.edu/
SCAIT IN ARIES GUIDE Accessing SCAIT The link to SCAIT is found on the Administrative Applications and Resources page, which you can find via the CSU homepage under Resources or click here: https://aar.is.colostate.edu/
INSTRUCTOR USER MANUAL/HELP SECTION
 Criterion INSTRUCTOR USER MANUAL/HELP SECTION ngcriterion Criterion Online Writing Evaluation June 2013 Chrystal Anderson REVISED SEPTEMBER 2014 ANNA LITZ Criterion User Manual TABLE OF CONTENTS 1.0 INTRODUCTION...3
WiggleWorks Software Manual PDF0049 (PDF) Houghton Mifflin Harcourt Publishing Company
 Houghton Mifflin Harcourt Publishing Company") WiggleWorks Software Manual PDF0049 (PDF) Houghton Mifflin Harcourt Publishing Company Table of Contents Welcome to WiggleWorks... 3 Program Materials... 3 WiggleWorks Teacher Software... 4 Logging In...
WiggleWorks Software Manual PDF0049 (PDF) Houghton Mifflin Harcourt Publishing Company Table of Contents Welcome to WiggleWorks... 3 Program Materials... 3 WiggleWorks Teacher Software... 4 Logging In...
Field Experience Management 2011 Training Guides
 Field Experience Management 2011 Training Guides Page 1 of 40 Contents Introduction... 3 Helpful Resources Available on the LiveText Conference Visitors Pass... 3 Overview... 5 Development Model for FEM...
Storytelling Made Simple
 Storytelling Made Simple Storybird is a Web tool that allows adults and children to create stories online (independently or collaboratively) then share them with the world or select individuals. Teacher
Using Blackboard.com Software to Reach Beyond the Classroom: Intermediate
 Using Blackboard.com Software to Reach Beyond the Classroom: Intermediate NESA Conference 2007 Presenter: Barbara Dent Educational Technology Training Specialist Thomas Jefferson High School for Science
Starting an Interim SBA
 Starting an Interim SBA January 26, 2015 DRAFT PowerPoint - 1.26.2015 by Laura Bay 1 Resources to help Start by visiting: www.wa.portal.airast.org which is the portal for SBA and MSP/EOC testing. This
New Features & Functionality in Q Release Version 3.1 January 2016
 in Q Release Version 3.1 January 2016 Contents Release Highlights 2 New Features & Functionality 3 Multiple Applications 3 Analysis 3 Student Pulse 3 Attendance 4 Class Attendance 4 Student Attendance
TK20 FOR STUDENT TEACHERS CONTENTS
 TK20 FOR STUDENT TEACHERS This guide will help students who are participating in a Student Teaching placement to navigate TK20, complete required materials, and review assessments. CONTENTS Login to TK20:
Student User s Guide to the Project Integration Management Simulation. Based on the PMBOK Guide - 5 th edition
 Student User s Guide to the Project Integration Management Simulation Based on the PMBOK Guide - 5 th edition TABLE OF CONTENTS Goal... 2 Accessing the Simulation... 2 Creating Your Double Masters User
LMS - LEARNING MANAGEMENT SYSTEM END USER GUIDE
 LMS - LEARNING MANAGEMENT SYSTEM (ADP TALENT MANAGEMENT) END USER GUIDE August 2012 Login Log onto the Learning Management System (LMS) by clicking on the desktop icon or using the following URL: https://lakehealth.csod.com
EMPOWER Self-Service Portal Student User Manual
 EMPOWER Self-Service Portal Student User Manual by Hasanna Tyus 1 Registrar 1 Adapted from the OASIS Student User Manual, July 2013, Benedictine College. 1 Table of Contents 1. Introduction... 3 2. Accessing
Course Groups and Coordinator Courses MyLab and Mastering for Blackboard Learn
 Course Groups and Coordinator Courses MyLab and Mastering for Blackboard Learn MyAnthroLab MyArtsLab MyDevelopmentLab MyHistoryLab MyMusicLab MyPoliSciLab MyPsychLab MyReligionLab MySociologyLab MyThinkingLab
Creating Your Term Schedule
 Creating Your Term Schedule MAY 2017 Agenda - Academic Scheduling Cycle - What is course roll? How does course roll work? - Running a Class Schedule Report - Pulling a Schedule query - How do I make changes
i>clicker Setup Training Documentation This document explains the process of integrating your i>clicker software with your Moodle course.
 This document explains the process of integrating your i>clicker software with your Moodle course. Center for Effective Teaching and Learning CETL Fine Arts 138 mymoodle@calstatela.edu Cal State L.A. (323)
GED Manager. Training Guide For Corrections Version 1.0 December 2013
 GED Manager Training Guide For Corrections Version 1.0 December 2013 GED is a registered trademark of the American Council on Education. Used under license. Table of Contents Introduction to GED Manager
New Features & Functionality in Q Release Version 3.2 June 2016
 in Q Release Version 3.2 June 2016 Contents New Features & Functionality 3 Multiple Applications 3 Class, Student and Staff Banner Applications 3 Attendance 4 Class Attendance 4 Mass Attendance 4 Truancy
Municipal Accounting Systems, Inc. Wen-GAGE Gradebook FAQs
 Municipal Accounting Systems, Inc. Wen-GAGE Gradebook FAQs Administration Question: If the administration office changes a grade for a student through the Wen-GAGE SI System, after it has been calculated
Preparing for the School Census Autumn 2017 Return preparation guide. English Primary, Nursery and Special Phase Schools Applicable to 7.
 Preparing for the School Census Autumn 2017 Return preparation guide English Primary, Nursery and Special Phase Schools Applicable to 7.176 onwards Preparation Guide School Census Autumn 2017 Preparation
Midland College Syllabus MUSI 1311 Music Theory I SCH (3-3)
") Midland College Syllabus MUSI 1311 Music Theory I SCH (3-3) COURSE DESCRIPTION This course is designed to present students with a detailed study of tonal music. Intended for music majors and other qualified
Midland College Syllabus MUSI 1311 Music Theory I SCH (3-3) COURSE DESCRIPTION This course is designed to present students with a detailed study of tonal music. Intended for music majors and other qualified
Moodle 2 Assignments. LATTC Faculty Technology Training Tutorial
 LATTC Faculty Technology Training Tutorial Moodle 2 Assignments This tutorial begins with the instructor already logged into Moodle 2. http://moodle.lattc.edu/ Faculty login id is same as email login id.
Introduction to WeBWorK for Students
 Introduction to WeBWorK 1 Introduction to WeBWorK for Students I. What is WeBWorK? WeBWorK is a system developed at the University of Rochester that allows professors to put homework problems on the web
Emporia State University Degree Works Training User Guide Advisor
 Emporia State University Degree Works Training User Guide Advisor For use beginning with Catalog Year 2014. Not applicable for students with a Catalog Year prior. Table of Contents Table of Contents Introduction...
Donnelly Course Evaluation Process
 Donnelly Course Evaluation Process Contents Donnelly Course Evaluation Process... 2 The Rules... 2 From the Student Perspective... 3 From the Faculty Perspective... 7 From the Moodle Admin Perspective...
Principal Survey FAQs
 Principal Survey FAQs Question: When will principals receive the Principal Survey? Answer: The surveys will be available in the principals TEA educator profiles on April 9, 2012. When principals access
Creating an Online Test. **This document was revised for the use of Plano ISD teachers and staff.
 Creating an Online Test **This document was revised for the use of Plano ISD teachers and staff. OVERVIEW Step 1: Step 2: Step 3: Use ExamView Test Manager to set up a class Create class Add students to
ACADEMIC TECHNOLOGY SUPPORT
 ACADEMIC TECHNOLOGY SUPPORT D2L Respondus: Create tests and upload them to D2L ats@etsu.edu 439-8611 www.etsu.edu/ats Contents Overview... 1 What is Respondus?...1 Downloading Respondus to your Computer...1
Office of Planning and Budgets. Provost Market for Fiscal Year Resource Guide
 Office of Planning and Budgets Provost Market for Fiscal Year 2017-18 Resource Guide This resource guide will show users how to operate the Cognos Planning application used to collect Provost Market raise
Illinois Assessment Update. Illinois State Board of Education July 07, 2017
 Illinois Assessment Update Illinois State Board of Education July 07, 2017 PARCC 2018 Test Administration Window March 5, 2018 to April 20, 2018 2 2016-17 PARCC (Partnership for Assessment of Readiness
MyUni - Turnitin Assignments
 - Turnitin Assignments Originality, Grading & Rubrics Turnitin Assignments... 2 Create Turnitin assignment... 2 View Originality Report and grade a Turnitin Assignment... 4 Originality Report... 6 GradeMark...
ecampus Basics Overview
 ecampus Basics Overview 2016/2017 Table of Contents Managing DCCCD Accounts.... 2 DCCCD Resources... 2 econnect and ecampus... 2 Registration through econnect... 3 Fill out the form (3 steps)... 4 ecampus
Moodle Student User Guide
 Moodle Student User Guide Moodle Student User Guide... 1 Aims and Objectives... 2 Aim... 2 Student Guide Introduction... 2 Entering the Moodle from the website... 2 Entering the course... 3 In the course...
INTERNAL MEDICINE IN-TRAINING EXAMINATION (IM-ITE SM )
") INTERNAL MEDICINE IN-TRAINING EXAMINATION (IM-ITE SM ) GENERAL INFORMATION The Internal Medicine In-Training Examination, produced by the American College of Physicians and co-sponsored by the Alliance
INTERNAL MEDICINE IN-TRAINING EXAMINATION (IM-ITE SM ) GENERAL INFORMATION The Internal Medicine In-Training Examination, produced by the American College of Physicians and co-sponsored by the Alliance
How To Enroll using the Stout Mobile App
 How To Enroll using the Stout Mobile App 1 Login Login using your user name and password. 2 Select Enrollment When you ve finished logging in, it will bring you to this page. Select enrollment. From here
PowerCampus Self-Service Student Guide. Release 8.4
 PowerCampus Self-Service Student Guide Release 8.4 Banner, Colleague, PowerCampus, and Luminis are trademarks of Ellucian Company L.P. or its affiliates and are registered in the U.S. and other countries.
Creating a Test in Eduphoria! Aware
 in Eduphoria! Aware Login to Eduphoria using CHROME!!! 1. LCS Intranet > Portals > Eduphoria From home: LakeCounty.SchoolObjects.com 2. Login with your full email address. First time login password default
Achievement Testing Program Guide. Spring Iowa Assessment, Form E Cognitive Abilities Test (CogAT), Form 7
, Form 7") Achievement Testing Program Guide Spring 2017 Iowa Assessment, Form E Cognitive Abilities Test (CogAT), Form 7 Updated August 22, 2016 An Opening Word About This Guide One of the numerous excellent resources
Achievement Testing Program Guide Spring 2017 Iowa Assessment, Form E Cognitive Abilities Test (CogAT), Form 7 Updated August 22, 2016 An Opening Word About This Guide One of the numerous excellent resources
Parent s Guide to the Student/Parent Portal
 Nova Scotia Public Education System Parent s Guide to the Student/Parent Portal Revision Date: The Student/Parent Portal is your gateway into the classroom of the children associated to your account. The
Introduction to Mobile Learning Systems and Usability Factors
 Introduction to Mobile Learning Systems and Usability Factors K.B.Lee Computer Science University of Northern Virginia Annandale, VA Kwang.lee@unva.edu Abstract - Number of people using mobile phones has
Rental Property Management: An Android Application
 Rental Property Management: An Android Application GRADUATE PROJECT Submitted to the Faculty of The School of Engineering & Computing Sciences Texas A&M University-Corpus Christi Corpus Christi, TX In
Ohio Individualized Education Plan Form Instructions and User Guide IEPPLUS
 Ohio Individualized Education Plan Form Instructions and User Guide IEPPLUS 1990-2014 SunGard Public Sector Inc. All rights reserved. No part of this publication may be reproduced without the prior written
Quick Reference for itslearning
 Quick Reference for itslearning Frequently Asked Questions... 2 How do I access itslearning?... 2 Who can I contact if I get a problem?... 2 Where can I get help?... 2 Can I get itslearning in my language?...
Updated: 7/17/12. User Manual v. 2
 Updated: 7/17/12 User Manual v. 2 Table of Contents Introduction to IndianaIEP PCG Overview................................................ Security....................................................
Connect Microbiology. Training Guide
 1 Training Checklist Section 1: Getting Started 3 Section 2: Course and Section Creation 4 Creating a New Course with Sections... 4 Editing Course Details... 9 Editing Section Details... 9 Copying a Section
FACULTY Tk20 TUTORIALS: PORTFOLIOS & FIELD EXPERIENCE BINDERS
 FACULTY Tk20 TUTORIALS: PORTFOLIOS & FIELD EXPERIENCE BINDERS TABLE OF CONTENTS TOPIC PAGE PORTFOLIOS 2 Introduction 2 Student View 2 Faculty Administrator View 3 Accessing eportfolios from personal Faculty
SCT Banner Financial Aid Needs Analysis Training Workbook January 2005 Release 7
 SCT HIGHER EDUCATION SCT Banner Financial Aid Needs Analysis Training Workbook January 2005 Release 7 Confidential Business Information --------------------------------------------------------------------------------------------------------------------------------------------------------------------------------
Android App Development for Beginners
 Description Android App Development for Beginners DEVELOP ANDROID APPLICATIONS Learning basics skills and all you need to know to make successful Android Apps. This course is designed for students who
InCAS. Interactive Computerised Assessment. System
 Interactive Computerised Assessment Administered by: System 015 Carefully follow the instructions in this manual to make sure your assessment process runs smoothly! InCAS Page 1 2015 InCAS Manual If there
DO NOT DISCARD: TEACHER MANUAL
 DO NOT DISCARD: TEACHER MANUAL Adoption Registration Guide for Teachers & Students FOR ONLINE ACCESS TO: Mastering MyLab Instructor Resource Center This manual supports only those programs listed online
Quick Start Guide 7.0
 www.skillsoft.com Quick Start Guide 7.0 Copyright 2010 SkillSoft Corporation. All rights reserved SkillSoft Corporation 107 Northeastern Blvd. Nashua, NH 03062 603-324-3000 87-SkillSoft (877-545-5763)
Moodle 3.2 Backup and Simple Restore
 Moodle 3.2 Backup and Simple Restore Center for Effective Teaching and Learning CETL Fine Arts 138 cetl@calstatela.edu Cal State L.A. (323) 343-6594 Table of Contents Create a Backup File of your Course...
TA Script of Student Test Directions
 TA Script of Student Test Directions SMARTER BALANCED PAPER-PENCIL Spring 2017 ELA Grade 6 Paper Summative Assessment School Test Coordinator Contact Information Name: Email: Phone: ( ) Cell: ( ) Visit
CSCI 333 Java Language Programming Fall 2017 INSTRUCTOR INFORMATION COURSE INFORMATION
 Department of Computer Science CSCI 333 Java Language Programming Fall 2017 INSTRUCTOR INFORMATION Instructor Dr. Yuehua Wang Office location Journalism Bldg 230 Office hours Office phone 903-886-5802
Science Olympiad Competition Model This! Event Guidelines
 Science Olympiad Competition Model This! Event Guidelines These guidelines should assist event supervisors in preparing for and setting up the Model This! competition for Divisions B and C. Questions should
FAU Mobile App Goes Live
 Back to School August 2011 IRM Newsletter Technology News for FAU Faculty and Students Summer at IRM Has Been Anything But Quiet! Whether you are new to FAU or returning to campus after a relaxing summer,
Netsmart Sandbox Tour Guide Script
 Netsmart Sandbox Tour Guide Script October 2012 This document is to be used in conjunction with the Netsmart Sandbox environment as a guide. Following the steps included in this guide will allow you to
Welcome to the session on ACCUPLACER Policy Development. This session will touch upon common policy decisions an institution may encounter during the
 Welcome to the session on ACCUPLACER Policy Development. This session will touch upon common policy decisions an institution may encounter during the development or reevaluation of a placement program.
An Introductory Blackboard (elearn) Guide For Parents
 Guide For Parents") An Introductory Blackboard (elearn) Guide For Parents Prepared: July 2010 Revised: Jan 2013 By M. A. Avila Introduction: Blackboard is a course management system widely used in educational settings. At
An Introductory Blackboard (elearn) Guide For Parents Prepared: July 2010 Revised: Jan 2013 By M. A. Avila Introduction: Blackboard is a course management system widely used in educational settings. At
Tour. English Discoveries Online
 Techno-Ware Tour Of English Discoveries Online Online www.englishdiscoveries.com http://ed242us.engdis.com/technotms Guided Tour of English Discoveries Online Background: English Discoveries Online is
READ 180 Next Generation Software Manual
 READ 180 Next Generation Software Manual including ereads For use with READ 180 Next Generation version 2.3 and Scholastic Achievement Manager version 2.3 or higher Copyright 2014 by Scholastic Inc. All
SCT Banner Student Fee Assessment Training Workbook October 2005 Release 7.2
 SCT HIGHER EDUCATION SCT Banner Student Fee Assessment Training Workbook October 2005 Release 7.2 Confidential Business Information --------------------------------------------------------------------------------------------------------------------------------------------------------------------------------
Examity - Adding Examity to your Moodle Course
 Examity - Adding Examity to your Moodle Course Purpose: This informational sheet will help you install the Examity plugin into your Moodle course and will explain how to set up an Examity activity. Prerequisite:
Five Challenges for the Collaborative Classroom and How to Solve Them
 An white paper sponsored by ELMO Five Challenges for the Collaborative Classroom and How to Solve Them CONTENTS 2 Why Create a Collaborative Classroom? 3 Key Challenges to Digital Collaboration 5 How Huddle
PEIMS Submission 3 list
 Campus PEIMS Preparation SPRING 2014-2015 D E P A R T M E N T O F T E C H N O L O G Y ( D O T ) - P E I M S D I V I S I O N PEIMS Submission 3 list The information on this page provides instructions for
SkillPort Quick Start Guide 7.0
 SkillPort Quick Start Guide 7.0 www.skillsoft.com Copyright 2009 SkillSoft Corporation. All rights reserved SkillSoft Corporation 107 Northeastern Blvd. Nashua, NH 03062 603-324-3000 87-SkillSoft (877-545-5763)
Online ICT Training Courseware
 Computing Guide THE LIBRARY www.salford.ac.uk/library Online ICT Training Courseware What materials are covered? Office 2003 to 2007 Quick Conversion Course Microsoft 2010, 2007 and 2003 for Word, PowerPoint,